Visible to Intel only — GUID: iga1464289769332
Ixiasoft
Visible to Intel only — GUID: iga1464289769332
Ixiasoft
7.5.8. Program and Run the Tightly Coupled Memory Project
To program and run a tightly coupled memory project, perform the following steps:
- To open a terminal session to capture messages from the Nios® II processor, type the following command:
nios2-terminal
If your development board includes more than one JTAG cable, you must specify which cable you are communicating with as an argument to the nios2-terminal command. To do so, first type the following command:
jtagconfig -r
Figure 284. jtagconfig Output
Figure 284 shows some sample output from the jtagconfig command. This output shows that the active JTAG cable is number 1. Substitute the number of your JTAG cable for the <cable_number> variable in the following command:
nios2-terminal -c <cable_number>
- In your first shell, enter the following command if you have a single JTAG cable:
nios2-download -g tcm_isr.elf
For development boards with more than one JTAG cable, enter the following command:
nios2-download -c <cable_number> -g tcm_isr.elf
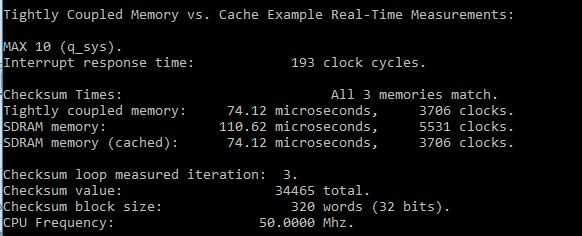
Figure 285 is a printout of the statistics that shows the higher speeds obtained by leveraging tightly coupled memories. Note that the number of clock cycles for tightly coupled memory is very similar to that of the cached memory. The result demonstrates that tightly coupled memories allow fixed low-latency read access to executable code as well as fixed low-latency read, write, or read and write access to data.
Note: The timing numbers output varies between Nios development boards.Figure 285. Tightly Coupled Memory versus Cache Example Real-Time Measures