Visible to Intel only — GUID: prf1682533546847
Ixiasoft
1. About the External Memory Interfaces Agilex™ 5 FPGA IP
2. Design Example Quick Start Guide for External Memory Interfaces Agilex™ 5 FPGA IP
3. Design Example Description for External Memory Interfaces Agilex™ 5 FPGA IP
4. Document Revision History for External Memory Interfaces (EMIF) IP Design Example User Guide
2.1. Creating an EMIF Project
2.2. Generating and Configuring the EMIF IP
2.3. Configuring DQ Pin Swizzling
2.4. Generating the Synthesizable EMIF Design Example
2.5. Generating the EMIF Design Example for Simulation
2.6. Pin Placement for Agilex™ 5 EMIF IP
2.7. Compiling the Agilex™ 5 EMIF Design Example
2.8. Using the Design Example with the Test Engine IP
2.9. Generating the EMIF Design Example with the Performance Monitor
2.3.1. Example: DQ Pin Swizzling Within DQS Group for x32+ECC DDR4 Interface
2.3.2. Example: Byte Swizzling for x32 DDR4 Interface, Using a Memory Device of x8 Width
2.3.3. Combining Pin and Byte Swizzling
2.3.4. Example: Swizzling for x32 + ECC DDR4 Interface
2.3.5. Example: Byte Swizzling for Lockstep Configuration
Visible to Intel only — GUID: prf1682533546847
Ixiasoft
3.2.1. Running Simulation
To run a simulation, navigate to the simulation directory <example_design_directory>/sim/ed_sim/ and run the simulation script of your choice.
For ModelSim* SE and Siemens* EDA QuestaSim*- Intel FPGA Edition Simulators
- At the command prompt, change the working directory to: <example_design_directory>/sim/ed_sim/mentor.
- Invoke vsim by typing vsim, which launches a window where you can run the following commands.
- Run the following command in the transcript terminal:
- source msim_setup.tcl
- Run the following command:
- ld_debug
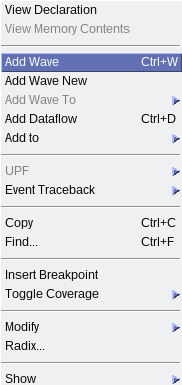
- When the command completes, add the desired signal to observe by right-clicking and selecting Add Wave.
Figure 41. Select Add Wave

- To run the simulation, type this command:
- run -all
- A successful simulation ends with the following message: Simulation stopped due to successful completion!
For Synopsys VCS-MX and Cadence Xcelium
The following are the steps to run simulation with the Synopsys VCS-MX simulator, however the steps are similar with Cadence Xcelium.
Working directory: <example_design_directory>/sim/ed_sim/synopsys/vcsmx
To run a simulation in non-interactive mode, follow these steps:
- On a single line, type:
sh vcs_setup.sh USER_DEFINED_COMPILE_OPTIONS="" USER_DEFINED_ELAB_OPTIONS="-xlrm\uniq_prior_final" USER_DEFINED_SIM_OPTIONS=""
- A successful simulation ends with the following message: Simulation stopped due to successful completion!
To run a simulation in interactive mode, follow these steps:
Note: If you have already generated a simv executable in noninteractive mode, delete the simv and simv.diadir file within the vcs folder.
- Open the vcs_setup.sh file and add a debug command:
- vcs -debug_access+r

- Compile the design example by entering the following command:
- sh vcs_setup.sh USER_DEFINED_ELAB_OPTIONS="- xlrm\ uniq_prior_final" SKIP_SIM=1
- To start the simulation in interactive mode, type the following command in the console:
- simv -gui&