Visible to Intel only — GUID: GUID-9A383916-EBCE-41EE-8602-73A9EE039E3C
Legal Information
Getting Help and Support
Introducing the Intel® SDK for OpenCL™ Applications
What's New in This Release
Which Version of the Intel® SDK for OpenCL™ Applications Should I Use?
Intel® Code Builder for OpenCL™ API Plug-in for Microsoft Visual Studio*
Intel® Code Builder for OpenCL™ API Plug-in for Eclipse*
Debugging OpenCL™ Kernels on GPU
Intel® SDK for OpenCL™ Applications Standalone Version
OpenCL™ 2.1 Development Environment
Intel® FPGA Emulation Platform for OpenCL™ Getting Started Guide
Troubleshooting Intel® SDK for OpenCL™ Applications Issues
Configuring Microsoft Visual Studio* IDE
Converting an Existing Project into an OpenCL™ Project
OpenCL™ New Project Wizard
Building an OpenCL™ Project
Using OpenCL™ Build Properties
Selecting a Target OpenCL™ Device
Generating and Viewing Assembly Code
Generating and Viewing LLVM Code
Generating Intermediate Program Binaries with Intel® Code Builder for OpenCL™ API Plug-in
Configuring OpenCL™ Build Options
Visible to Intel only — GUID: GUID-9A383916-EBCE-41EE-8602-73A9EE039E3C
Running a Session With a YUV Image Variable
After you have created a YUV format image variable, you can run an analysis session with the image variable as one of the kernel arguments:
- Create a session with the relevant kernel and build the session.
- In the OpenCL Kernel Analysis Input pane, assign the image variables to the kernel arguments.
- Run the session: OpenCL Kernel Development > Run.
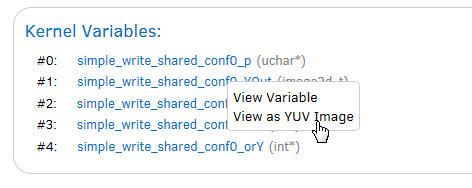
- In the report that is generated, from the Select Report drop-down, select Variables View.

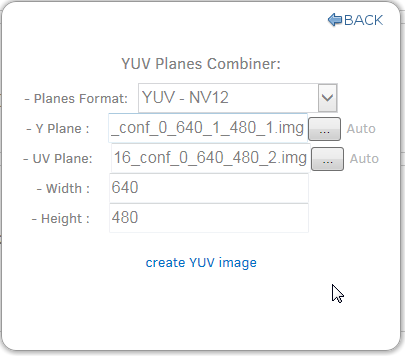
- Right-click on one of the links and select Open in YUV Combiner. The YUV Planes Combiner dialog box appears
- Fill in the YUV Plane, height and width fields and click create YUV image:
