Developer Guide
Intel oneAPI DPC++/C++ Compiler Handbook for Intel FPGAs
A newer version of this document is available. Customers should click here to go to the newest version.
Use SYCL Shared Library With Third-Party Applications
Use the Intel® oneAPI DPC++/C++ Compiler to compile your SYCL code to a C-standard shared library (.so file on Linux and .dll file on Windows). You can then call this library from other third-party code to access a broad base of accelerated functions from your preferred programming language.

To use a shared library with a third-party application, perform these steps:
- Define the Shared Library Interface.
- Generate the Library File in Linux or Windows.
- Use the Shared Library.
Define the Shared Library Interface
Intel® recommends defining an interface between the C-standard shared library and your SYCL code. The interface must include functions you want to export and how those functions interface with your SYCL code. Prefix the functions that you want to include in the shared library with extern "C".
Consider the following example code of the vector_add function:
extern "C" int vector_add(int *a, int *b, int **c, size_t vector_len) {
  // Create device selector for the device of your interest.
  #if FPGA_EMULATOR
    // Intel extension: FPGA emulator selector on systems without FPGA card.
    auto selector = sycl::ext::intel::fpga_emulator_selector_v;
  #elif FPGA_SIMULATOR
    // Intel extension: FPGA simulator selector on systems without FPGA card.
    auto selector = sycl::ext::intel::fpga_simulator_selector_v;
  #elif FPGA_HARDWARE
    // Intel extension: FPGA selector on systems with FPGA card.
    auto selector = sycl::ext::intel::fpga_selector_v;
  #else
    // The default device selector will select the most performant device.
    auto selector = default_selector_v;
  #endif

  try {
    queue q(d_selector, exception_handler);
    // SYCL code interface:
    // Vector addition in SYCL
    VectorAddKernel(q, a, b, c, vector_len);
  } catch (exception const &e) {
      std::cout << "An exception is caught for vector add.\n";
      return -1;
  }
  return 0;
}
Generate the Shared Library File in Linux
If you are using a Linux system, then perform these steps to generate the shared library file:
- Compile the device code separately.
icpx -fsycl -fPIC –fintelfpga –fsycl-link=image [kernel src files] –o <hw image name> -XshardwareWhere:
fPIC: Determines whether the compiler generates position-independent code for the host portion of the device image. Option -fPIC specifies full symbol preemption. Global symbol definitions and global symbol references get default (preemptable) visibility unless explicitly specified otherwise. You must use this option when building shared objects. You can also specify this option as -fpic.
NOTE:PIC is required so that pointers in the shared library reference global addresses and not local addresses.fintelfpga: Targets FPGA devices.
fsycl-link=image: Informs the Intel® oneAPI DPC++/C++ Compiler to partially link device binaries for use with FPGA.
Xshardware: Compiles for hardware instead of the emulator.
- Compile the host code separately.
icpx -fsycl –fPIC –fintelfpga <host src files> -o <host image name> -c -DFPGA=1Where:
DFPGA=1: Sets a compiler macro, FPGA, equal to 1. It is used in the device selector to change between target devices (requires corresponding host code to support this). This is optional as you can also set your device selector to FPGA. For more information, refer to Device Selectors for FPGA.
- Link the host and device images and create the binary.
icpx -fsycl –fPIC –fintelfpga –shared <host image name> <hw image name> -o lib<library name>.soWhere:
shared: Outputs a shared library (.so file).
Output file name: Prefix with lib for the GCC type of compilers. For additional information, see Shared libraries with GCC on Linux. For example:
gcc -Wall -fPIC -L. -o out.a -l<library name>.so
Generate the Shared Library File in Windows
If you are using a Windows system, then perform these steps to generate the library file:
- Intel® recommends creating a new configuration in the same project properties. If you want to build the application, you can avoid changing the configuration type for your project.
Creating a Windows library with the default Intel® oneAPI Base Toolkit is supported only for FPGA emulation. For custom platforms, contact your board vendor for Windows support for FPGA hardware compiles.
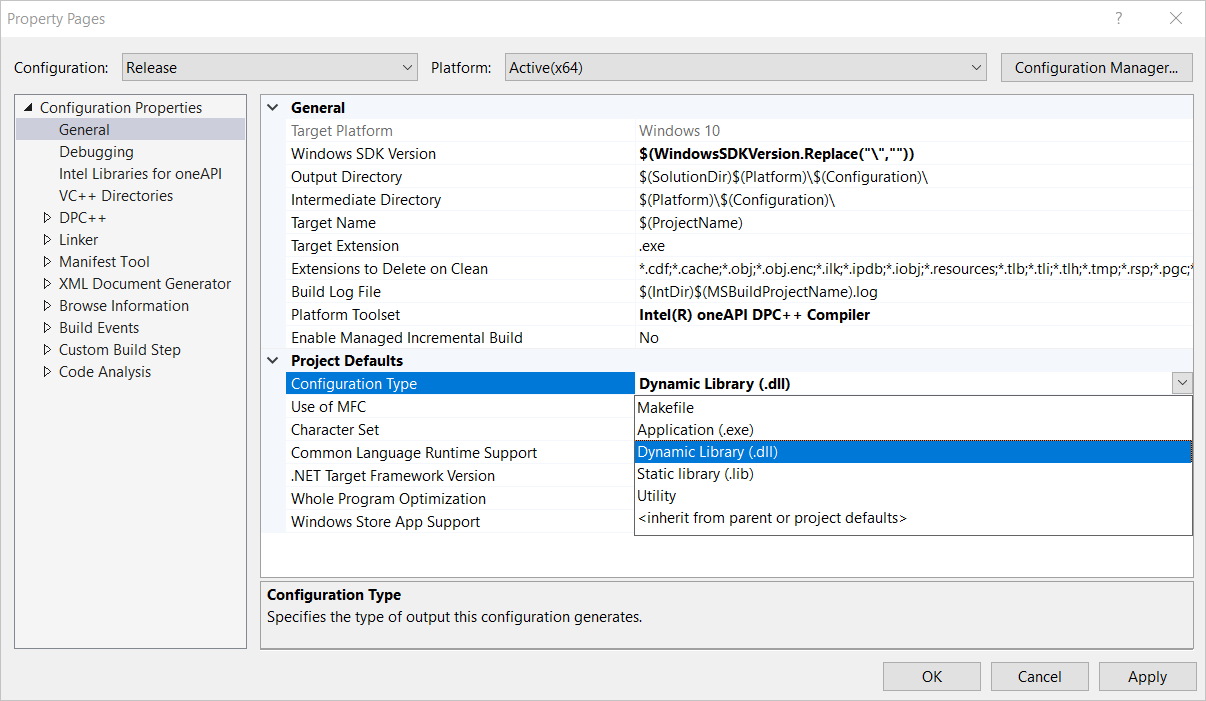
- In Microsoft Visual Studio*, navigate to Project > Properties. The Property Pages dialog is displayed for your project.
- Under the Configuration Properties > General > Project Defaults > Configuration Type option, select Dynamic Library (``.dll``) from the drop-down list.
Project Properties Dialog

- Click OK to close the dialog.
The project automatically builds to create a dynamic library (.dll)
Use the Shared Library
These steps may vary depending on the language or compiler you decide to use. Consult the specifications for your desired language for more details. See Shared libraries with GCC on Linux for an example.
Generally, follow these steps to use the shared library:
- >Use the shared library function call in your third-party host code.
- Link your host code with the shared library during the compilation.
- Ensure that the library file is discoverable. For example:
export LD_LIBRARY_PATH=<lib file location>:$LD_LIBRARY_PATH
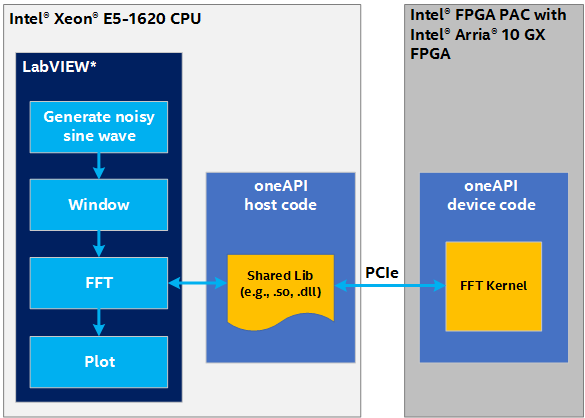
The following is an example illustration of using the shared library:
