Visible to Intel only — GUID: wkx1620249890853
Ixiasoft
1. Introduction
2. FPGA Configuration First Mode
3. HPS Boot First Mode
4. Creating the Configuration Files
5. Golden System Reference Design and Design Examples
6. Configuring the FPGA Fabric from HPS Software
7. Debugging the Intel® Agilex™ SoC FPGA Boot Flow
A. Document Revision History for Intel® Agilex™ SoC FPGA Boot User Guide
Visible to Intel only — GUID: wkx1620249890853
Ixiasoft
4.6.3.2. Creating Configuration Files Using Graphical Interface
The following example creates the QSPI configuration files for HPS boot first mode using the Programming File Generator in GUI mode:
- Start the Programming File Generator in GUI mode by running the qpfgw command.
- Select the Device Family to be Intel® Agilex™ .
- Select the Configuration mode to be Active Serial x4.
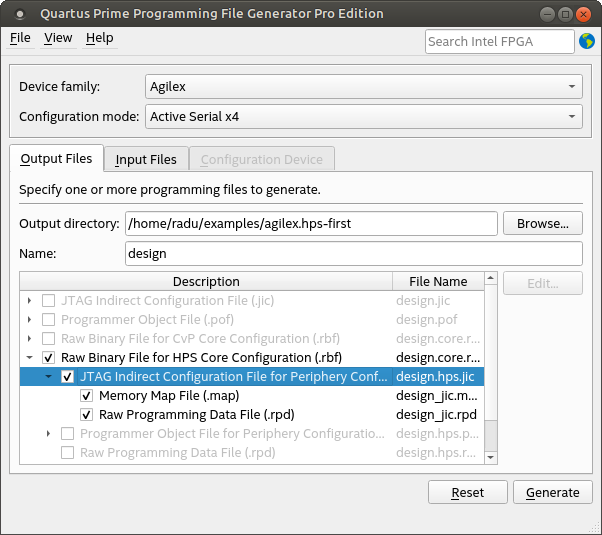
- In the Output Files tab:
- Change the output file Name to “design”.
- Check Raw Binary File for HPS Core Configuration (.rbf) option – the others are grayed out.
- Check the JTAG Indirect Configuration File for Periphery Configuration (.jic) sub-option
- Optionally check the Memory Map File (.map) sub-option
- Optionally check the Raw Programming Data (.rpd) sub-option.
- Click the Raw Programming Data (.rpd) sub-option (if checked above) then click on Edit button and select the Bit swap option to be “on”. This ensures the file uses the natural byte format that can be used by 3rd party tools like U-Boot.
The Intel® Quartus® Prime Programming File Generator window is displayed:Figure 18. Intel® Quartus® Prime Programming File Generator Pro Edition Window: Output Files
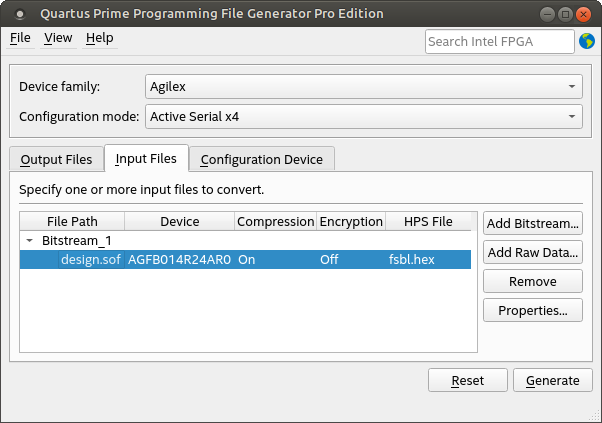
- Switch to Input Files tab by clicking it. In the Input Files tab, do the following:
- Click the Add Bitstream button, browse to your SOF file, then click Open.
- Click the newly added design.sof file, then click Properties. In the HPS settings > Bootloader section, click the “..” browse button, go to the location of your HPS FSBL hex file, select it and click Open.
The Intel® Quartus® Prime Programming File Generator window is displayed:Figure 19. Intel® Quartus® Prime Programming File Generator Pro Edition Window: Input Files
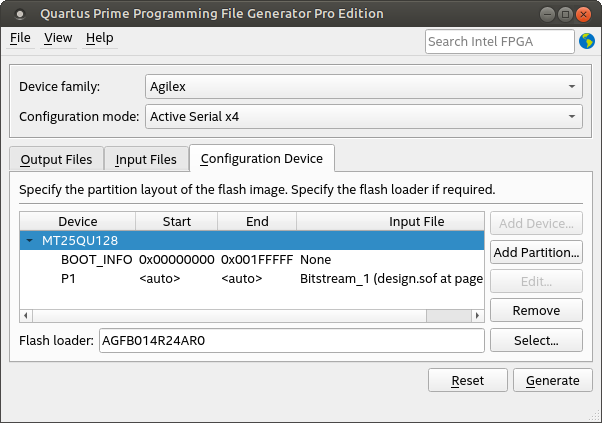
- Switch to the Configuration Device tab by clicking it. In the Configuration Device tab, do the following:
- Click Add device, select your desired flash device (in this example MT25QU128) then click OK
- Click the newly added device, then click Add Partition. In the partition window, leave Name as “P1”, select Input file to be “Bitstream_1 (design.sof)” and leave Page as “0”, Address Mode as “Auto”, then click OK.
- Under Flash Loader, click the Select.. button, then select Intel® Agilex™ under Device Family, and AGFB014R24AR0 under Device Name. Click OK.
The Intel® Quartus® Prime Programming File Generator window is displayed:Figure 20. Intel® Quartus® Prime Programming File Generator Pro Edition Window: Configuration Device
- Click the Generate button. Once the files are generated, a confirmation message is received.
- Optionally, go to File > Save or File > Save As to save the configuration in a .pfg file. You can generate the output again by applying the same options by running the command line version of the tool like this: “quartus_pfg -c <filename.pfg>”.