Performance Monitor FPGA IP User Guide: Agilex™ 5 and Agilex™ 7 FPGAs
ID
817760
Date
7/08/2024
Public
A newer version of this document is available. Customers should click here to go to the newest version.
Visible to Intel only — GUID: fjm1718289422996
Ixiasoft
1. About the Performance Monitor (PMON) FPGA IP
2. Introduction to the Performance Monitor (PMON) IP
3. Performance Monitor IP Functional Description
4. Creating and Parameterizing the Performance Monitor (PMON) FPGA IP
5. Performance Monitor (PMON) FPGA IP Interface Signals
6. Adding the PMON FPGA IP to Your Design in Platform Designer
7. Document Revision History for the Performance Monitor (PMON) FPGA IP User Guide
A. Performance Monitor (PMON) Library Functions
Visible to Intel only — GUID: fjm1718289422996
Ixiasoft
6. Adding the PMON FPGA IP to Your Design in Platform Designer
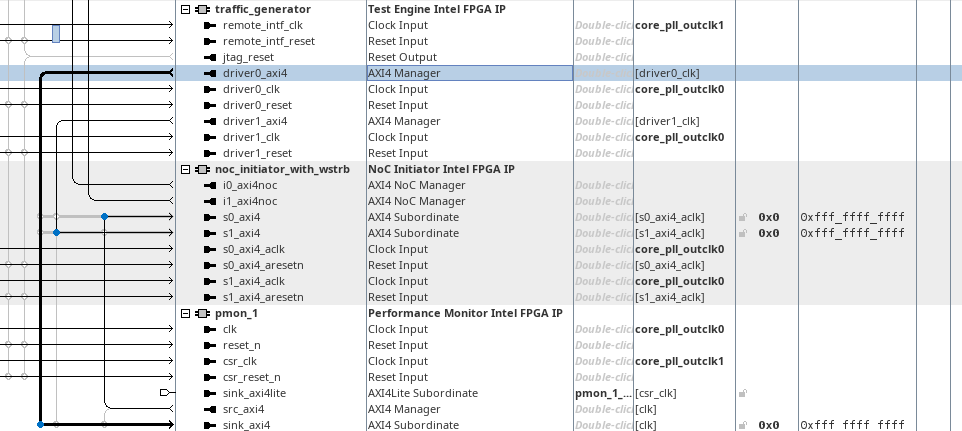
Follow this procedure to connect an instance of the PMON IP to AXI4 IPs in your design in Platform Designer.
- To enable the PMON FPGA IP for use in Platform Designer, instantiate the following:
- PMON FPGA IP
- AXI4 manager IP
- AXI4 subordinate IP
- Clock and reset IPs
Note: This example uses the Test Engine IP as AXI4 manager and NoC Initiator IP as AXI4 subordinate. These IPs are used as substitutes for the AXI4 manager/subordinate IPs. In general, you can use the PMON IP with any AXI4 IP. - Make the appropriate connections, as follows:
- Connect the src_axi4 (AXI4 manager) port to the AXI4 subordinate.
- Connect sink_axi4 (AXI4 subordinate) port to the AXI4 manager.
- Connect the csr_clk/csr_reset_n ports to the appropriate PLL and reset IPs.
- Connect the clk and reset_n port of the PMON IP to match the AXI4 interface being monitored.
- After you make the necessary connections in the Platform Designer, ensure that you specify the correct width of the AXI4 parameters from the PMON IP to match the AXI4 IPs.
- Generate HDL for your design.
Figure 3. Connections in Platform Designer

