Visible to Intel only — GUID: dsu1441820531298
Ixiasoft
1. CvP Initialization in Intel® Arria® 10
2. Design Considerations for CvP Initialization in Intel® Arria® 10
3. Understanding the Design Steps for CvP Initialization in Intel® Arria® 10
4. CvP Driver and Registers
5. Partial Reconfiguration over PCI Express in Intel® Arria® 10
6. Understanding Design Steps for PR over PCI Express in Intel® Arria® 10
7. Document Revision History for the Intel® Arria® 10 CvP Initialization and Partial Reconfiguration over PCI Express* User Guide
4.3.1. Altera-defined Vendor Specific Capability Header Register
4.3.2. Altera-defined Vendor Specific Header Register
4.3.3. Altera Marker Register
4.3.4. CvP Status Register
4.3.5. CvP Mode Control Register
4.3.6. CvP Data Registers
4.3.7. CvP Programming Control Register
4.3.8. Uncorrectable Internal Error Status Register
4.3.9. Uncorrectable Internal Error Mask Register
4.3.10. Correctable Internal Error Status Register
4.3.11. Correctable Internal Error Mask Register
Visible to Intel only — GUID: dsu1441820531298
Ixiasoft
3.2. Setting up the CvP Parameters in Device and Pin Options
Follow these steps to specify CvP parameters:
- On the Quartus Prime Assignments menu, select Device, and then click Device and Pin Options.
- Under Category select General, and then enable the following option:
- Auto-restart configuration after error, enable this option to allow automatic restart of configuration attempts if an error is detected. Any restarted configuration may exceed the required PCIe startup time to allow bus enumeration and prevent the use of quartus_cvp for core programming.
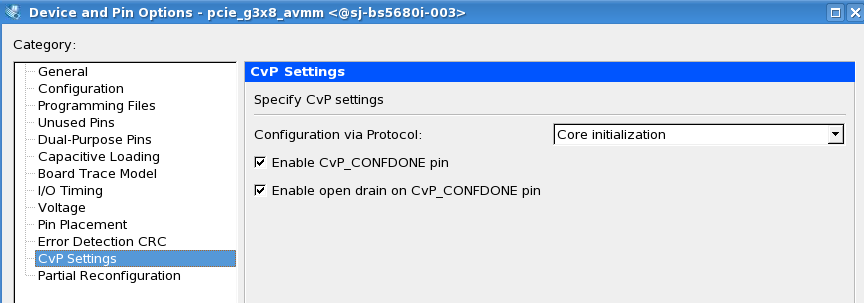
Leave all other options disabled. - Under Category, select CvP Settings, and specify the following settings:
Parameter Value Configuration via Protocol Core initialization Enable CvP_CONFDONE pin Turn this option on. Enable open drain on CvP_CONFDONE pin Turn this option on. Figure 6. Illustrating the specified CvP parameters in Device and Pin options dialog box