Visible to Intel only — GUID: dfp1619809179212
Ixiasoft
Visible to Intel only — GUID: dfp1619809179212
Ixiasoft
3.5.2.3.3. Run the Reference Example Application
- Build the reference application.
$ cd software/user/cli/perfq_app/
$ make clean && make all
$ ./perfq_app -h
- This command displays the available options in the application, as shown in the image below:
Refer to the README file located in the software/user/cli/perfq_app directory for more information.
- Perform a PIO test to check if the setup is correct. If successful, the application displays a Pass status as shown in the image below:

Here the -b option should be provided with the correct BDF in the system.
- Perform IP reset.
This step will perform an IP Reset. You can perform this step before every run.
Build devmem utility:$ cd software/user/cli/devmem $ make clean all $ ./devmem 0000:01:00.0 0 0x00200120 0x1
-
For Channel ID VF PF verification: Channel ID , VF and PF information is inserted in AVST/AXIST data pattern. To test dma in proper channel and VF, it can be tested as described below:
For AVST/AXIST LB : In the file software/user/common/mk/common.mk, enable CID _PAT.
For Example: __cflags += -DCID_PAT
Data validation mode supported. Performance mode is disabled.
__cflags += -DPERFQ_LOAD_DATA \
__cflags += -UPERFQ_PERF
Supported direction: Applicable Bi-directional (-i) only.
For AVST/AXIST PKT GEN: The following configuration should be made in software/user/common/mk/common.mk
Enable both CID_PAT and IFC_PROG_DATA_EN
__cflags += -DCID_PAT
__cflags += -DIFC_PROG_DATA_EN
DIFC_PROG_DATA_EN
In validation mode, enable DPERFQ_LOAD_DATA flag and disable PERFQ_PERF flag.
__cflags += -DPERFQ_LOAD_DATA
__cflags += -UPERFQ_PERF
Supported direction: Bi-directional (-Z), Tx (-t) and Rx (-r) as well.
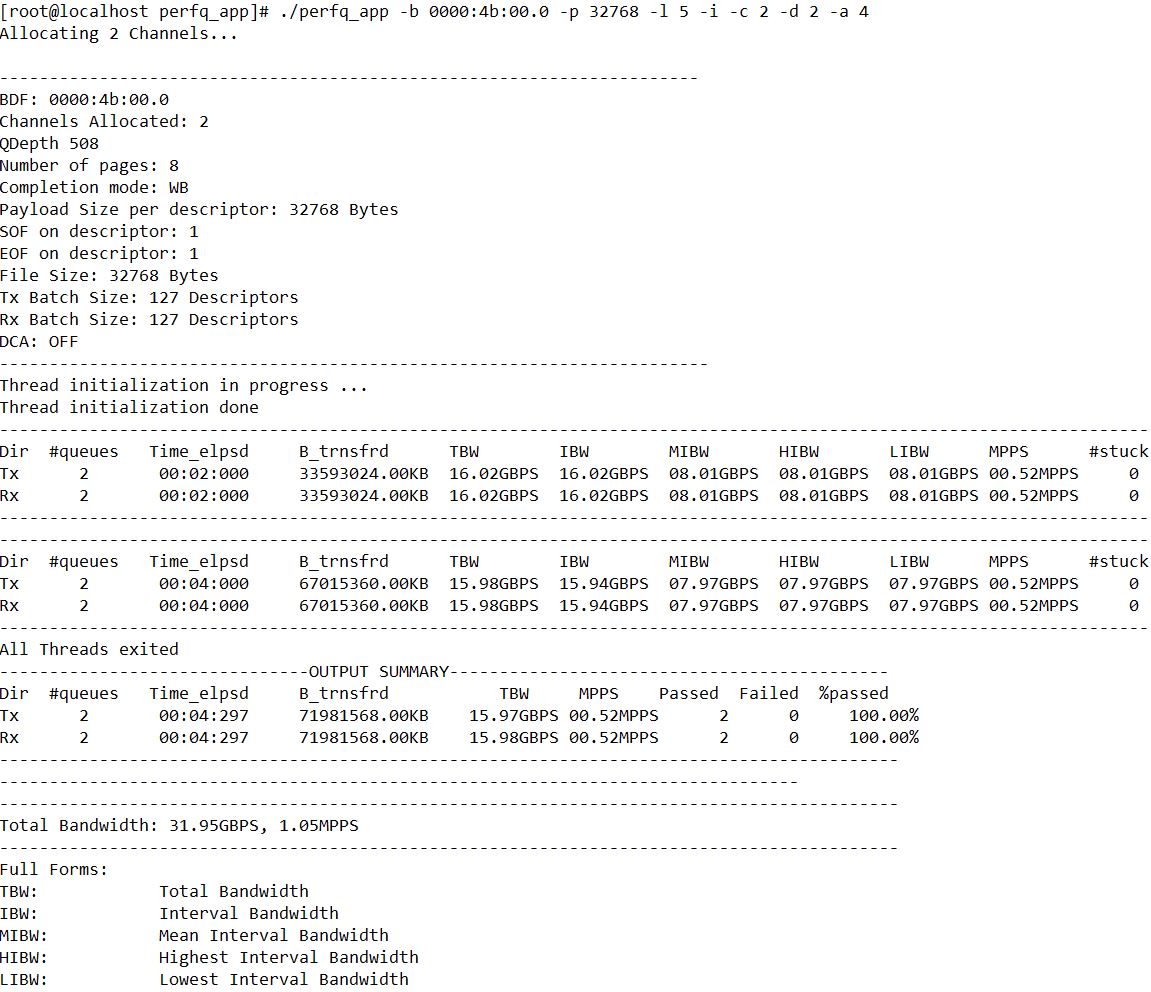
- Example of testing a loopback design with the following configuration:
Command:
$ ./perfq_app -b 0000:01:00.0 -p 32768 -l 5 -i -c 2 -d 2 -a 4
Configuration:
- bdf (-b 0000:01:00.0)
- 2 channels (-c 2)
- Loopback (-i)
- Payload length of 32,768 bytes in each descriptor (-p 32768)
- Time Limit (-l 5)
- Debug log enabled (-d 2)
- One thread per queue (-a 4)
Note: This hardware test was run with the Stratix® 10 GX H-tile PCIe Gen3 x16 configuration.Note: This hardware test was run with the Agilex™ 7 P-Tile PCIe Gen4x16 configuration.Figure 31. Custom AVST DMA Gen4 x16 : P-Tile Hardware Test Result Note:For Rx/Tx test:
- AVMM should use -u instead of -i
- -i should be used for AVST/AXIST Loopback case
- -z should be used in AVST/AXIST PKT case
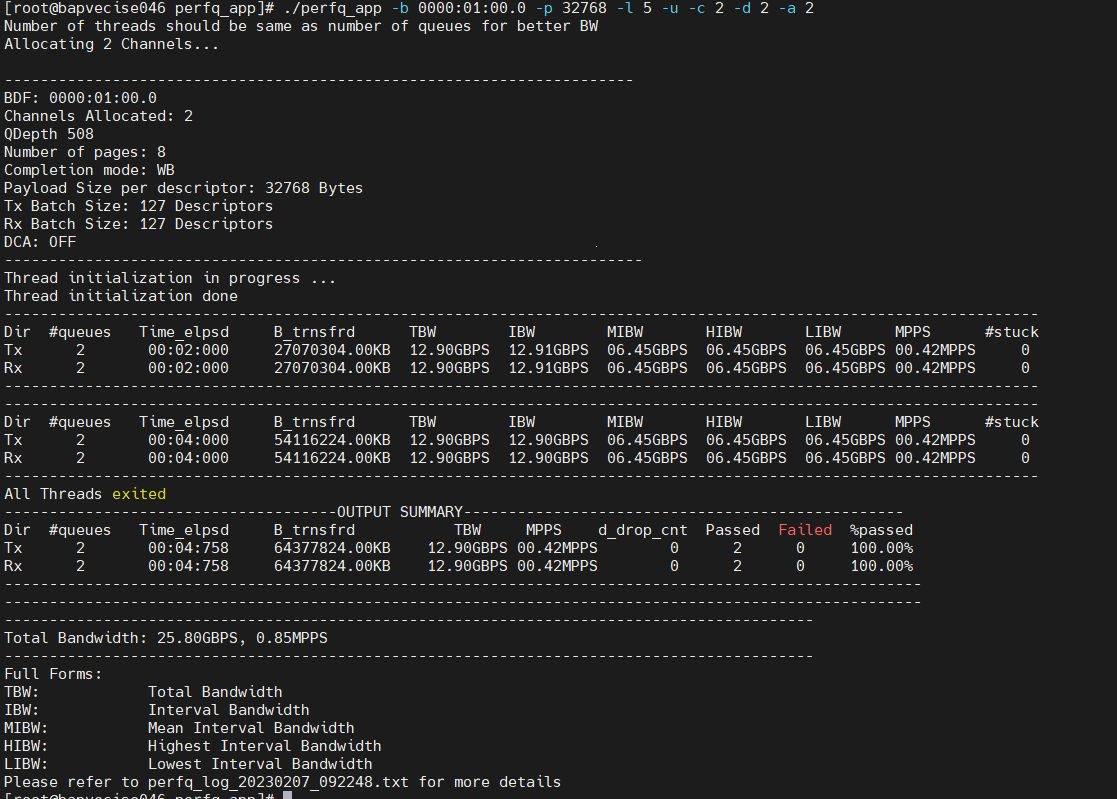
- Example of verifying on AVMM DMA:
Modify the below micro in the file: user/common/include/ifc_libmqdma.h
#define PCIe_SLOT 0 /* 0 - x16, 1 - x8 */
Command:$ ./perfq_app -b 0000:01:00.0 -p 32768 -l 5 -u -c 2 -d 2 -a 4
Configuration:
- bdf (-b 0000:01:00.0)
- 2 channels (-c 2)
- bi-directional DMA transfer (-u)
- Payload length of 32768 bytes in each descriptor (-p 32768)
- Time Limit set to 5 (-l 5)
- Debug log enabled (-d 2)
- One thread per queue (-a 4)
Note: To test the data validity, you need to perform H2D then D2H operations.Figure 32. Custom AVMM DMA Gen4 x16 : P-Tile Hardware Test Result
$ulimit -n 8192
cflags += -UPERFQ_PERF
cflags += -DPERFQ_LOAD_DATA