Developing a Remote Visual Studio Code Linux Project using SSH
Using Visual Studio Code* with Intel® oneAPI Toolkits
This guide assumes you are familiar with C/C++ development and the Visual Studio Code (VS Code) editor. If you are new to Visual Studio Code, review these VS Code documentation links:
Prerequisites:
If you have not configured your remote Linux system to build and run a sample project, refer to the appropriate toolkit Get Started Guide and complete those steps using a command-line terminal session on your remote Linux development system.
Add the following VS Code extensions to your local installation of VS Code. They are needed for working with a remote Linux C/C++ development environment:
These extensions are optional, but may be useful:
Most of the detailed instructions needed to understand how the VS Code Remote SSH extension works are in the VS Code Remote Development, Remote Development using SSH and Remote Development with Linux sections of the Microsoft VS Code documentation.
Important notes regarding the VS Code Remote-SSH extension:
Putty is not supported, use SSH.
The standard version of SSH installed on your local Windows, macOS or Linux system should be sufficient.
The Microsoft edition of OpenSSH is supported and is typically found here: C:\Windows\System32\OpenSSH\ssh.exe.
Ensure SSH can be found in the PATH on your local system.
The Bash, curl and wget commands must be present on the remote Linux system.
An sshd server must be installed and running on the remote Linux system.
You will need an account on the remote Linux system that supports SSH logins.
It is most convenient to setup an SSH key-pair without a passphrase for establishing VS Code Remote-SSH connections. On Windows, your default user SSH configuration file is located at %userprofile%\.ssh\config (consistent with the Linux and macOS default locations).
VS Code only needs to be installed on your local Windows, Linux, or macOS machine.
Your local machine does not require an Intel GPU. You can use any system that supports VS Code as your local machine.
VS Code will automatically install and configure the VS Code backend when connecting to the remote Linux system.
Ensure the remote Linux system has the correct GPU drivers and Intel development software installed.
Connect to Your Remote Linux Target
Before you connect to your remote Linux system using the Remote-SSH extension, confirm that you can login to the remote system from your local command-line. For example, assuming the remote system is named my-remote-linux-machine and your account is my-remote-username, type the following into your local machine’s command-line (terminal session) to login to the remote machine using SSH:
This command-line works identically on Windows, macOS and Linux. If you are successful, you will typically see a message welcoming you to the remote Linux system. If you are unsuccessful, ensure you have the correct username, password and network name or IP address for the remote Linux machine. Also, ensure the SSHD daemon has been installed and started on your remote Linux machine.
See the Visual Studio Code Remote Development using SSH documentation for detailed instructions, requirements, and additional information.
Click the remote-ssh icon located in the lower left corner of your VS Code window. A remote-ssh commands palette appears at the top of the VS Code window. Select Connect to Host… Remote-SSH in the command palette.
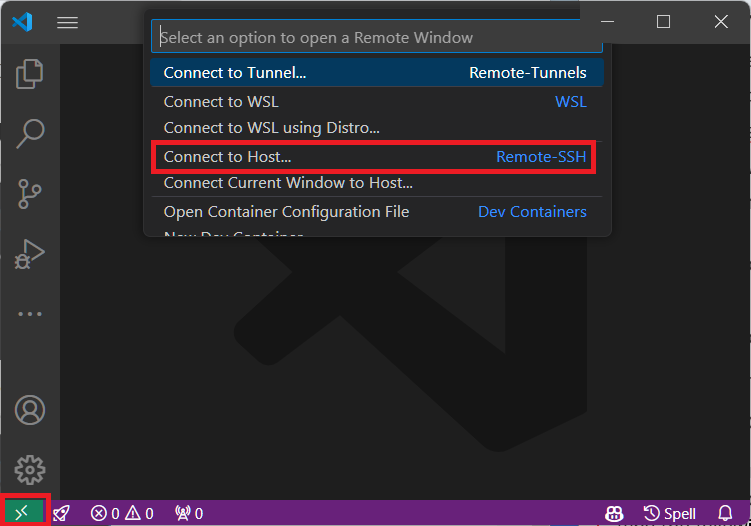 NOTE:The first connection to your remote Linux target may require a minute or longer to download and install the necessary VS Code backend tools to your remote system. Subsequent connections to the remote system are generally faster. VS Code will indicate the installation process in the lower-right corner of your VS Code window.
Enter the username and an IP address or a config file hostname for your remote Linux target, using the same format you would use for a SSH connection into that system, and press Enter. In the image below, the username is ubuntu.
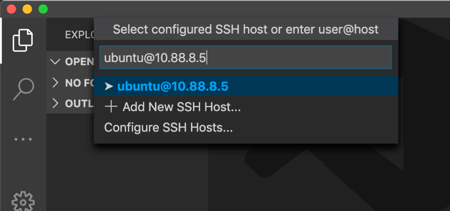
or if you are using a config file hostname for your remote Linux target, enter the hostname and press Enter:

A new VS Code window opens and is connected to the remote host. If you do not have an SSH key-pair set up for this connection, you will be prompted to enter a password for your remote Linux target.
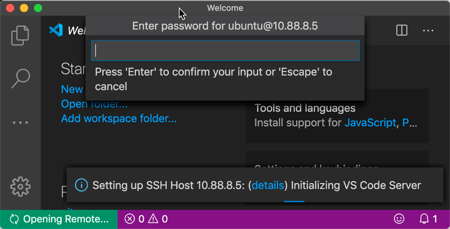
Watch the command palette for password prompts. If you need to type in a password as part of your remote connection process, you may be prompted more than once for the remote login password. This is due to the Remote-SSH extension sometimes needing to establish multiple SSH connections to the remote system.
Configuring and Testing the Remote-SSH Extension
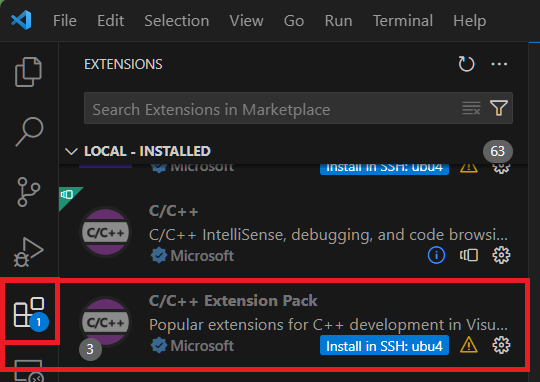
Once connected to the remote Linux system, you can perform some simple tests to confirm that your connection is stable. From the VS Code menu, select Terminal > New Terminal to open a VS Code terminal session on the remote system. Since you remoted into a Linux system, you will typically get a bash terminal session; where you can run commands like “hostname -f” or “hostname -i” to confirm that the VS Code backend is operating on the remote machine. The VS Code extensions you installed earlier (C++, hex editor, GDB, etc.) need to be installed onto the remote machine. To see the list of installed extensions, click the building block icon on the left side of the VS Code window. Scroll through the list of extensions and locate those that include an Install in SSH:<hostname> button (see the following image):
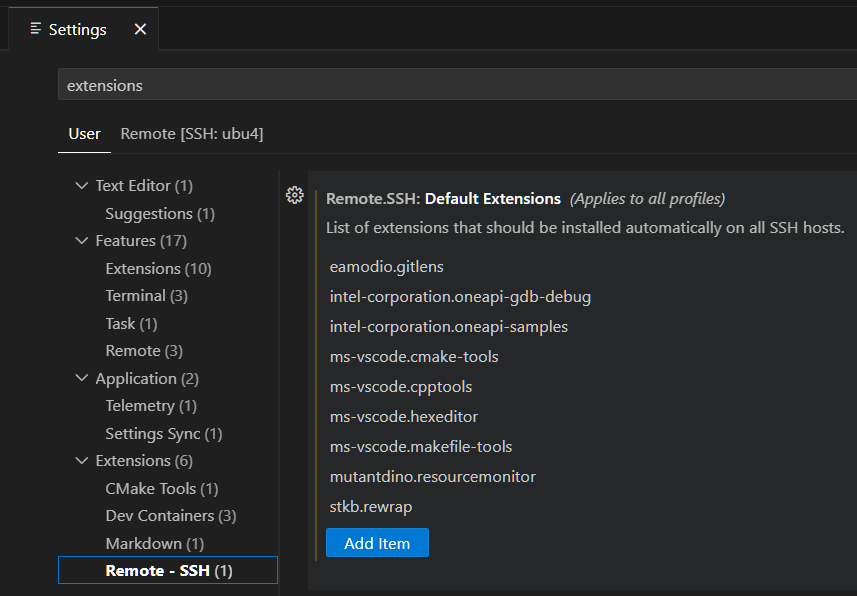
Set oneAPI Environment Variables on the Remote Host
It is unlikely that the oneAPI environment variables have already been set up on your remote development system. If the environment variables are not set up, it will prevent you from building your application remotely and can limit the functionality of some extensions, especially the debug and Intellisense extensions. When connecting to a system via SSH, there is no obvious opportunity to source either the oneAPI setvars.sh or oneapi-vars.sh environment set up scripts before the remote VS Code backend is started. Ideally you would source the oneAPI environment setup script and then start VS Code from that shell. That way the VS Code backend and all VS Code extensions would inherit the PATH, CPATH, LD_LIBRARY_PATH and other environment variables that are needed to support your development tasks.
The Intel oneAPI Environment Configurator VS Code extension cannot resolve this issue. It can only change the environment variables in the VS Code terminal sessions, not the environment variables seen by the VS Code backend and installed extensions.
One way to resolve this problem is to add a conditional statement like the following in the remote login user’s profile scripts (~/.profile or ~/.bash_profile or ~/.zprofile). Profile scripts are sourced prior to starting the remote VS Code backend.
Then add a script named vscode-remote-ssh-env-setup.sh (as named in the above script) to your remote system’s home directory, containing something like the following:
The example above sources the oneAPI setvars.sh script prior to starting the remote VS Code backend. The VS Code backend and extensions will then inherit the oneAPI environment variables defined by the vscode-remote-ssh-env-setup.sh script. If you prefer the unified layout, you can check for and source the oneapi-vars.sh script instead of the setvars.sh script.
The Remote-SSH extension provides a command to kill the remote VS Code backend. Open the Command Palette and search for the “Remote-SSH: Kill VS Code Server on Host…” command. You must first close the Remote-SSH connection (search for “Close Remote Connection”) before you can kill the remote backend. Alternatively, you can ssh into the remote system from a non-VS Code terminal session and kill the “vscode-server” or “node” processes.

Configuring Intellisense and Debug
In order to make VS Code work well with C/C++ development, it is necessary to configure 2 key JSON files in your project’s .vscode folder: c_cpp_properties.json and launch.json. The c_cpp_properties.json file instructs the Intellisense feature on how to locate include headers and the Intel compiler. The launch.json file defines debug configurations to configure the gdb-oneapi application debugger. An introduction and general background for using the VSCode debugger can be found in the Microsoft Debug C++ in Visual Studio Code documentation. To understand and learn about Intellisense, see the Configure C/C++ IntelliSense documentation.
The following pre-configured JSON files will help you get started with IntelliSense and debugging in an Intel oneAPI development environment. This c_cpp_properties.json file is configured for a 2024.0 or later release. See the comments in the JSON file for help on how to modify it to work with a 2023.2 or earlier release.
If VS Code indicates one or more problems with this file, it might need to be re-configured for a release that is prior to 2024.0 or, if using the unified directory layout, the path names may need to be changed to reflect the unified layout. Unneeded path references can be removed or commented out.
This launch.json file is configured to work with the “array-transform” example application. It provides two configurations named “CPU array-transform” and “GPU array-transform”.
The key attributes in the launch.json file are:
name: Identifies the specific debug configuration.
program: Provides the path to the executable that will be debugged.
args: Arguments to be passed to the debugger on its command-line.
environment: Defines environment variables that will be exported prior to starting the debug session.
setupCommands: Specifically, disabling the mi-async feature; enabling it will generate GPU seg faults.
The name attribute is used only as an identifier for the configuration, as shown in the following image:
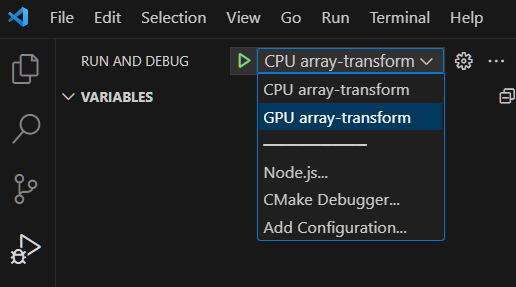
You can create as many debug configurations as you need, the name field inside each configuration is there to help you distinguish which configuration you will use for your debug session.
Explore Samples Using Visual Studio Code* Remote
To get started, install the VS Code “Sample Browser for Intel oneAPI Toolkits” extension. You can optionally install the VS Code “Environment Configurator for Intel® oneAPI Toolkits” extension, but it is not needed if you have set up the oneAPI environment remotely using the technique described in the Set oneAPI Environment Variables on the Remote Host section above.
Both can be quickly found in the VS Code extensions marketplace by typing “oneapi” into the marketplace search bar.
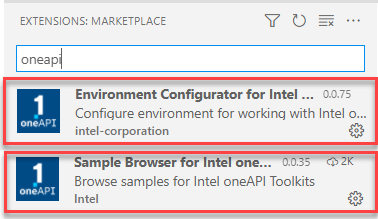
When developing remotely over SSH with VS Code, setup the oneAPI environment remotely using the technique described in the Set oneAPI Environment Variables on the Remote Host section above.
To browse oneAPI samples using VS Code:
Click on the oneAPI button on the left navigation to view samples.
A list of available samples will open in the left navigation:
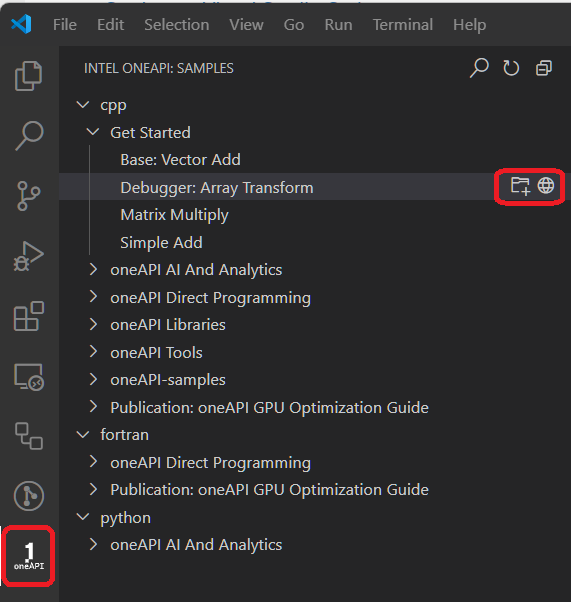
To view the sample readme, click the
 next to the sample. If you choose to build and run the sample, the readme will also be downloaded with the sample.
To download a sample, click the
 to the right of the sample name.
Create a new folder for the sample. The sample will load in a new window:
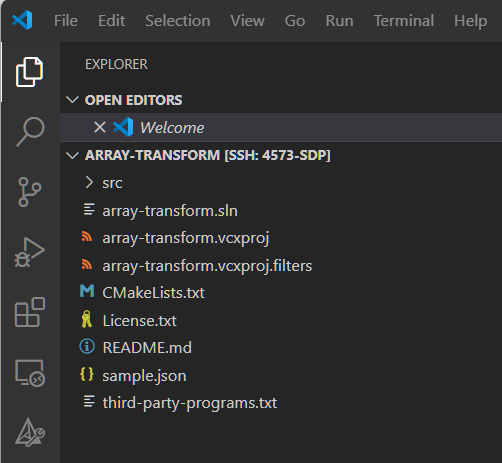
Click README.md to view instructions for the sample.
Try Debugging (CPU and GPU)
The GDB with GPU Debug Support for Intel® oneAPI Toolkits extension for Visual Studio Code (VS Code) enables additional features of GPU debugging with GDB for Intel® oneAPI toolkits. Note that this feature is only available for the Linux* target platform. Start using this VS Code extension with guide Get Started with Intel® Distribution for GDB* on Linux* OS Host.
This section assumes that you can build your sample and have installed the C/C++ Extension Pack for Visual Studio Code. The C/C++ extension is required to configure the oneAPI C/C++ debugger.
The Intel® oneAPI Base Toolkit includes a special version of GNU* GDB (gdb-oneapi) designed to support oneAPI C/C++ applications. To debug your DPC++ application using this special debugger, you will need to make changes to the .vscode/launch.json configuration file. The launch.json file defines debug configurations to integrate with the gdb-oneapi application debugger. This launch.json file is configured to work with the array-transform example application. It provides two configurations named CPU array-transform and GPU array-transform.
Create a .vscode folder in your sample’s workspace folder.
Copy the c_cpp_properties.json and launch.json files that are shown in the “Configuring Intellisense and Debug” section of this document. The c_cpp_properties.json and launch.json files are pre-configured for use with the array-transform sample application.
NOTE:If VS Code doesn’t recognize the application name, you may have to insert the full path and file name into the launch.json file’s "program": property.The key attributes in the launch.json file above are name (identifies the specific debug configuration), program (provides the path to the executable that will be debugged), args (arguments to be passed to the debugger on its command-line), environment (defines environment variables that will be exported prior to starting the debug session), and setupCommands (disables the mi-async feature; enabling it will generate GPU seg faults). The name attribute is used only as an identifier for the configuration. You can create as many debug configurations as you need.
In some configurations, GDB may not be compatible with VS Code. If this happens, add the environment variable to disable gdb-oneapi support for GPU autolaunch. This can either be done in the environment prior to launching VS Code, or within the launch.json: export INTELGT_AUTO_ATTACH_DISABLE=1
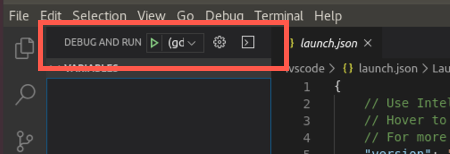
Bring up the debug view by selecting the Debug and Run icon in the Activity Bar. You can also use the keyboard shortcut (Ctrl+Shift+D).

Start the run and debug session by clicking the green DEBUG AND RUN icon, or go to Run > Start Debugging (F5).
Disconnect from a Remote Host
You can close the VS Code remote connection by selecting File > Close Remote Connection from the VS Code menu. Alternatively, click the colored remote ssh notification in the lower-left corner of the VS Code window and select Close Remote Connection from the list of Remote-SSH commands.
Kill Remote VS Code Server
If you need to kill the remote VS Code SSH server on your remote Linux target, perform the following steps:
Close all remote connections for “user@host” (see section above).
Open the VS Code command palette (View > Command Palette).
Type “remote” in the command palette dialog box.
Select Remote-SSH: Kill VS Code Server on Host.
You will be prompted to provide a user@host value or choose from a list of preconfigured SSH hosts in your .ssh/config file. Use the same credentials that you used to make your remote VS Code connection; VS Code will kill only the VS Code remote server instances that match that user.