
The popularity of large language models (LLM) is driving a need for more compute power. While the most powerful solutions from OpenAI, Anthropic, etc. run in the cloud, an increasing number of models can run on smaller systems. The limits of what can be run locally depend on both compute power and memory capacity. Models typically have a parameter size that indicates how large and computationally complex they are. As parameter size grows, not only do users face challenges in compute requirements, but memory requirements also become a factor. To efficiently execute training or inference, the LLM must be loaded into device (typically a GPU) memory. Consumer GPUs are limited to, at most, 24 GB of memory; the majority have less than 16 GB of memory. This is why the Llama models from Meta and the Phi models from Microsoft come in a variety of parameter sizes as companies attempt to balance compute requirements and model accuracy. For example, the Llama models are the most popular on Hugging Face*. Llama 2 comes in 7B, 13B, and 70B sizes and Llama 3 comes in 8B and 70B sizes. The 7B, 8B, and 13B models can be run using quantization and optimizations on many high-end consumer GPUs. The 70B models are typically too large for consumer GPUs.
Developing Locally with Larger LLMs
In general, I prefer not to log in to a data center or the cloud to develop my solutions. The latency and security of developing on a local system are better, but the size and compute requirements of LLMs make local development challenging. One option is to build a workstation with an enterprise grade GPU, but that can get expensive. The good news is that small form-factor vendors shipping Intel® Core™ Ultra processor solutions have a remedy for us.
I recently bought an Asus NUC 14 Pro* system that uses an Intel Core Ultra 155H processor with an Intel® Arc™ integrated GPU (iGPU). The novel aspect of this system is that an iGPU is allowed to use up to half of the system RAM as GPU memory. When configured with the maximum possible 96GB of DDR5-5600 DRAM, the system can run even the largest 70B Llama model at a fraction of the cost of a workstation.
System Setup
Hardware Setup
Setting up the Asus NUC 14 Pro was easy. It required no tools and was as simple slotting in two sticks of 48 GB DDR5-5600 SODIMM DRAM and then installing an M.2 20x80 NVMe SSD. Knowing that I wanted to dual-boot Windows* and Linux* for my testing and that the Meta Llama 3 70B model takes around 550 GB of disk space, I would recommend at least a 4 TB SSD. The whole hardware installation process took less than five minutes.
Operating System Installation
Installing the operating systems was also relatively straightforward. I installed Windows 11 first, which does require a hardware ethernet connection, or no network install workaround, as Wi-Fi did not work out of the box. After Windows was installed, I downloaded and installed the latest drivers from Asus’ website, did a Windows Update, and my system was ready to go.
Next, I installed Ubuntu* 22.04.4, which worked without any issues. Once the base Linux was up and running, I followed the instructions to install the latest user mode GPU drivers.
One quick tip is to have a relatively large, shared drive between Windows and Linux. If you are testing LLMs in Windows and Linux, you will not want the same model taking up space in both your partitions.
Running an LLM
Software stacks for LLMs are rapidly changing and there are a variety of options to try. I am testing Llama 3 70B using a traditional Hugging Face/PyTorch* workflow as well as the popular llama.cpp open source framework. Because I am using this as a test platform with the expectation of running on a larger data center system in the future, I am describing my Windows workflow, although I should point out this platform and the software stacks also work on Linux.
Base Configuration
Before I get into the AI-specific parts of running the model, I need to create the appropriate environment in Windows. To do this I install a few packages:
- Windows Visual Studio* 2022 Community Edition
- conda-forge
- Intel oneAPI Base Toolkit
Running with PyTorch
Running an LLM using PyTorch is commonly done using the open-source libraries, APIs, and models found at Hugging Face.
Install PyTorch and Hugging Face APIs
To set up your PyTorch environment and the required Hugging Face libraries, launch a conda-forge Miniforge prompt then run the following commands:
# create and activate a conda environment with conda-forge
conda create -n llm python=3.11 libuv
conda activiate llm

# Install PyTorch and Hugging Face libraries with Intel LLM library for PyTorch
pip install --pre --upgrade ipex-llm[xpu] --extra-index-url https://pytorch-extension.intel.com/release-whl/stable/xpu/us/
I installed the dependencies using the Intel LLM library for PyTorch, which provides more performant implementations of the Hugging Face APIs on Intel GPUs. The dependency tree of the library also installs PyTorch and other required Hugging Face libraries.
Getting the Model
I want to test the current state-of-the-art Llama 3 model, Llama 70B, which can be downloaded from Hugging Face. The Llama models require approval from Meta, so first you need to apply for access and accept their license here: https://huggingface.co/meta-llama/Meta-Llama-3-70B. Once approved, you can do the following:
# Install Hugging Face CLI
pip install huggingface-cli

# Login to Hugging Face using CLI
git clone https://huggingface.co/meta-llama/Meta-Llama-3-70B
As I mentioned before, the model is quite large and took 551 GB of disk space, so it may take a while to download.
Performing Inference
Running inference using PyTorch and the Hugging Face APIs is straightforward. You will see some minor differences (highlighted in yellow) from other GPU scripts. The import in this case is using an Intel library and the device targeted by the to function is ‘xpu’ instead of ‘cuda.’
from ipex_llm.transformers import AutoModelForCausalLM
...

model = AutoModelForCausalLM.from_pretrained(model_path,
                                             load_in_4bit=True,
                                             optimize_model=True,
                                             trust_remote_code=True,
                                             use_cache=True)

# Move the model to the GPU accelerator
model = model.half().to('xpu')
# Load tokenizer
tokenizer = AutoTokenizer.from_pretrained(model_path, trust_remote_code=True)

...

# Generate predicted tokens
with torch.inference_mode():
   prompt = get_prompt(args.prompt, [], system_prompt=DEFAULT_SYSTEM_PROMPT)
   input_ids = tokenizer.encode(prompt, return_tensors="pt").to('xpu')

   # Start inference
   output = model.generate(input_ids,
                           eos_token_id=terminators,
                           max_new_tokens=args.n_predict)
   torch.xpu.synchronize()
   output = output.cpu()
   output_str = tokenizer.decode(output[0], skip_special_tokens=False)
My full script can be found here. Running the script is easy. Just provide a few parameters: the model, the prompt, and the desired output size, e.g.:
python llama3.py --repo-id-or-model-path D:\models\Meta-Llama-3-70B-Instruct --prompt "Tell me if or why AI is important to the future of humanity" --n-predict 512
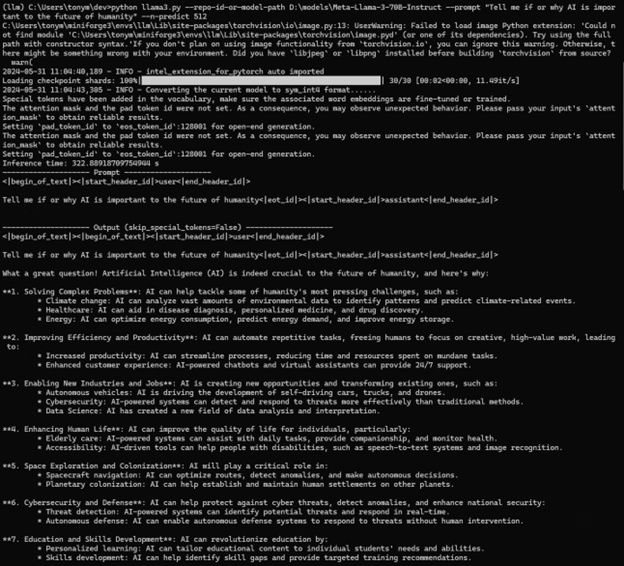
The Python output shows all the standard parts Hugging Face users would expect, including loading the model checkpoints, quantizing the model, and then showing the prompt and output from the model.
Running with llama.cpp
The llama.cpp project enables LLM inference using a purely C++ implementation. It supports a variety of backends for different GPUs and frameworks. We will use the SYCL* backend for our tests.
Build
First, clone the repository:
git clone https://github.com/ggerganov/llama.cpp.git
Next, install the following dependencies: cmake, mingw-w64, and the Intel® oneAPI Base Toolkit. Once the dependencies are installed, building llama.cpp with SYCL is easy:
# Initialize the oneAPI environment
"C:\Program Files (x86)\Intel\oneAPI\setvars.bat" intel64

# Configure the llama.cpp build
cmake -B build -G "MinGW Makefiles" -DLLAMA_SYCL=ON -DCMAKE_C_COMPILER=icx -DCMAKE_CXX_COMPILER=icx -DCMAKE_BUILD_TYPE=Release

# Build the llama.cpp executable
cmake --build build --config Release -j
The output binary is in build/bin/main.
Getting the Model
The llama.cpp project uses the GPT-generated unified format (GGUF) for fast LLM loading. Note that this format does have security concerns, so make sure you are using GGUF files from reliable sources. I downloaded an INT4-quantized version of the Llama 3 70B model from the Hugging Face LMStudio repository (click to download). It takes 42.5 GB on disk, which means running the model will use about that much GPU memory.
Performing Inference
Now that we have an executable and our model, we simply invoke llama.cpp with the model and a prompt, while telling it to offload all the model layers to the GPU:
build\bin\main.exe --model d:\models\Meta-Llama-3-70B-Instruct-Q4_K_M.gguf --prompt "Tell me if or why AI is important to the future of humanity" --n-gpu-layers 999
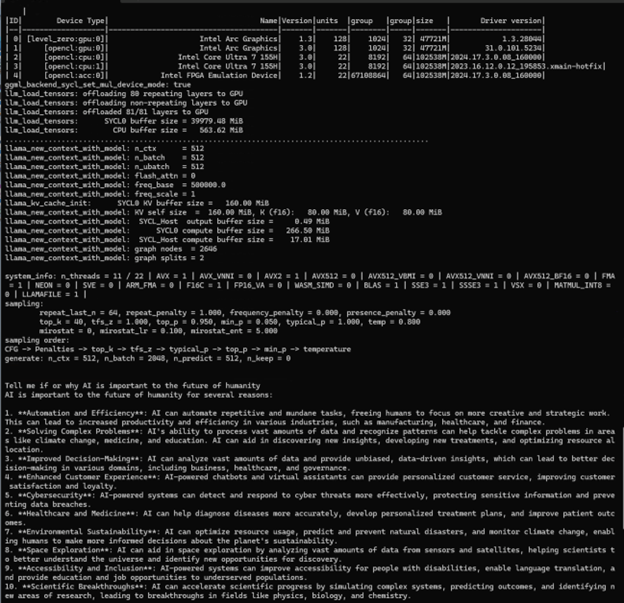
Unlike the Hugging Face/PyTorch workflow, llama.cpp loads a pre-quantized version of the model. The llama.cpp output shows some of the model parameters, how the model is being loaded, and the characteristics of the model on the devices. The model has 81 layers and is running on the Intel Core Ultra iGPU. We can see the model uses 40 GB of memory to run the 81 layers using the SYCL-based compute path. Finally, we see the prompt and output, which is similar to the Hugging Face/PyTorch implementation.
Why This Is Awesome
As someone who has built a variety of applications and tools that incorporate any number of complex components, I find that the more I can do locally, the more efficient my personal development process is. Yes, it is easy to deploy a model in the cloud, if you understand cloud deployment workflows. Yes, it is easy to deploy a model on enterprise infrastructures, if you understand how to work in that infrastructure. The great thing about being able to run LLMs locally is that we don’t need to understand all those things to immediately make progress in our testing. At some point, deploying a solution will become the challenge, but I prefer not to tackle that challenge while designing my solution.
The other advantage of this solution is that even for smaller models, we often use quantization to run on client systems. This may also lead to a loss in model accuracy. By having more memory accessible, you can test models using higher precision quantization, or even non-quantized models to appropriately judge the model capabilities.
Software development around LLM design, usage, and integration is a priority to a growing number of software solutions today. These solutions have significant compute and memory requirements that challenge even the best consumer systems today. Pair that with a developer’s desire to keep as much local as possible presents a huge challenge in optimizing developer productivity.
Fortunately, the combination of a small form-factor PC with Intel Arc integrated GPU configured with 96 GB of DRAM provides a solution. This system provides the ability to run models locally that do not even run on high-end consumer discrete GPUs. All of this is possible at a very reasonable price of around $1,200 (at the time of writing). Best of all, because the aforementioned software is built on top of a unified oneAPI stack, you can develop locally and know that you will be able to deploy it anywhere.