Visible to Intel only — GUID: hov1689040617442
Ixiasoft
Answers to Top FAQs
1. Introduction to Intel® FPGA Software Installation and Licensing
2. Determining System Requirements
3. Downloading Intel® FPGA Software
4. Installing Intel FPGA Software
5. Licensing Intel® FPGA Software
6. Next Steps After Installing and Licensing the Software
A. Intel FPGA Software Installation and Licensing Archives
B. Document Revision History for Intel® FPGA Software Installation and Licensing
4.1. Installing Intel® FPGA Software Through Quartus® Prime Installer
4.2. Installing the Intel® FPGA Software Manually
4.3. Using the Same Installation Files on Multiple Systems
4.4. Managing Multiple Versions and Copies of Intel FPGA Software
4.5. Setting Quartus® Prime Environment Variables
4.6. Starting the Quartus® Prime Software
4.7. Updating Intel FPGA Software
4.8. Installing and Uninstalling a Software Patch
4.9. Uninstalling Intel FPGA Software
4.10. Troubleshooting Installation Issues
5.1. Summary of Intel FPGA Software Licenses Required
5.2. Evaluating the Quartus® Prime Software
5.3. Acquiring Free, No-Cost Licenses
5.4. Licensing Intel® FPGA Software Walkthrough
5.5. Getting Hardware Information for License
5.6. Using the Intel FPGA Self-Service Licensing Center
5.7. About Intel® FPGA Software License Files
5.8. Checking the IP License Status
5.9. Viewing IP Core License Data
5.10. Configuring the License Manager Server
5.11. Troubleshooting License File Issues
5.6.1. Using the License Assistant
5.6.2. Getting a License File with Your New Purchase
5.6.3. Viewing Licenses
5.6.4. Filtering Your Licenses
5.6.5. Viewing and Generating a Legacy License
5.6.6. Viewing Licenses or License Files Associated to a Computer
5.6.7. Regenerating a License File
5.6.8. Generating a Temporary Checkout License
5.6.9. Generating a Companion License
5.6.10. Renewing Your License
5.6.11. Managing a Computer Profile
5.6.12. Rehosting a License on a Different Computer
5.6.13. Rehosting All Licenses from Current Computer to a Different Computer
5.6.14. Rehosting Multiple/Partial Licenses from Current Computer to a Different Computer
5.6.15. Sharing a License with Another User
5.6.16. Adding Delegate Administrators to Your Licenses and Computers
5.6.17. Splitting Seats on Your License and Generating Licenses
5.6.18. Merging or Adding Seats on Your License and Generating License
5.6.19. Adding Floating Seats
5.6.20. Signing Up for an Evaluation or No-Cost License
5.6.21. Signing Up For an Employee License
5.10.1. Installing the FLEXlm License Manager Server Software on Another License Server
5.10.2. Upgrading the FLEXlm License Manager Server Software
5.10.3. (Windows Only) Starting and Stopping the License Server
5.10.4. (Windows Only) Starting the License Server Automatically
5.10.5. Rereading an Existing License File on a License Server
Visible to Intel only — GUID: hov1689040617442
Ixiasoft
3.3.1.2. Getting Started With the Quartus® Prime Installer GUI
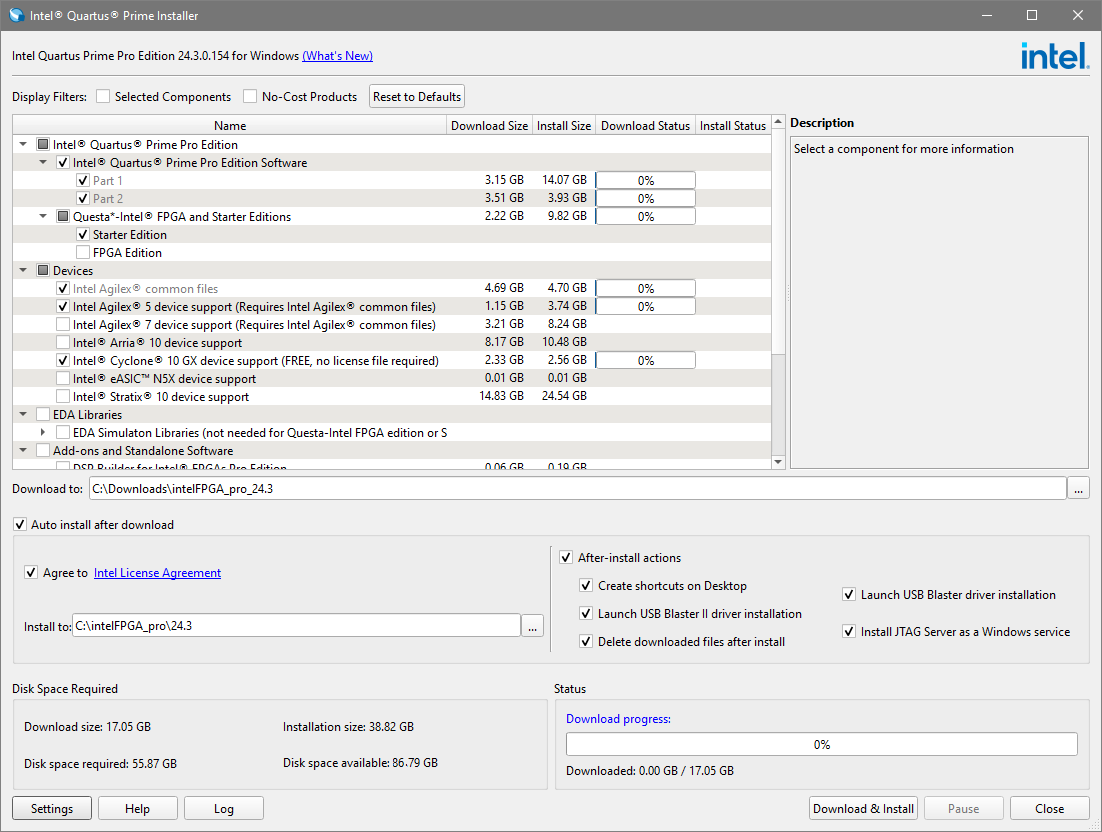
The top section of the GUI lists all downloadable components and their relevant information in a hierarchical format. You can select and download the desired components, as shown in the following image:
Figure 2. Quartus® Prime Installer GUI


- The default download location is <user_home>/Downloads and installation location is C:\intelFPGA_pro\<ver> on Windows and /<user_home>/intelFPGA_pro/<ver> on Linux. However, you can select a different location using the browse button and selecting the desired location. Space is not allowed in both download and installation paths.
- The Auto install after download and After-install actions options are enabled by default when you launch the GUI. However, the Agree to the Intel License Agreement is disabled by default. You must enable it to proceed with software download and installation.
- If you want to review the license agreement, click the Intel License Agreement link to view it in your default browser.
- If you choose to turn off the Auto install after download option, then After-install actions options are disabled, and only the Download button becomes available, allowing you to download selected components that you can install manually.
- If your installation directory contains a matched version of Quartus® Prime software, the installer changes into the update mode, allowing you to install additional components or uninstall components. If the installation directory does not contain a matched version of the Quartus® Prime software, the installer displays an error when you click the Download & Install button.
- If you are downloading for a platform (Linux or Windows) other than the one your system is running on, the Auto install after download option is disabled, and the tooltip shows why it is disabled.
- The bottom section of the GUI displays the download size, installation size, disk space required for download and installation, disk space available, and download status. The disk space is highlighted if the available space is less than the disk space needed. If you proceed with the download and installation, you are prompted with a warning message for insufficient disk space. The download status dynamically changes when the download is in progress.
- If you want to modify the installer settings, click the Settings button. Refer to Modifying the Installer Settings for more information.
- After selecting the components and reviewing all settings, click the Download & Install button. Use the Pause button if you want to interrupt the download.
- If you encounter any error throughout the download process, use the Log button to invoke the Log Viewer. The log file is saved to your download directory if you only downloaded the files. However, enabling the Auto Install option saves the log file to your installation directory.
Important: If Delete downloaded files after install is enabled, downloaded files corresponding to the installed components are deleted automatically after a successful installation. If the option is disabled, you need to manually delete the downloaded files if you no longer need them.