RAID management through the BIOS Setup environment, included with the Intel® VROC package, incorporates the functionality of Intel® VROC and Intel® VROC Pre-Operating System (Pre-OS) management components so that RAID management and control can begin directly within the BIOS Setup.
This enables the creation of RAID volumes that can be assembled in advance of installation of an operating system. This guide will also cover the instructions of how to load the specialized F6 Windows* drivers during the operating system installation process to utilize this feature.
Refer to the documentation provided with your system for the exact configuration details for enabling the Intel® Volume Management Device (Intel® VMD) controller and setting the Platform Controller Hub (PCH) into RAID mode. This guide includes a generalized series of instructions provided based on one of the Intel® Xeon® Scalable Platform Customer Reference Board (CRB) as a primer.
Navigating the Pre-OS Environment
The BIOS Setup environment is accessed during a system start or Power on Self-Test (POST). The option to access the Setup menu does vary depending on the system manufacturer. The examples in this guide will all be presented with the value as F2.
Note
Consult the BIOS documentation from the platform manufacturer for a complete list of options that can be configured.
Enabling Intel® VROC (SATA RAID)
Intel® VROC (SATA RAID) allows for the creation of RAID volumes through the UEFI HII interface, which is part of the UEFI driver package, and is included with the platform BIOS. The Intel® VROC (SATA RAID) UEFI HII can be accessed via the BIOS Setup environment. To enable the ability to create RAID volumes, the steps below have been created using an Intel Customer Reference Board (CRB). Refer to the instructions that have been supplied by the platform BIOS vendor as those instructions may differ from the set below.
Immediately following the POST, select the option that will allow for the user to access the BIOS Setup menu. This example uses the F2 key.
Navigate to Advanced > Mass Storage Controller Configuration.
Within the section Mass Storage Controller Configuration, there are two menu options. The first one is the option sSATA Controller for Ports 0-5, and the second one is the option SATA Controller for Ports 0-7. Depending on where you have the devices connected, they may show in either menu. It is best to check each independently. To do so, highlight the desired controller and pressEnter.
Once the desired controller(s) have been identified, to enable the controller for RAID mode, the option by default will be lit up and set as AHCI. PressEnter to open a selection menu. There will be three options. One will disable the controller completely. The second one is the legacy option AHCI Mode. The third one is the option RAID Mode, which will enable the Intel® VROC (SATA RAID) Pre-OS. Highlight the option RAID Modeand pressEnter.
There will be a small notification in the bottom right-hand corner indicating that the configuration has changed. For these changes to be activated, a Save Changes and Exit command will need to be given. Press the F10 key to save the changes and exit.
A pop-up window will ask you to confirm the action. Press the Ykey to confirm and reboot the system.
Press the F2 key again after POST to enter the BIOS.
Navigate to Advanced > PCI Configuration > UEFI Option ROM Control. The menu UEFI Option ROM Control should now show the newly enabled controller below the header Storage Controller.
Enabling Intel® VROC (VMD NVMe* RAID)
Intel® VROC (VMD NVMe* RAID) allows for the creation of RAID volumes through the UEFI HII interface, which is part of the UEFI driver package, and is included with the platform BIOS. The Intel® VROC (VMD NVMe* RAID) UEFI HII can be accessed via the BIOS Setup environment. With Intel® VROC (VMD NVMe* RAID), Intel® VMD will also need to be enabled on the platform. The following series of steps are provided based on an Intel Customer Reference Board (CRB). Refer to the instructions that have been supplied by the platform BIOS vendor as those instructions may differ from the set below.
Immediately following the POST, select the option that will allow for the user to access the BIOS Setup menu. This example uses the F2 key.
Navigate to Advanced > PCI Configuration > Volume Management Device.
The following steps vary depending on the physical configuration of the system. The reference system used in this example has four direct connections from the backplane to the motherboard using Oculink* cables for NVMe* devices:
Select the option CPU1 Oculink Volume Management. Toggle the setting from Disabled to Enable by pressing Enter to select.
The options for VMD Port 3C (PCIe* SSD0) and VMD Port 3D (PCIe* SSD1) by default will also be disabled. Select each to also toggle the setting from Disabled to Enabled.
Repeat the process for the option CPU2 Oculink Volume Management.
Press the F10 key to save the changes and exit.
Creating a RAID Volume for a Boot Disk
The following instructions are for creating a bootable RAID volume using the Intel® VROC UEFI HII. This procedure should only be used for a newly built system or for re-installation of the operating system. It is advised to use the Intel® VROC Graphical User Interface (GUI) within the Windows* operating system for the creation of RAID volumes after the operating system is installed. See more information in the Intel® Virtual RAID on CPU (Intel® VROC) Graphical User Interface (GUI) Getting Started Guide.
Assumptions Made
It is known how to enter to the appropriate BIOS Setup menus in the platform. Consult the platform documentation for instructions on how to enter the Intel® VROC HII interface.
The appropriate number of matching NVMe* SSDs have been plugged into the enabled Intel® VMD controller.
Enter the BIOS Setup menu to access the Intel® VROC UEFI HII interface.
Navigate to the Intel® Virtual RAID on CPU configuration menu.
Select the option Create RAID Volume.
Type in a volume name and pressEnter. Alternatevely, simply pressEnter to accept the default name.
Select the RAID level by pressing Enter and using the arrow keys to scroll through the available values. Highlight the desired RAID type and pressEnter to set the RAID type.
To enable spanned volumes, use the arrow key to highlight the < > bracket and pressEnter. This will open a small selection menu. Navigate the cursor to the X and pressEnter to enable volume spanning. To disable it, you would set the value back to blank and press Enterto save the value. Keep in mind that only data volumes are supported in this configuration, boot volumes that are spanned are not supported.
Using the arrow keys, select the drives one by one by highlighting the < > bracket on the line next to the drive’s port number. PressEnter to open the selection menu, which will be set to blank or off status. Navigate the cursor to the X and pressEnter to include that drive within the array.
Repeat this step for each drive required within this array.
Unless the RAID level was selected to RAID 1, select the strip size by using the arrow keys and press Enter to open the options menu. Utilize the arrow keys to select the desired strip size and pressEnter to save the value.
RAID 1 is set at the default strip size value of 128k and cannot be modified.
Select the volume capacity and pressEnter. The default value will be displayed as the maximum capacity available with the drives selected. The value is calculated in bytes, for example a 700GB drive would use the following math: 700 x 1024 = 716000 bytes.
Unless specifically selected, the default volume capacity will be 95% of the available space. This is to support disk coercion.
Select the option Create Volume. This will create the RAID volume using the configuration set in previous steps. The user will then be returned to the Intel® Virtual RAID on CPU configuration menu and the newly created RAID volume will be listed just below the header Intel® VROC Managed Volumes. Other drives or unused portions of drives will be listed under the header Non-RAID Physical Disks. These may be used to create additional RAID volumes.
Press the ESC key to exit.PressESC again, the following message will be shown: Changes have not saved. Save changes and exit? Press ‘Y’ to save and exit, ‘N’ to discard and exit, ‘ESC’ to cancel”. Press the Y key to save and exit. Not saving at this time will discard the changes made, including all changes and configuration settings for the RAID array.
To save and reboot, in order to begin the operating system installation, press the ESC key to return to the main menu. Select the option Reset to reboot the system back to the boot menu.
Volume Initialization
For the RAID levels 1, 5 and 10 the system will not automatically initialize these volumes via UEFI. This will need to be accomplished once the operating system has been installed.
Installing Windows* Server on a RAID Volume
With RAID boot volumes through Intel® VROC, additional drivers are required in order to properly install a Windows* operating system. This is a brief guide to show the slight difference in order to introduce the appropriate F6 drivers to utilize for BIOS created RAID volume as a system disk.
Assumptions Made
Intel® VMD has been configured and enabled.
Intel® VROC has been utilized and the RAID volume has been created.
During the Windows* installation process, click on the option Load Driver.
Windows* Setup Screen
Click on the option Browse.
Navigate to where the correct F6 driver is located. The driver to load will be one of the following:
iaStorE drivers are for SATA and sSATA drives.
iaVROC drivers are for NVMe* drives (when attached to the Intel® VMD controller).
iaRNVMe is the driver designated for Intel platforms that do not support Intel® VMD technology.
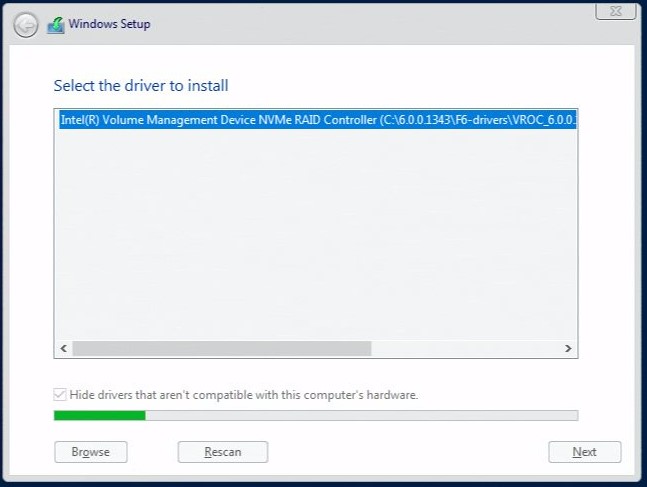
Available F6 Drivers
Highlight the selected driver and click on the OK option to install. It requires several minutes to complete the installation of the selected driver.
F6 Driver Installation
The RAID volume should now appear once the driver has installed. Select the volume and proceed with the operating system installation for Windows* as normal. If the volume does not immediately appear, use the Refresh option to rescan the system for the RAID volume and proceed. The order of drives shown in the list is not fixed when multiple drives and RAID volumes are present in the system.
RAID Volume Ready for Operating System Installation