Environment
Operating System
Intel® Optane™ memory is a system acceleration solution that uses Intel® Optane™ memory media, along with the Intel® Rapid Storage Technology (Intel® RST) driver to improve system performance.
This guide is focused on how to troubleshoot issues with the Intel® Optane™ memory M series.
| Before you continue reading |
|
Prior to enabling Intel® Optane™ memory, there are two main configurations to be done. The first one is at the BIOS level and the second one is at the OS level. In a similar way, the troubleshooting process has to be focused on these two parts.
Troubleshooting at the BIOS level
Troubleshooting issues with Intel® Optane™ memory at the BIOS level will vary from vendor to vendor as they don't have the same exact settings, locations, and configurations. They could also have special features that other vendors don't have. The best recommendation is to contact the vendor for specific BIOS configuration help.
The vendors listed below certify Intel® Optane™ memory-ready motherboards. Check the website for your specific motherboard model:
Click or the topic for details:
BIOS update
The first detail to check is the BIOS version. It may be possible that the current BIOS version doesn't include the support for the module, especially the Intel® RST pre-OS UEFI driver version 15.x or later.
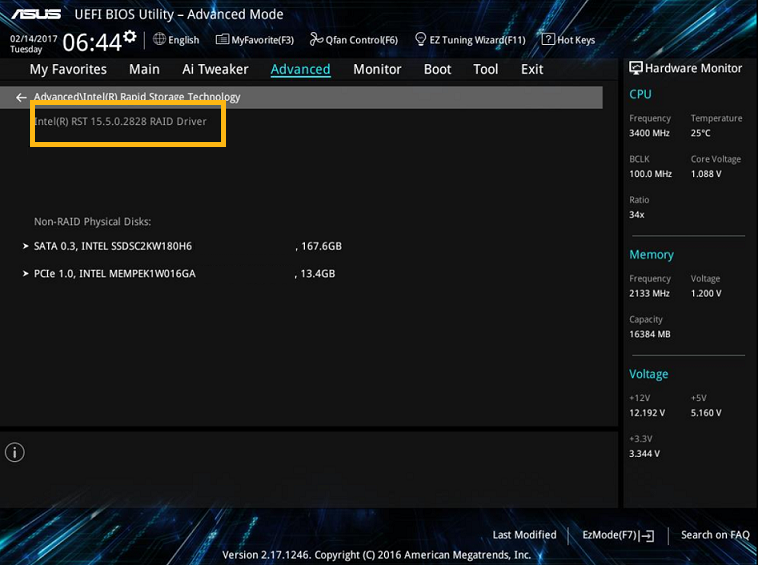
Contact your motherboard manufacturer to confirm you're using the latest BIOS version. It may be also possible that the motherboard used doesn't support Intel® Optane™ memory. Either way, this information must be confirmed directly with the motherboard vendor.
M.2 and SATA ports
Another possible root cause of issues is the M.2 port used to connect Intel® Optane™ memory, and the SATA drives your system includes. It's usual that some M.2 and SATA ports share data lines, so only one can be used at a time. It could also be possible that there's only one M.2 port in the motherboard designed to support the module.
Consider any of those scenarios before going forward on troubleshooting issues with the module because the hardware connection isn't correct.
| Note | The hardware connection of Intel® Optane™ memory and motherboard varies by vendor, as well as any settings. Contact your motherboard vendor and consult your motherboard's manual to confirm how to properly connect the module. |
BIOS settings
Before using Intel® Optane™ memory, the BIOS must be configured correctly. The BIOS settings vary by vendor. However, there are some common settings that you can check and confirm in your motherboard's BIOS:
| Notes |
|
- SATA mode: The SATA mode in the BIOS has to be set to Intel® RST mode. This option may appear as Intel® RST premium with Intel® Optane™ or a similar name. Once this option is set, there might be another option for the M.2 port where the module is connected. If this option is visible, it should be enabled for RAID support.
- UEFI mode: There are two modes for your BIOS: UEFI and Legacy. The BIOS must be configured to work in UEFI mode. Legacy mode doesn't support Intel® Optane™ memory.
- Compatibility Support Module (CSM): The Compatibility Support Module (CSM) is a component of the UEFI firmware that provides legacy BIOS compatibility. This option must be disabled.
Module not recognized in BIOS
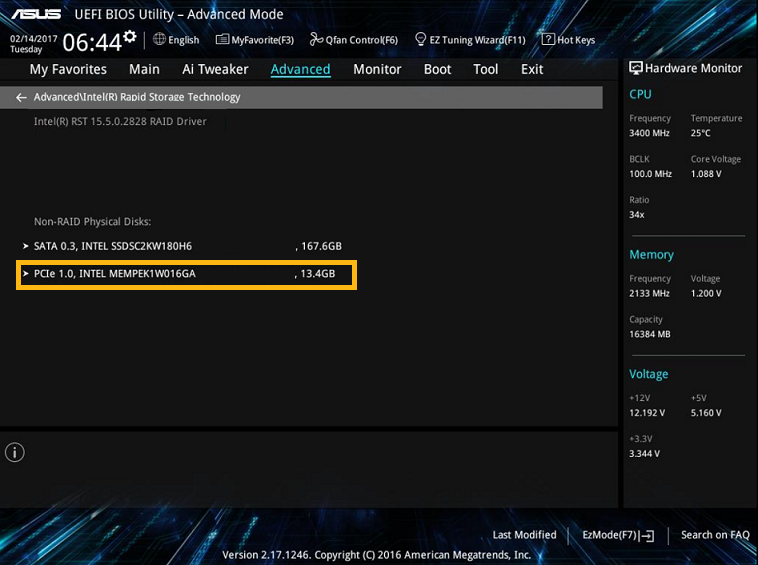
Even if Intel® Optane™ memory hasn't been enabled yet, it should appear in the BIOS as any other device connected to the motherboard. Confirm the M.2 port used is the correct one and there aren't conflicts with other SATA ports. If the module isn't visible, the module may be damaged.
It's important to check this detail first, as it may save time during the troubleshooting process.
How to check the Intel® Optane™ memory appears in BIOS
The specific location of the module in the BIOS varies by vendor. But in general, it should be located under Peripherals, probably under the Intel(R) Rapid Storage Technology option. There you can see a list of the drives in your system. Intel® Optane™ memory should be included in the list and it may appear as INTEL MEMPEK.
Resetting module to factory settings
| Note | This process may cause data issues. Back up your data before following this process. |
Depending on the vendor and the BIOS version, it's possible to reset Intel® Optane™ memory to its factory settings. This option is useful in case the module was previously paired with a SATA drive and then removed from the system without first being disabled from the application.
The specific location or the availability of this option in the BIOS varies by vendor. In general, it may be located under Peripherals, probably under the Intel(R) Rapid Storage Technology option. In this section, Intel® Optane™ memory should be listed in the system along with the other drives connected. An option called Reset-to-non-Optane or something similar should be visible here or after entering the Intel® Optane™ memory option.

Specific vendor instructions
As mentioned before, the BIOS configuration varies by vendor. The information above can be used for general troubleshooting, but for specific settings, contact your motherboard vendor. You can also check the list below with specific set-up guides developed by some vendors:
Troubleshooting at OS level
Troubleshooting issues with Intel® Optane™ memory at the OS level are usually related to how the SATA drive to be accelerated by the module has been set up in the system.
OS version
Intel® Optane™ memory is supported under Windows® 10 64-bit and Windows 11 64-bit (8th Generation platforms and later only) . Even if other settings are properly configured, if the OS version is a different one, the module can't be set up. The OS version can be checked by following these steps:
- Press the Windows key + r, and type MSINFO32.EXE in the dialog box that will appear.
- Press Enter. The System Information window will appear with details about the system, including the OS version.
| Note | The System Information window includes more details about the current system configuration. It's possible to check as well if the system is configured in UEFI mode under System Summary > BIOS Mode. |
Format type and Partition style
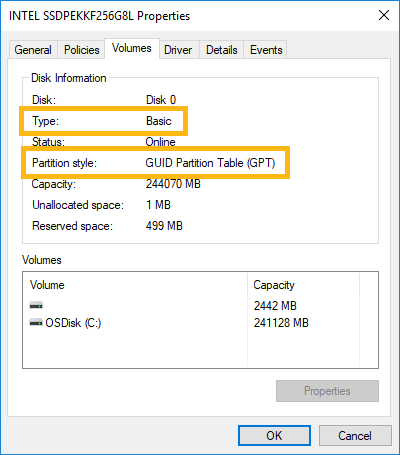
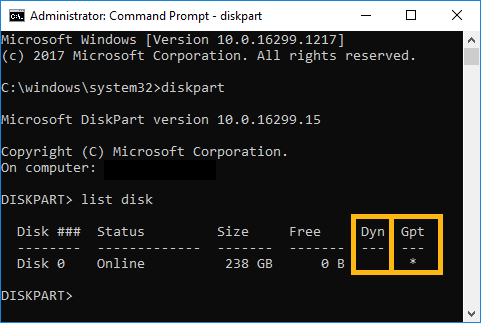
Drives can use two format types: Basic and Dynamic. The only supported format type is Basic, so if the drive is formatted as Dynamic, the Intel® Optane™ memory won't support it.
In a similar way, there are two possible partition styles the drive could be configured as: MBR or GPT. The only supported partition is GPT, so if the drive is formatted as MBR, Intel® Optane™ memory won't support it.
How to check the format type and partition style
There are different ways to check the current format type and partition style of the drives in your system. Below are two methods to check it.
Method #1: Disk Management
- Press the Windows key + x, and select the Disk Management option from the menu. You'll be able to see all disks in your system. If Intel® Optane™ memory is properly installed and it's not enabled yet, you'll see it here as well.
- On any disk listed, right-click and select Properties. The Properties window will pop up.
- Select the Volumes tab to check the format type and partition style of the drive selected.
Method #2: Diskpart
- Open your Command Prompt as Administrator.
- Run the command diskpart. You'll enter in Diskpart environment.
- Run the command list disk. This command will list all the drives currently connected and recognized in your system. If Intel® Optane™ memory is properly installed and it's not enabled yet, you'll see it here as well. The format type and partition style are also shown in this list.
How to change the partition style
| Note | This process may cause data issues. Back up your data before following this process. |
The partition style is defined when you install the OS in the drive, or when the drive is initialized after formatting it. This means that to change the partition style, the drive has to be formatted (low-level format recommended). Therefore it's highly recommended that you back up your data before performing this action.
A low-level format can be done following the information in Available Tools to Run a Low-Level Format or Secure Erase on Intel® Optane™ Solid State Drives.
Alternatively, there's a Windows* tool that can be used to make the conversion without the need of formatting the drive. The tool is called MBR2GPT.EXE. The process of using MBR2GPT.EXE is described in a Microsoft* article.
Unallocated space
One of the requirements to pair Intel® Optane™ memory with the SATA drive is to reserve a portion of unallocated space at the end of the booting drive. This unallocated space should be at least 5 MB. It should be located at the very end of the other partitions as shown below.
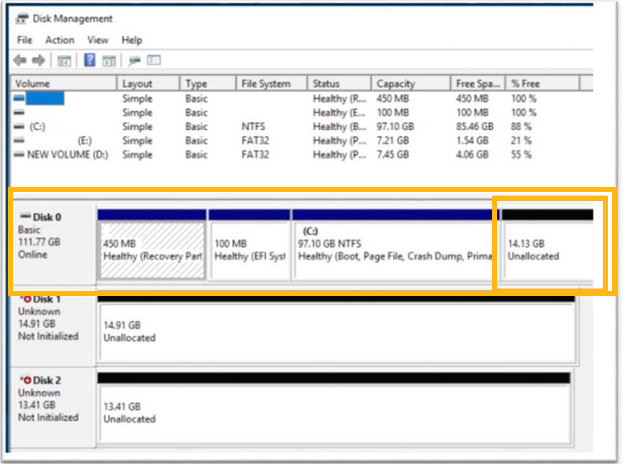
How to reserve the unallocated space
| Note | This process may cause data issues. Back up your data before following this process. |
There are different ways to reserve a portion of the disk space as unallocated. The recommended one is to reserve this space when the OS is installed. This way, everything will be set up correctly during the OS installation.
Another way is to create this space from Disk Management as follows:
- Press the Windows key + x, and select the Disk Management option from the menu. You'll be able to see all disks on your system. If Intel® Optane™ memory is properly installed and it's not enabled yet, you'll see it here as well.
- Shrink the partition at the end of the drive. Right-click on the partition of the system OS drive and select Shrink Volume. If this option isn't available, the partition may not be shrinkable or there may not be space to allocate.
There are also third-party tools that can help to create this space in the drive. For further details refer to the article Unsupported System Drive: Last Partition Unable to Resize Error.
Intel® RST driver
Intel® Optane™ memory requires the Intel® RST driver to work and it must be recognized properly. See the following article to determine what driver is best for your platform, Software and Platform support for Intel Optane Memory
Depending on the driver version, one of the following applications will be used to manage and setup Intel® Optane Memory
- Intel® Optane™ Memory and Storage Management
- Intel® Optane Memory User Interface
- Intel® Rapid Storage Technology User Interface
If the Intel® RST driver isn't installed, you may be able to see Intel® Optane™ memory in the system. But it can't be set up, as it's not being recognized properly. Check the Device Manager to see if Intel® Optane™ memory is being recognized correctly.
| Note | Once Intel® Optane™ memory is enabled and paired with the SATA drive, it won't be visible in Device Manager. |
To open Device Manager, press the Windows key + x, and select the Device Manager option from the menu.
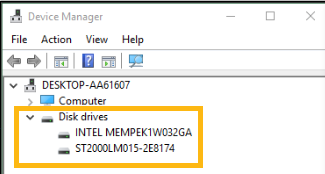
How to install the Intel® RST driver
The Intel® RST driver will be installed once you install one of the applications noted earlier
If you get an error that prevents you from installing the application, make sure you don't already have one of these applications in your system, or any old version already installed. If so, uninstall it and re-install the newer version.
Data in the Intel® Optane™ memory
Intel® Optane™ memory is a device that pairs with a SATA drive and accelerates it. This means that the module itself must not have any partitions or volumes in it. The entire module's space should be unallocated before enabling it.
Disk Management can be used to check the module's space and confirm it's unallocated. To open Disk Management, press the Windows key + x, and select the Disk Management option from the menu. You'll be able to see all disks in your system, including Intel® Optane™ memory.
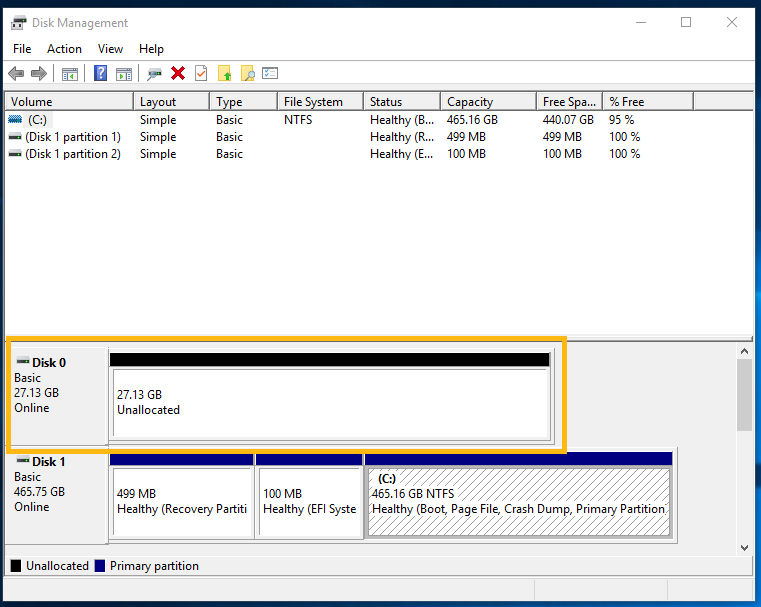
How to clean Intel® Optane™ memory
| Note | This process may cause data issues. Back up your data before following this process. |
If Intel® Optane™ memory has partitions, or in general if it has any data for any reason (such as metadata from a previous configuration), you can clean the module's data from Diskpart by following these steps:
- Open your Command Prompt as Administrator.
- Run the command diskpart. You'll enter the Diskpart environment.
- Run the command list disk. This command will list all the drives currently connected and recognized in your system. If Intel® Optane™ memory is properly installed and it's not enabled yet, you'll see it as well.
- Run the command select disk <index number>. Use the index number associated to the module.
- Run the command clean all to start the cleaning process. Make sure you selected Intel® Optane™ memory and no other drive by mistake because this process will delete all data in the disk.
- Once the process is complete, you can confirm in Disk Management that the module's space is unallocated.
Gathering data
| End of Interactive Support | The products Intel® Optane™ Memory Series and Intel® Optane™ Memory M10 Series reached their End of Interactive Support (EOIS) on 2024. Intel no longer provides interactive support, including technical support provided through web tickets, telephone, chat, community support forums, or email inquiries. The information below is for reference purposes only as they can help you troubleshoot issues with Intel® Optane™ memory on your own. Learn more in Announcement: End-of-Interactive-Support (EOIS) for Intel® Optane™ Memory Series. |
You can always contact Intel Customer Support for further help regarding Intel® Optane™ memory issues. In order to speed up the issue resolution and the troubleshooting process, we recommend that you provide the following information.
BIOS configuration
It's important to know the current BIOS settings to identify any misconfiguration. You can take screenshots of the BIOS settings and share them with the support team. Check the BIOS settings above to know which information screenshots you should take.
You can take screenshots of the BIOS settings by pressing F12 or the Print Screen button. This will require a USB Flash memory connected to the computer because the images are saved there automatically.
System configuration
There are different sources of information that you can provide to the support team to speed up the troubleshooting process. These sources are described below.
System details
In order to confirm the system meets the requirements and it's configured correctly (such as UEFI mode, SATA drive, OS version) you need to generate a text file with your system details. This file can be generated using the Intel® System Support Utility (SSU).
This tool will scan your system and report back system information, motherboard details, storage information, and other details about your system. The tool will allow you to export the information in a text file that you can share with the support team.
| Note | The Intel® System Support Utility (SSU) won't collect any personal data in your system. |
Disk Management
From Disk Management, you can see which drives your system can recognize, their partitions and positions in the drive. This information is used to determine if your SATA drive is formatted correctly, or if it's missing the 5 MB of unallocated space at the end. This information can be also used to determine if Intel® Optane™ memory is recognized correctly by the system.
To open Disk Management, press the Windows key + x, and select the Disk Management option from the menu. Take a screenshot of this window and share it with the support team.
Diskpart output
Diskpart is another Windows tool that can monitor the drives in your system, including Intel® Optane™ memory if it's not paired yet with any drive. You can easily see from here if the drives are using the correct partition style. You can take a screenshot of the information shown in Diskpart and share it with the support team.
To open Diskpart and get the information of the drives, follow these steps:
- Open your Command Prompt as Administrator.
- Run the command diskpart. You'll enter the Diskpart environment.
- Run the command list disk. This command will list all the drives currently connected and recognized in your system. If Intel® Optane™ memory is properly installed and it's not enabled yet, you'll see it here as well.
- Take a screenshot of this output.
Intel® Optane™ logs
If you get errors while enabling Intel® Optane™ memory, or while installing the application, there are logs that you can provide to the support team. These log files may include error codes that can be used to identify specific issues and narrow the possible options to fix them.
You can search for the log files in C:\Users\[your user name]\Intel\Logs. You'll find different files such as the ones listed below, you can zip those files and share them with the support team.
- IntelOptaneMemory.log
- IntelRST.log
- OptaneMemoryPinning.log
- OptaneMemoryUI.log
- Change the settings to view 'Hidden' files and add the following log:
- OsDrive>\Users\<User>\AppData\
Local\Packages\AppUp.IntelOpta neMemoryandStorageManagement\LocalState\RSTHSA
- OsDrive>\Users\<User>\AppData\
Detailed description of the issue
Besides the logs and screenshots that you can provide, it's also useful to provide a detailed description of the issue, such as:
- There was any previous configuration with the module
- The module was moved to another system
- The module was removed without being disabled beforehand from the application
- Error messages
- Codes
Such information can be used by the support team to identify possible root causes and narrow the troubleshooting process to those possible options.
Additional resources
There are additional resources that you can check prior contacting Intel Customer Support. These resources include information about known error codes and suggested processes to fix them. You can review them below: