Visible to Intel only — GUID: vfv1553037791246
Ixiasoft
1.1. Supported Devices and Systems
1.2. Power Source Requirements
1.3. Software Requirements and Support
1.4. Installing the Intel® FPGA Download Cable II for Configuration or Programming
1.5. Installing the Intel® FPGA Download Cable II Driver on Windows 7/8/10/11 Systems
1.6. Installing the Intel® FPGA Download Cable II Driver on Linux Systems
1.7. Setting Up the Intel® FPGA Download Cable II Hardware with the Quartus® Prime Software
2.1. Voltage Requirements
2.2. Cable-to-Board Connection
2.3. Intel® FPGA Download Cable II Plug Connection
2.4. 10-Pin Female Plug Signal Names and Programming Modes
2.5. Circuit Board Header Connection
2.6. Operating Conditions
2.7. JTAG Timing Constraints and Waveforms
2.8. Changing the TCK Frequency
Visible to Intel only — GUID: vfv1553037791246
Ixiasoft
3.1. Turn ON/OFF Auto-Adjust Feature
JTAG config command
The JTAG config command can be used to query the JTAG frequency auto-adjust status and turning ON/OFF the feature.
To turn off the JTAG frequency auto-adjust feature, use the following command:
jtagconfig --setparam <cable number> JtagClockAutoAdjust 0
To turn on the JTAG frequency auto-adjust feature, use the following command:
jtagconfig --setparam <cable number> JtagClockAutoAdjust 1
You may use the following command to check if auto-adjust feature is enabled. The expected output is "0" if auto-adjust is disabled and "1" if the auto-adjust is enabled
Jtagconfig --getparam <cable number> JtagClockAutoAdjust
Programmer GUI
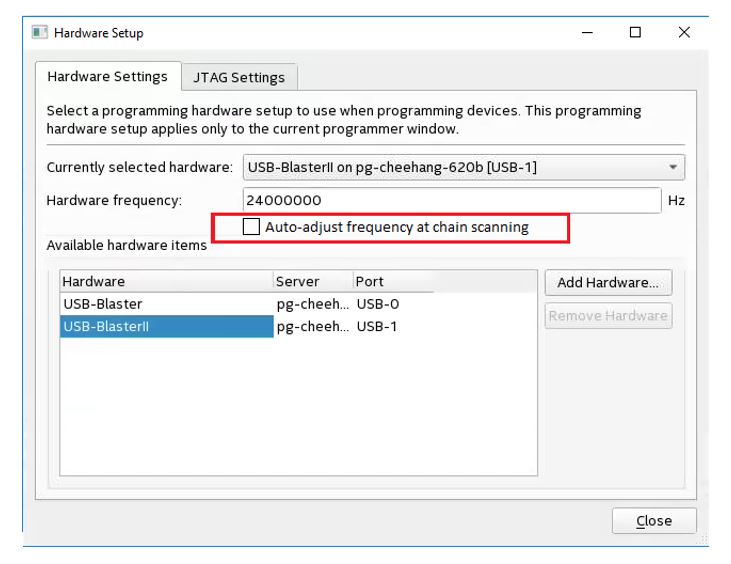
A checkbox is added in the Programmer's "Hardware Setup" dialog box to turn On/Off the frequency adjust feature. The checkbox is enabled when the frequency auto-adjust feature is available . Otherwise, it is greyed out. If the frequency auto-adjust-feature is enabled, new adjusted TCK frequency value will be shown under the message box of the programmer GUI.
Figure 8. Programmer GUI (Hardware Settings → Hardware Settings Tab)

