Migrating Your ISS Eclipse Project to a oneAPI Linux CLI Project
These instructions assume you are going to migrate your Intel® System Studio (ISS) Eclipse* Linux* IoT project to a Linux command-line (CLI) project. This means you are currently using ISS Eclipse and Docker* to build and debug your Linux IoT application and you want to convert that project to one that is built and debugged using Linux CLI tools.
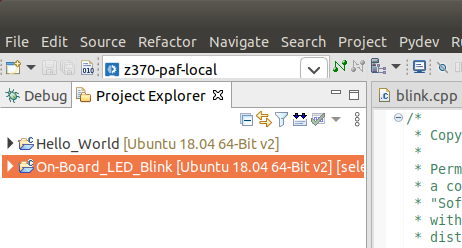
To identify such a project, open the Project Explorer view in Eclipse. An ISS Eclipse project that uses Docker to build and debug a Linux IoT application includes a “decoration” in square brackets after the project name. This “decoration” contains the name of the ISS Docker container that is linked to this project. For example, in the image below, both projects are ISS Eclipse projects and both are linked to the same ISS Docker container. These two projects are linked to a container named Ubuntu 18.04 64-Bit v2 (the colored text surrounded by square brackets after the project name).

Confirm that your project’s Eclipse “managed” build is working
Your ISS Eclipse container project is an Eclipse “managed” project. This means there is no makefile (or cmake file) containing the build commands. In such a project Eclipse manages the compile and link commands directly. To build your project at the command-line you need a build file.
Before proceeding, ensure that your project successfully builds for all configurations (Debug, Release, etc.) you wish to export. A successful “managed” Docker build will generate output in the “CDT Global Build Console” similar to the following, which is based on the “LED Blink” sample:
16:30:29 **** Incremental Build of configuration Debug for project On-Board_LED_Blink ****
Info: Internal Builder is used for build
docker exec -i fc859d8ce7ce30478e4c0420f763a5208c13a6af64377d0423b690ee99205f9b /bin/bash -c "[ -d /workspace/On-Board_LED_Blink/Debug ] || mkdir -p /workspace/On-Board_LED_Blink/Debug && cd /workspace/On-Board_LED_Blink/Debug && [ -d src ] || mkdir -p src && x86_64-linux-gnu-g++ -I/usr/include -I/usr/include/c++ -I/usr/include/c++/5 -I/usr/include/c++/5/backward -I/usr/include/c++/7 -I/usr/include/c++/7.4.0 -I/usr/include/mraa -I/usr/include/upm -I/usr/include/x86_64-linux-gnu -I/usr/include/x86_64-linux-gnu/c++/5 -I/usr/lib/gcc/x86_64-linux-gnu/5/include -I/usr/lib/gcc/x86_64-linux-gnu/5/include-fixed -I/usr/lib/gcc/x86_64-linux-gnu/7 -I/usr/lib/gcc/x86_64-linux-gnu/7/bits -I/usr/lib/gcc/x86_64-linux-gnu/7/include -I/usr/lib/gcc/x86_64-linux-gnu/7/include-fixed -I/usr/lib/gcc/x86_64-linux-gnu/7.4.0 -I/usr/lib/gcc/x86_64-linux-gnu/7.4.0/bits -I/usr/local/include -O0 -g3 -Wall -c -fmessage-length=0 --sysroot= -c -ffunction-sections -fdata-sections -o src/blink.o ../src/blink.cpp"
docker exec -i fc859d8ce7ce30478e4c0420f763a5208c13a6af64377d0423b690ee99205f9b /bin/bash -c "[ -d /workspace/On-Board_LED_Blink/Debug ] || mkdir -p /workspace/On-Board_LED_Blink/Debug && cd /workspace/On-Board_LED_Blink/Debug && x86_64-linux-gnu-g++ --sysroot= -o On-Board_LED_Blink src/blink.o -lmraa"
NOTE: Keep a copy of the “managed” build output in case you encounter problems with the export process. It is a useful reference of the compile and link options used to build your project.
Most of the artifacts resulting from the managed build can be inspected directly, inside the Docker build container. Based on the managed build example above, the following command gets you inside the Docker container, where you can cd to the /workspace directory, inside the Docker container, to see all the files that were generated by the Docker “managed” build:
docker exec -t -i fc859d8ce7ce30478e4c0420f763a5208c13a6af64377d0423b690ee99205f9b /bin/bash
NOTE: you must add the -t option in order to open an “interactive” session. Type exit to close the interactive Docker session.
Exporting a makefile from your Eclipse “managed” build
NOTE: Your project should be in a build-able state before you follow these instructions. If your project is not building properly the next steps may result in exporting incorrect makefiles.
To make Eclipse generate a makefile for your project, you must change your project’s properties from an Eclipse “internal builder” project to an “external builder” project (both builders are “managed build” projects, meaning managed by Eclipse). Once your project is configured as an “external builder” project, performing a build will auto-generate a makefile that can then be used to build your application at the command-line, outside of Eclipse.
Open the project’s virtual “Binaries” folder and delete the binaries.
Delete the “Debug” and/or “Release” folder (and any custom configurations).
From the “Project” menu, choose “Properties” and select the “C/C++ Build” section.
Change the “Builder type:” pull-down and select “External builder” as shown below.
Make sure the three checkboxes in your properties dialog match the image below.
Use the “Apply and Close” button to save the changes.

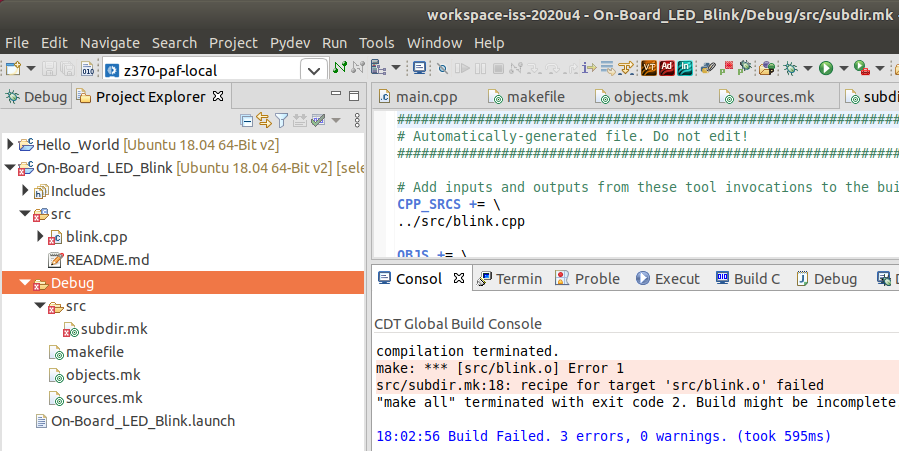
Return to your project and perform a build (e.g., Project > Build Project). The build will fail, but it will generate a master makefile inside your project’s currently selected configuration folder (Debug, Release, etc.).
For example, if your Eclipse project is configured as a “Debug” build then you should see a Debug folder in the project explorer tree that contains an auto-generated master makefile for that configuration, as well as supporting auto-generated makefiles (*.mk) that are referenced by the master makefile.

Inside your build configuration folder (e.g., Debug or Release) you should see at least the following three makefiles:
makefile
objects.mk
sources.mk
If your project includes sources inside of folders you should also find additional makefiles, such as a subdir.mk file inside the source folders. The precise list of makefiles you find will depend on the structure and complexity of your project.
NOTE: The auto-generated build files fail because the build instructions inside those makefiles include references to the docker exec command (see the previous section), which do not work because Eclipse attempts to run the makefile inside the docker build container.
Those problem commands inside the auto-generated makefiles need to be changed to remove the docker exec references, as well as the /workspace folder references, in order to create a set of makefiles that can be used at the CLI on your local Linux build system. The problem lines are very similar to those emitted in the console during a successful “internal managed” Docker build.
NOTE: Do not be a alarmed by the Automatically-generated file. Do not edit! warnings at the top of the makefiles that were generated by the steps above. As long as you are using this process to export these makefiles for use without Eclipse, you can ignore those warnings. They only apply if you plan to continue to use Eclipse to manage and build your project.
Using the example above, the text inside the makefiles needs to be changed from this:
docker exec -i fc859d8ce7ce30478e4c0420f763a5208c13a6af64377d0423b690ee99205f9b /bin/bash -c "[ -d /workspace/On-Board_LED_Blink/Debug ] || mkdir -p /workspace/On-Board_LED_Blink/Debug && cd /workspace/On-Board_LED_Blink/Debug && x86_64-linux-gnu-g++ -I/usr/include -I/usr/include/c++ -I/usr/include/c++/5 -I/usr/include/c++/5/backward -I/usr/include/c++/7 -I/usr/include/c++/7.4.0 -I/usr/include/mraa -I/usr/include/upm -I/usr/include/x86_64-linux-gnu -I/usr/include/x86_64-linux-gnu/c++/5 -I/usr/lib/gcc/x86_64-linux-gnu/5/include -I/usr/lib/gcc/x86_64-linux-gnu/5/include-fixed -I/usr/lib/gcc/x86_64-linux-gnu/7 -I/usr/lib/gcc/x86_64-linux-gnu/7/bits -I/usr/lib/gcc/x86_64-linux-gnu/7/include -I/usr/lib/gcc/x86_64-linux-gnu/7/include-fixed -I/usr/lib/gcc/x86_64-linux-gnu/7.4.0 -I/usr/lib/gcc/x86_64-linux-gnu/7.4.0/bits -I/usr/local/include -O0 -g3 -Wall -c -fmessage-length=0 --sysroot="" -c -ffunction-sections -fdata-sections -MMD -MP -MF"$(@:%.o=%.d)" -MT"$(@)" -o "$@" "$<""
docker exec -i fc859d8ce7ce30478e4c0420f763a5208c13a6af64377d0423b690ee99205f9b /bin/bash -c "[ -d /workspace/On-Board_LED_Blink/Debug ] || mkdir -p /workspace/On-Board_LED_Blink/Debug && cd /workspace/On-Board_LED_Blink/Debug && x86_64-linux-gnu-g++ --sysroot="" -o "On-Board_LED_Blink" $(OBJS) $(USER_OBJS) $(LIBS)"
to this:
x86_64-linux-gnu-g++ -I/usr/include -I/usr/include/c++ -I/usr/include/c++/5 -I/usr/include/c++/5/backward -I/usr/include/c++/7 -I/usr/include/c++/7.4.0 -I/usr/include/mraa -I/usr/include/upm -I/usr/include/x86_64-linux-gnu -I/usr/include/x86_64-linux-gnu/c++/5 -I/usr/lib/gcc/x86_64-linux-gnu/5/include -I/usr/lib/gcc/x86_64-linux-gnu/5/include-fixed -I/usr/lib/gcc/x86_64-linux-gnu/7 -I/usr/lib/gcc/x86_64-linux-gnu/7/bits -I/usr/lib/gcc/x86_64-linux-gnu/7/include -I/usr/lib/gcc/x86_64-linux-gnu/7/include-fixed -I/usr/lib/gcc/x86_64-linux-gnu/7.4.0 -I/usr/lib/gcc/x86_64-linux-gnu/7.4.0/bits -I/usr/local/include -O0 -g3 -Wall -c -fmessage-length=0 --sysroot="" -c -ffunction-sections -fdata-sections -MMD -MP -MF"$(@:%.o=%.d)" -MT"$(@)" -o "$@" "$<"
x86_64-linux-gnu-g++ --sysroot="" -o "On-Board_LED_Blink" $(OBJS) $(USER_OBJS) $(LIBS)
NOTE: Do not forget to remove the extra double-quote character at the end of each line and ensure that you do not replace the tab character at the beginning of each line with space characters. The make command can be very picky about tabs versus spaces.
In this example, the first problem line (above) was located inside a %.o:%.cpp make rule in a subdir.mk file. This rule provides the compile build instructions for the sources in that folder. The second problem line in the example above was located inside the top-level makefile which provides the link step instructions.
NOTE: The complexity of your project will determine how many of the makefiles generated by Eclipse must be updated before you can use them to build your project at the Linux command-line.
Once you have made the appropriate edits to your auto-generated makefiles, you can try building your project on the command-line (but only on a Linux system). For example, if you exported the Debug configuration:
$ cd path/to/eclipse/workspace-folder
$ cd project-folder-name/Debug
$ make
Using the example above, the following is what you would see when performing a build of this exported project, at the CLI, using the make command:
$ cd ~/Desktop/workspace-iss-2020u4
$ cd On-Board_LED_Blink/Debug
$ make clean
rm -rf  ./src/blink.o  ./src/blink.d  On-Board_LED_Blink

$ make
Building file: ../src/blink.cpp
Invoking: GNU 64-bit G++ Compiler
x86_64-linux-gnu-g++ -I/usr/include -I/usr/include/c++ -I/usr/include/c++/5 -I/usr/include/c++/5/backward -I/usr/include/c++/7 -I/usr/include/c++/7.4.0 -I/usr/include/mraa -I/usr/include/upm -I/usr/include/x86_64-linux-gnu -I/usr/include/x86_64-linux-gnu/c++/5 -I/usr/lib/gcc/x86_64-linux-gnu/5/include -I/usr/lib/gcc/x86_64-linux-gnu/5/include-fixed -I/usr/lib/gcc/x86_64-linux-gnu/7 -I/usr/lib/gcc/x86_64-linux-gnu/7/bits -I/usr/lib/gcc/x86_64-linux-gnu/7/include -I/usr/lib/gcc/x86_64-linux-gnu/7/include-fixed -I/usr/lib/gcc/x86_64-linux-gnu/7.4.0 -I/usr/lib/gcc/x86_64-linux-gnu/7.4.0/bits -I/usr/local/include -O0 -g3 -Wall -c -fmessage-length=0 --sysroot="" -c -ffunction-sections -fdata-sections -MMD -MP -MF"src/blink.d" -MT"src/blink.o" -o "src/blink.o" "../src/blink.cpp"
Finished building: ../src/blink.cpp

Building target: On-Board_LED_Blink
Invoking: GNU 64-bit G++ Linker
x86_64-linux-gnu-g++ --sysroot="" -o "On-Board_LED_Blink"  ./src/blink.o   -lmraa
Finished building target: On-Board_LED_Blink
Because the build tools were located inside a Docker container, it is possible that attempting to build on your local Linux build system (or Windows or macOS) will fail. That is likely due to the fact that you do not have the appropriate C/C++ build tools (gcc or icc, etc.) on your CLI build system. See the next section for help.
NOTE: You can also use the following find/sed commands to fix the problem docker exec lines in the exported makefiles (they are aligned so you can see that they are identical, other than the names of the makefiles being searched):
find . -type f -iname     "*.mk" -exec sed -E -i~org "s:^$(printf '\t')docker exec -i [0-9a-f]* \/bin\/bash -c .* (x86.*-linux-gnu-g++.*)\"$:$(printf '\t')\1:" {} \;
find . -type f -iname "makefile" -exec sed -E -i~org "s:^$(printf '\t')docker exec -i [0-9a-f]* \/bin\/bash -c .* (x86.*-linux-gnu-g++.*)\"$:$(printf '\t')\1:" {} \;
Make sure to “export” makefiles for all of the build configurations in your Eclipse project. Most projects have a “Debug” and a “Release” configuration. Also, note that there is no project-level makefile in the exported ISS Eclipse project folder. You can add one of your own, or add the following build.sh script to the top-level of your project to help manage building a specific “configuration”:
#!/bin/sh
# First argument names the folder in which to run make.
# Additional optional arguments are passed to the make command.
# For example: build.sh Debug <additional make options>

cd "$1"
shift
make "$@"
Moving your CLI project to a Linux development system
Because the ISS Eclipse Docker build environment is in a Linux container, regardless of your development host OS, the exported makefile build instructions will require a Linux development system to build your project at the command-line (CLI). This means that if you have been using a Windows* or macOS* machine as your development host, you must copy your CLI project to an appropriate Linux machine, along with the exported and corrected makefiles, and use that Linux machine and the make command to perform project builds. Likewise, if your Eclipse host was a Linux machine, it makes sense to move the project and makefiles to a location outside of the Eclipse workspace, to insure you do not accidentally write over your CLI project within Eclipse.
If your project links to the mraa and/or upm libraries you also need to install those onto your Linux CLI build system. Those libraries were pre-loaded inside the ISS Eclipse Docker container and are not typically installed on a standard Linux distribution. Instructions for installing the mraa/upm libraries can be found here:
NOTE: If you customized your Eclipse Docker build environment(s) with other libraries you may have to add those libraries to your new Linux CLI build system.
See the Get Started with the Intel oneAPI IoT Toolkit for Linux online documentation for more hints on what to install on your Linux CLI system for C/C++ development.
Finally, do not forget to install any Intel oneAPI tools required for your project onto your Linux CLI build system (VTune, ICC, MKL, etc.). The typical development tools configuration for most ISS Eclipse IoT applications is taken care of with the “Get Started…” instructions referenced above. Most of the ISS IoT samples only require the gcc build tools and the mraa/upm libraries. If your application requires more than those common tools you will need to install them onto your Linux CLI build system.
See Also
SSH Connection: Password-less Access to a Remote Linux Target Device
Other names and brands may be claimed as the property of others.