Import an ISS Eclipse Project into Eclipse for C/C++ Developers
The following instructions assume you have already exported your existing Intel® System Studio (ISS) IoT project into an Intel® oneAPI CLI (command-line) project, as described in the document titled Migrating Your ISS Eclipse Project to a oneAPI CLI Project
That export, out of the custom version of Eclipse* that is shipped with Intel ISS, resulted in a set of makefiles that will build your ISS project, using the make command at a Linux command-line.
You can now import the ISS IoT project you exported into the standard Eclipse IDE for C/C++ Developers (aka Eclipse CDT) development environment, as an Eclipse “makefile” project. You might want to do this in order to take advantage of the Eclipse C/C++ source code debugger, as well as the Eclipse C/C++ editor’s indexing features (aka IntelliSense).
NOTE: This import into Eclipse is only supported on Linux development systems. The oneAPI Eclipse plugins are only supported on Linux.
Readying your makefile project for Eclipse CDT
Before you import into Eclipse CDT, it is very important that you first clean the exported ISS Eclipse project of Eclipse configuration files. Failure to remove the Eclipse ISS configuration files before importing your project into Eclipse CDT will result in a “limbo” Eclipse project that will not build. Unfortunately, Eclipse provides no useful information as to why the project does not build.
IMPORTANT: Perform the project cleaning steps below before importing your ISS project into your copy of the Eclipse IDE for C/C++ Developers (aka Eclipse CDT).
The following instructions apply to importing into an installation of Eclipse CDT that you downloaded from the Eclipse Foundation site.
Export your ISS IoT Eclipse project per these instructions.
Copy your exported ISS project into your Eclipse CDT workspace folder.
Remove the .settings folder from within your copied ISS export project.
Remove the .project and .cproject folders from your copied ISS export project.
Import your clean copy of the ISS export project into your Eclipse CDT.
Assuming you have successfully exported and built your ISS IoT Eclipse project, at the command-line on a Linux build system (first bullet above), the second, third and fourth bullets above will look something like this:
$ cd path/to/exported-iss-project-folder
$ cp -a ../exported-iss-project-folder path/to/eclipse-cdt/workspace/
$ cd path/to/eclipse-cdt/workspace
$ rm -rf .cproject .project .settings/
The pathnames are fictional in the first three lines above. Substitute your old and new workspace and project folder names for these fictional pathnames (in the cd and cp commands). The final rm command is precisely what you need to type to remove the Eclipse project files located in the exported ISS project that you copied into your new Eclipse CDT workspace folder.
After your project has been cleaned of ISS Eclipse project files, you can safely import it into Eclipse CDT as an “Existing Code as Makefile Project.”
Importing your makefile project into Eclipse CDT
The process of importing your makefile project consists of the following general steps (screenshots and details follow):
Use File > Import… to start importing the exported ISS project.
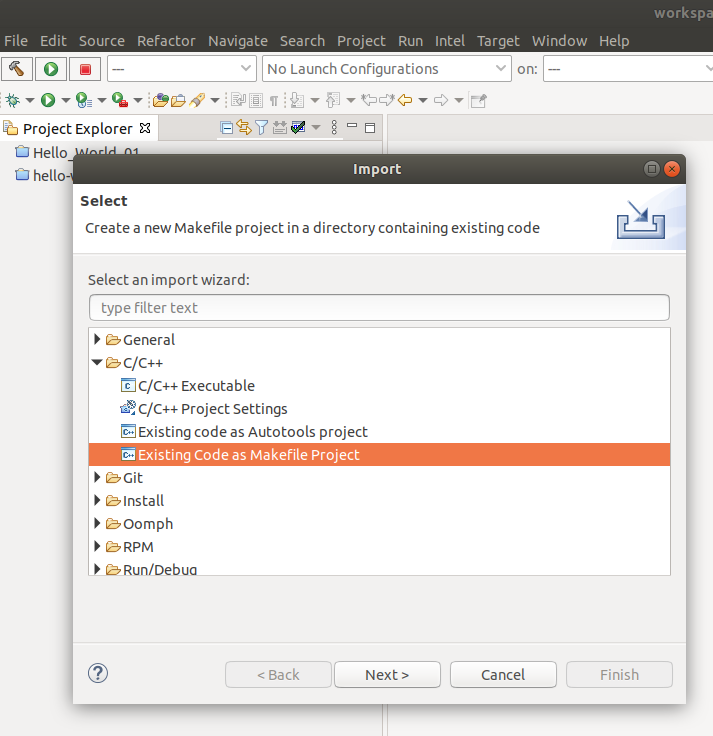
Select Existing Code as Makefile Project in the C/C++ section of the Import dialog.
Browse for the location of your clean exported ISS project folder.
Select the appropriate Toolchain for Indexer Settings option.
In Project > Properties define your build configurations (Debug, Release, etc.).
NOTE: Before you import your makefile project into your copy of Eclipse CDT you may want to install the Intel oneAPI Eclipse plugins. If you are not sure if that has already been done, there is no harm in doing it again.
Use the install-eclipse-plugins.sh script located in the dev-utilities component folder to install the Intel oneAPI Eclipse plugins into the Eclipse CDT where you will be importing your makefile project. That script can be found in this folder: <oneapi-install-dir>/dev-utilities/latest/bin.
Open your copy of Eclipse IDE for C/C++ Developers. DO NOT open and import your project into the custom version of Eclipse included in Intel System Studio.
To confirm that you have a copy of the Eclipse IDE for C/C++ Developers, follow Help > About Eclipse IDE in the Eclipse menu and check the content of the “help about” dialog box. It will clearly say “Eclipse IDE for C/C++ Developers” at the top of the dialog. The Intel System Studio copy of Eclipse will clearly say “Intel® System Studio YYYY Update #” (where YYYY and # indicate the specific ISS release and update).
From the File > Import… menu, choose the Existing Code as Makefile Project wizard in the C/C++ section of the import dialog and proceed with the NEXT> button:
From the New Project dialog, leave the Project Name blank and Browse… to the folder that contains the clean exported ISS project. The name of the folder will automatically be used to fill in the Project Name field. Note that the project folder will NOT be moved or copied inside the current Eclipse CDT workspace, but it will be associated with that workspace. You must also select the Toolchain for Indexer Settings from the list of available compatible toolchains. The screenshot below shows several Intel compiler toolchains, in addition to the standard GNU toolchains. The Intel toolchains will only be present if you installed the Intel oneAPI Eclipse plugins into your copy of Eclipse CDT.
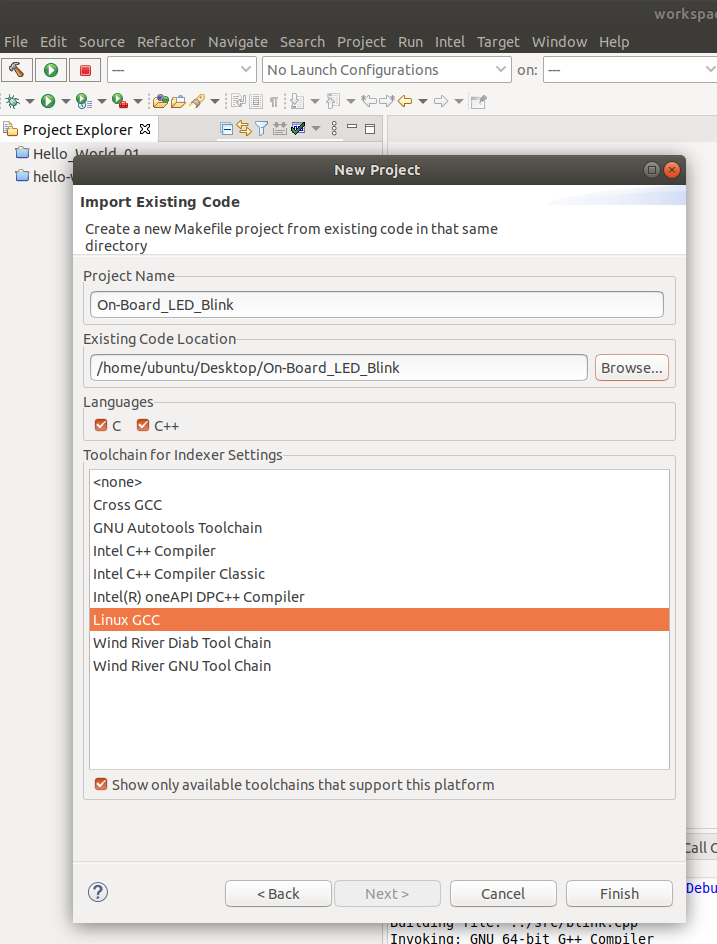
NOTE: Your makefile determines the compiler and compiler options that will be used to build your application. The toolchain selection is used by the Eclipse indexer (aka IntelliSense) feature. If you are not sure which toolchain to select, use the Linux GCC toolchain. You can always change it later in the project C/C++ properties dialog.
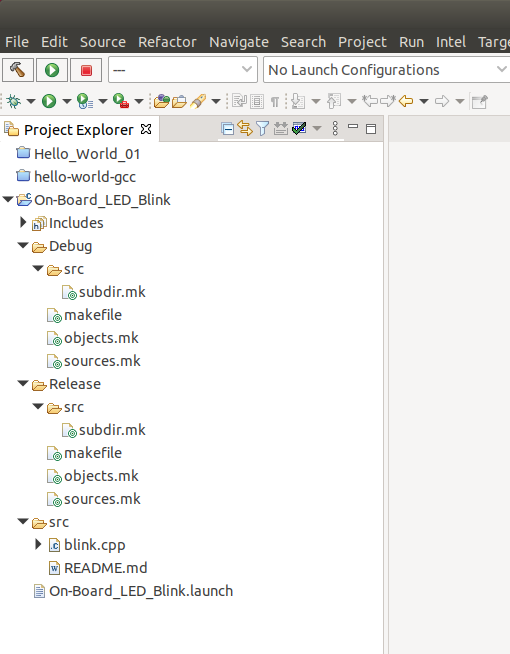
Once imported, your project will appear in the Project Explorer view. In the example shown below, there were two Eclipse configurations as part of this project. Each contains a makefile and supporting *.mk files. The next section explains how to configure your project in Eclipse CDT so it will build all of your project’s configurations (Debug, Release, etc.).
Configuring your imported Eclipse CDT makefile project
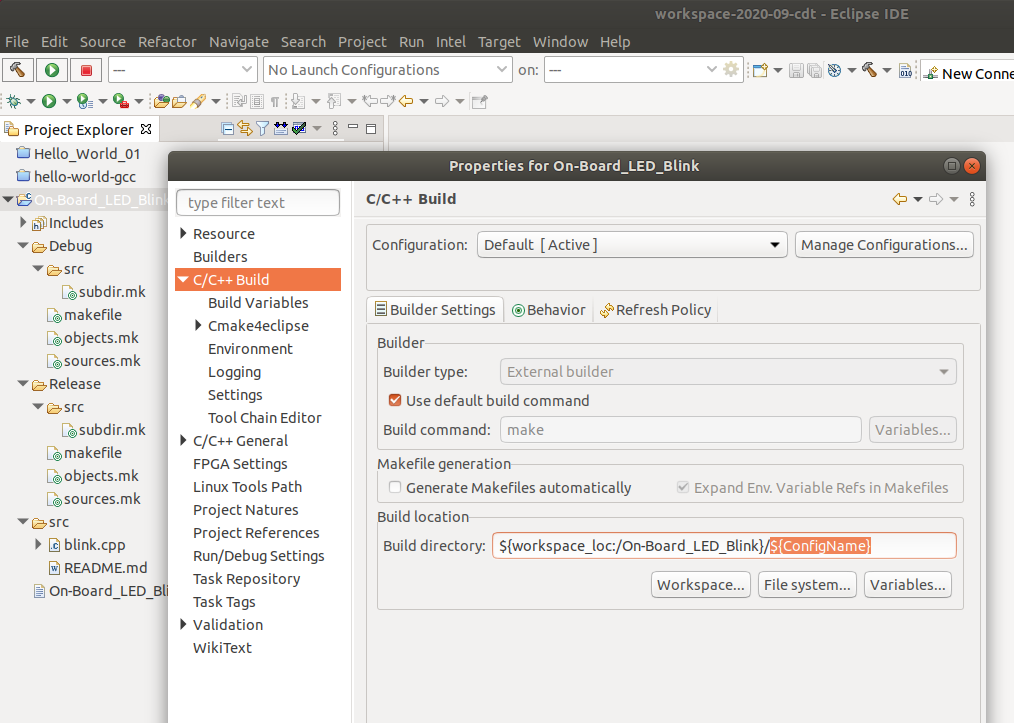
Highlight the newly imported project and use Project > Properties on the Eclipse menu. Select the C/C++ Build section of the Properties dialog. Note that the Configuration: field should be displaying Default [Active]. Add ${ConfigName} to the Build directory: field at the bottom of the dialog, as shown in the image below:
Next, you will create a set of Eclipse build configurations that match your project. The export process resulted in a makefile inside each build configuration folder; where each build configuration folder matches the name of the Eclipse build configuration. The project in this example has a Release configuration folder and a Debug configuration folder, which is typical of most Eclipse projects. You need to make a build configuration for each build configuration folder in your project.
Select the Manage Configurations… button at the upper right of the Properties dialog. Then, select New… in the small dialog box that appears. Finally, in the Name: field (see screenshot below), enter a build configuration name that matches your project layout:
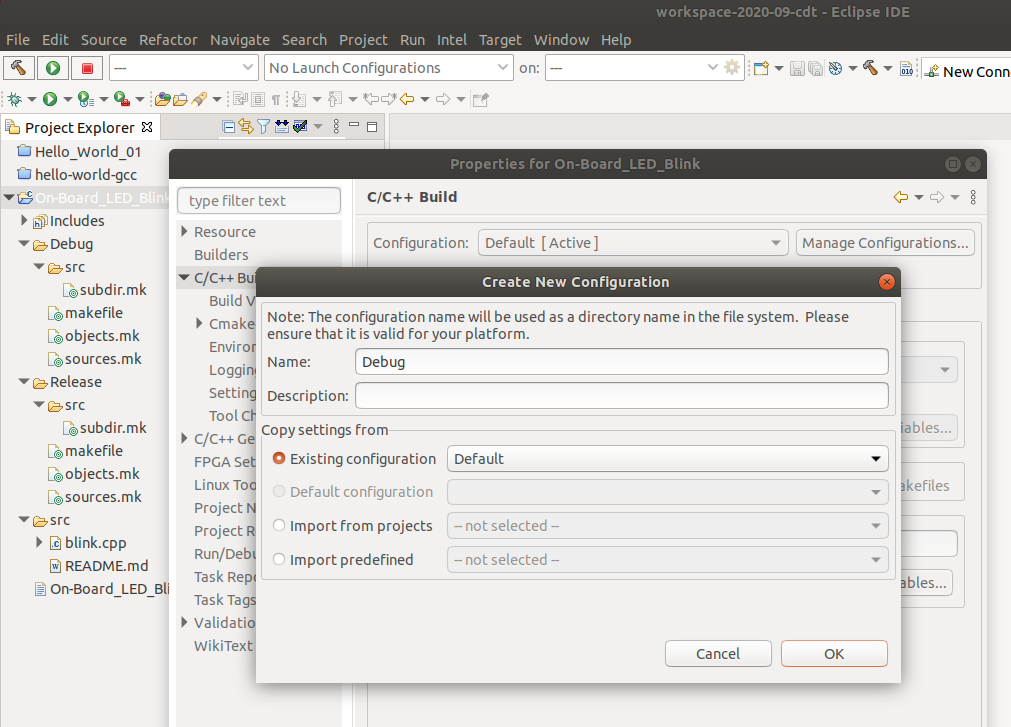
Repeat this process until you have created a build configuration for every top-level folder in your project that contains a makefile. In the example above, that means a Debug and a Release configuration must be created.
You should delete the Default configuration, since you likely do not have a Default build folder that contains a makefile. However, before you delete the Default configuration, set one of your new configurations as the active configuration, by selecting it and clicking the Set Active button. Then you can safely select the Default configuration and push the Delete button.
NOTE: Do not delete the currently active configuration, it will cause Eclipse to crash and your project configuration work will not be saved.
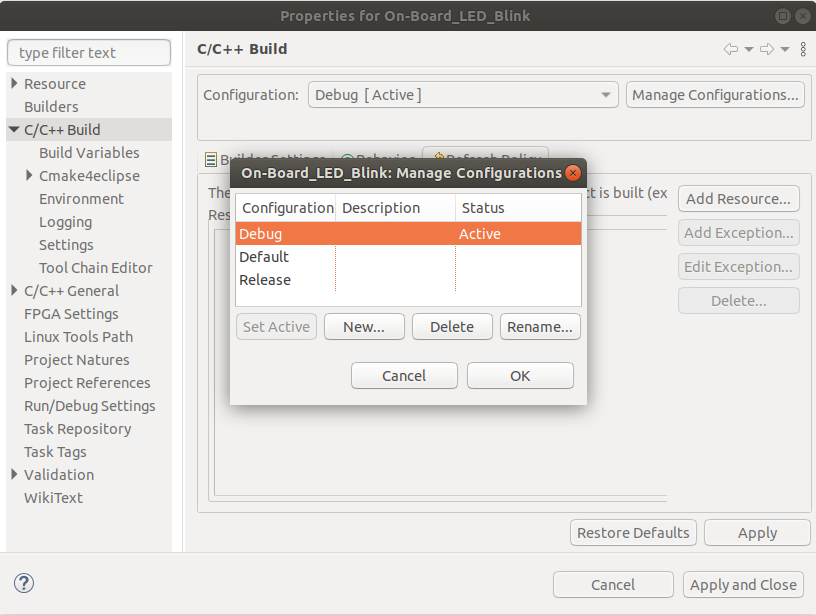
With your build configurations in place, you can now direct Eclipse to build the currently active configuration (e.g., Debug or Release) by clicking the “hammer” icon or using the Project > Build Project menu. You activate a build configuration using the Project > Build Configurations > Set Active menu. Eclipse will respond with a make all command in the folder that matches the name of the active build configuration. You can see the make all command issued by Eclipse in the CDT Build Console.
Likewise, you can direct Eclipse to perform a make clean action, on the currently active configuration, by choosing Project > Clean… from the menu. Again, watch the CDT Build Console for the make clean command and results.
Of course, the above assumes that an all target and a clean target exist inside each makefile for each build configuration (which is normally the case). Unfortunately, all and clean are the only make targets that Eclipse inherently understands. To direct Eclipse to process other targets in your makefiles:
Double-click the top-level makefile in a build configuration folder (Project Explorer).
Right-click the name of a make target from the Outline view that appears on the right.
Choose Add Build Target from the make target’s right-click menu.
Click the OK button in the Create Build Target dialog (accept the defaults).
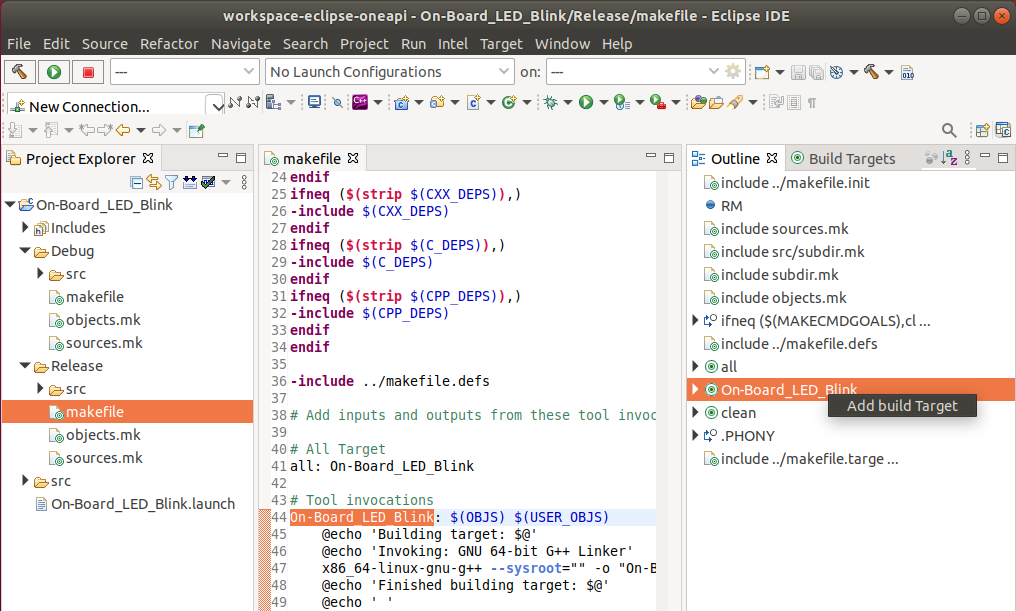
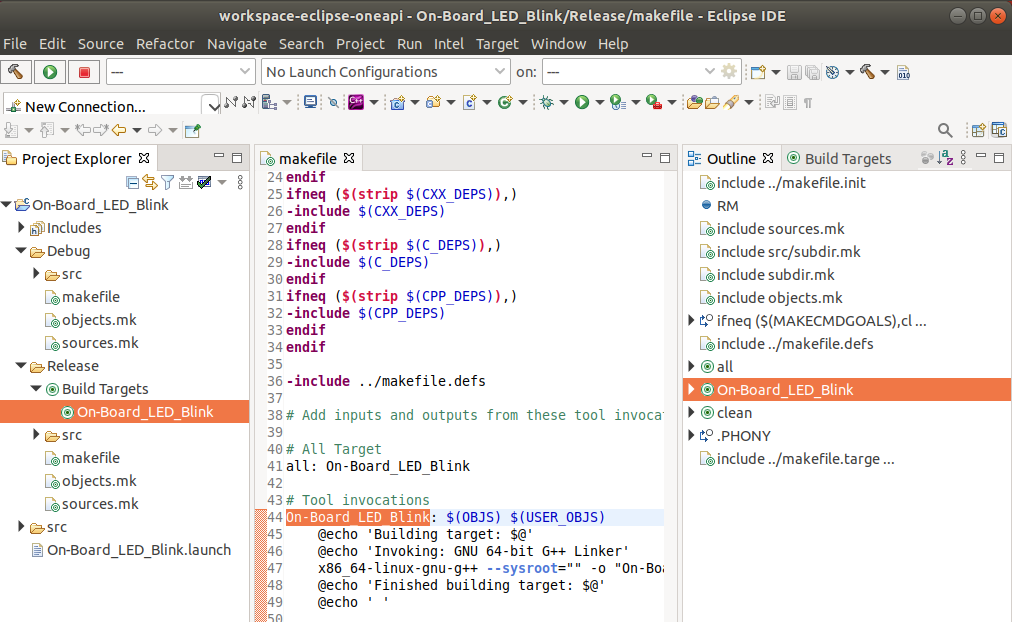
Look for a new Build Targets virtual folder in the Project Explorer.
Double-click a target in the Build Targets to direct Eclipse to run the make target.
Watch the CDT Build Console for the make <target> command and results.
Deploying and debugging on a remote Linux machine in Eclipse CDT
The Eclipse IDE for C/C++ Developers includes infrastructure to assist the process of running and debugging applications on a remote Linux system, via an ssh connection. Remote launch and debug configurations must be defined to automate this task.
Before you begin, ensure that you can ssh into your remote Linux system. Also, if you need to deploy and debug your application as a “root” user on your remote system, you can either enable the root user on the remote system or use an ssh key pair to connect remotely as a root user, without having to enable the root user on your remote system and configure your sshd daemon to accept requests to login as root. For example, the typical Ubuntu installation does not enable the “root” user. See this ssh setup documentation for a step-by-step that explains how to enable root access via an ssh key pair, without having to enable the root user on your remote system.
Once an ssh connection to your remote system is setup, see *Running an Application Built with Eclipse on an SSH Target* for step-by-step instructions on how to setup a remote Run Configuration.
Keep the following hints available in case you run into problems:
The Connections view in Eclipse may be located in the bottom console view area of Eclipse.
If you cannot locate the Eclipse Connections view use the Window > Show View > Other… menu and find the Connections view inside the Connections section of the Show View dialog that appears.
NOTE: If your connection icon shows a small red “x”, after you have created the Connection per the article above, try right-clicking the connection icon and choosing Open Command Shell to force a connection to the remote system. You should be prompted with an “authentication” question. Answer “yes” to accept the authentication and you should then be presented with a command prompt on the remote system.
If you cannot find the Run Configuration dialog, use the Run > Run Configurations menu.
If you see a message at the bottom of the Run Configurations dialog indicating you have multiple launchers, follow the link and choose the Legacy Remote Create Process Launcher option.
Once you have configured the run configuration, it will automatically be used as a debug configuration. Note that gdb must be located on your local build system’s path and gdbserver must be available on the remote system’s path to allow the remote debug session to work.
See Also
*Other names and brands may be claimed as the property of others.