Intel® Advisor Tutorial: Use the Automated Roofline Chart to Make Optimization Decisions
Standalone GUI: Prepare the Sample Application
This topic is part of a tutorial that shows how to use the automated Roofline chart to make prioritized optimization decisions.
Follow these initial steps if you prefer to use the Intel Advisor standalone GUI to try out the plots floating-point performance training sample application.
Get Software Tools and Unpack the Sample Application
You need the following tools:
Intel Advisor installation package and license
Version 15.x or higher of the Intel® C++ Compiler Classic or a supported compiler
Use an Intel compiler to get more benefit (and version 17.x or higher to get the most benefit) from the Vectorization Advisor Survey Report. See the Release Notes for more information on supported compilers.
.zip file extraction utility
If you do not already have the Intel Advisor or the Intel® C++ Compiler Classic, download it from https://software.intel.com/content/www/us/en/develop/tools.html.
To set up the roofline_demo_samples sample application:
Download both the sample code and sample results to a writable directory or share on your system.
Extract the sample code and sample results from the .zip files.
Prepare the Sample Application
To follow along with this tutorial:
Set up the Intel® C++ Compiler Classic environment. For example, in a command prompt, type:
"<compiler-install-dir>\bin\compilervars.bat" intel64
This will set the environment for the highest Intel® C++ Compiler Classic version installed. The exact path of the compiler environment may vary depending on your installation directory.
See Specifying the Location of Compiler Components with compilervars in the Intel® C++ Compiler Classic Developer Guide and Reference for more information about setting the compiler environment.
In the command prompt window, change directory to the roofline_demo_samples\ directory in its unzipped location.
Run build.bat, which creates a release subdirectory and builds the sample application in release mode.
To build your own applications to produce the most accurate and complete Vectorization Advisor analysis results, build an optimized binary in release mode using the following settings.
To Do This |
Optimal C/C++ Settings |
|---|---|
Request full debug information (compiler and linker). |
Linux* OS command line: -g Windows* OS command line:
Microsoft Visual Studio* IDE:
|
Request moderate optimization. |
Linux* OS command line: -O2 or higher Windows* OS command line: /O2 or higher Visual Studio* IDE: C/C++ > Optimization > Optimization > Maximum Optimization (Favor Speed) (/O2) or higher |
Produce compiler diagnostics (necessary for version 15.0 of the Intel compiler; unnecessary for version 16.0 and higher). |
Linux* OS command line: -qopt-report=5 Windows* OS command line: /Qopt-report:5 Visual Studio* IDE: C/C++ > Diagnostics [Intel C++] > Optimization Diagnostic Level > Level 5 (/Qopt-report:5) |
Enable vectorization |
Linux* OS command line: -vec Windows* OS command line: /Qvec |
Enable SIMD directives |
Linux command line: -simd Windows* OS command line: /Qsimd |
Enable generation of multi-threaded code based on OpenMP* directives. |
Linux* OS command line: -qopenmp Windows* OS command line: /Qopenmp Visual Studio* IDE: C/C++ > Language [Intel C++] > OpenMP Support > Generate Parallel Code (/Qopenmp) |
Launch the Intel Advisor
Setting up the Windows* OS environment is necessary only if you use the advixe-gui command to launch the Intel Advisor standalone GUI (or the advixe-cl command to run the command line interface). To set up your Intel Advisor environment, run the following:
The default installation path for:
- Intel Advisor, <advisor-install-dir> depends on where you installed the product and is inside C:\Program Files (x86)\IntelSWTools\ for standalone installations or C:\Program Files (x86)\Intel\oneAPI\ as part of a Intel® oneAPI Base Toolkit installation.
Do one of the following to launch the Intel Advisor:
Run the advixe-gui command.
From the Start menu, choose All Programs > Intel oneAPI [version] > Intel Advisor [version].
Prepare the Project
- Choose File > New > Project... (or click New Project... in the Welcome page) to display a Create a Project dialog box.
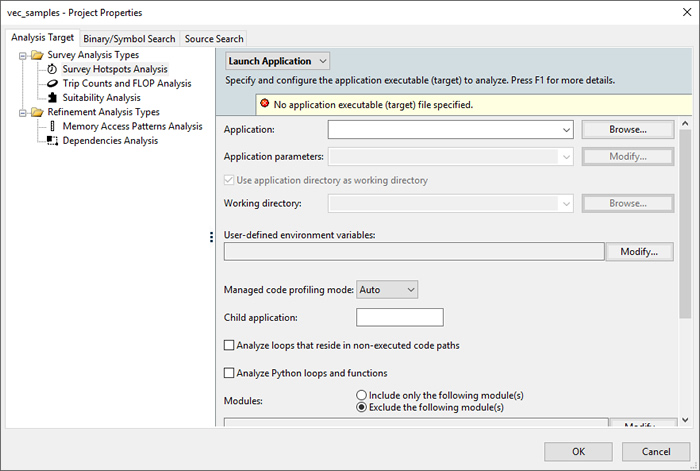
Type roofline in the Project name field, supply a location for the sample application project, then click the Create Project button to create a roofline.advixeproj file and open the Project Properties dialog box.

In the Analysis Target tab, ensure the Survey Hotspots Analysis type is selected.
Click the Browse... button next to the Application field and choose the just-built roofline_demo binary file in the release subdirectory.
For the Survey Trip Count Analysis type, make sure the Inherit settings from Survey Hotspots Analysis Type checkbox is selected.
Click the OK button to close the Project Properties dialog box.