Environment
Operating System
| Note | Pinning is not supported on 12th Generation platforms and Intel RST 19.x drivers. |
This information explains what pinning is, the software/hardware requirements for pinning, and how to use pinning with Intel® Optane™ Memory.
What is Pinning?
Pinning enables customized responsiveness by allowing the selection of specific files, folders, and applications to be accelerated.
What objects can't be pinned?
The following objects can't be pinned:
- Quick Access
- This PC
- Any disk's Root directory (for example, Local Disk (C:))
- Control Panel
- Libraries Folder
- Network objects
- Recycle Bin
- Shortcuts
Requirements for Pinning Once Acceleration is Enabled
- Device with 32GB or greater Intel® Optane™ memory capacity.
- Pinning is only available when accelerating the system/boot drive (the drive/media/partition that contains the OS).
Note Pinning is only available for data contained on the same partition of the OS Drive being accelerated. Data on separate partitions is not supported. - Intel® Rapid Storage Technology (Intel® RST) driver, find more information for supported M Series platforms.
Note - Check with your system manufacturer or related support documentation for the latest driver versions supporting Intel® Optane™ Memory H Series products.
- Driver versions 19.x and greater do not support this functionality.
- Only files, folders, and applications on the drive/partition that is currently enabled for acceleration can be pinned.
See below for how to use the pinning feature in the Intel® Optane™ memory-related applications. The instructions that follow assume that
- The computer supports Intel® Optane™ memory-related products, and
- It's already properly configured and enabled as detailed in the Installation Guide for Intel® Optane™ Memory.
Through the Application
The steps below detail how to use the Intel® Optane™ Memory and Storage Management application. The steps are similar to the ones you would take in other Intel® Optane™ memory capable applications.
- Launch the Intel® Optane™ Memory and Storage Management application.
- Click the Pinning tab. This will bring up the 'Intel® Optane™ Memory Pinning' page.
Note If the window refers to logging in as Administrator to drag an drop files, find more information. - To Pin: Choose Files, Folders or Applications from the Pin dropdown
- Navigate to the item to be pinned and select OK/Open.
Note If selecting a Folder, the subfolders and related content won't be accelerated. Only files within the folder selected will be accelerated. (If a folder is selected with only subfolders, no files are accelerated.) - To Unpin:
- Select the item to be unpinned.
- Press Unpin button.
Quick Tip: It may not always be easy to know where to browse to for the location of the EXE you wish to accelerate. To determine this, you can do one of the following on your favorite applications:
- If you're selecting an application such as Microsoft Word* from the Start menu, you would do the following:
- Open the Start Menu.
- Right-click the application.
- Go to the More field in the menu.
- Select Open file location.
Note These actions may take you to the location of the shortcut. If that happens, do either point 1 or 2 above to find the location of the actual application file.
- You can also select Properties after right-clicking the shortcut and then locate the path under the Target field.
- Right-click the shortcut of the application and select Open file location. This will open the folder that contains the exe for this shortcut. (Make note of the folder path at the top of the window.)
Through Windows File Explorer*
- After the application (Version 16.8 or later) is installed and enabled, the pinning option will be added to Windows File Explorer.
- Launch Windows File Explorer.
- Navigate to the folders, files, or applications that you wish to accelerate.
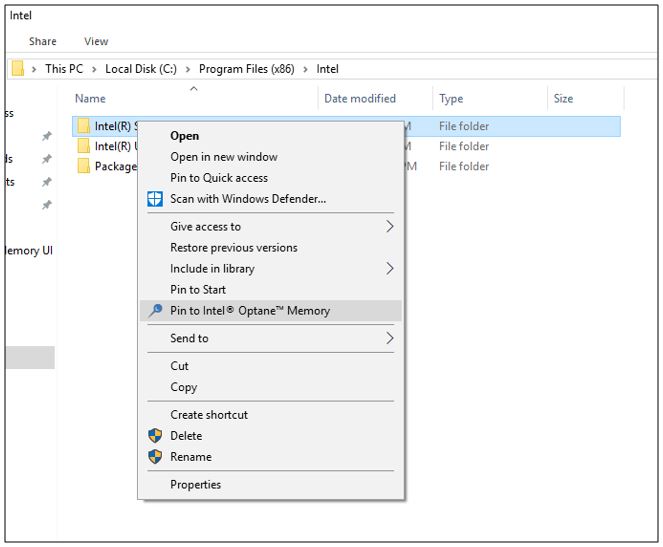
- Right-click the folder, file, or application.
- In the pop-up menu, left-click the Pin to Intel® Optane™ Memory' option.
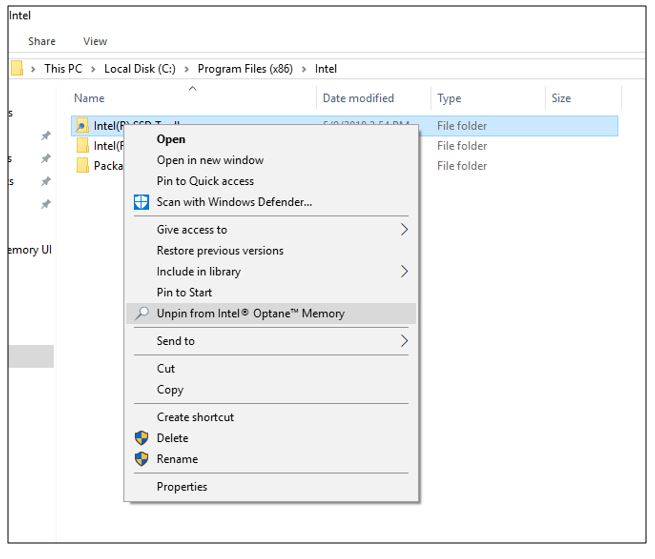
- You'll now see a Pin on the name of the folder, file, or application that shows it is being accelerated. It will also show as a pinned selection in the application under Pinning.
- To Unpin, follow the same steps as above and select the 'Unpin to Intel® Optane™ Memory' option.
Pin with Windows File Explorer example:

Unpin with Windows File Explorer example:
