To set up a system with matrix RAID, follow these steps:
- Enable RAID in the system BIOS
- Create a RAID volume
- Install the Operating System on the RAID volume using the F6 installation method
- Install the Intel® Rapid Storage Technology driver from Windows*
- Create the second RAID volume
| Note |
|
Enable RAID in the system BIOS
If required, enable RAID option in the system BIOS.
| Note | These instructions are specific to Intel® Desktop Boards with a supported Intel® Chipset. Always follow the instructions included with your motherboard. |
Depending on your Intel desktop board model, enable RAID by following either of the steps below.
- Press the F2 key after the Power-On-Self-Test (POST) memory test begins.
- Select the Configuration menu, then the SATA Drives menu.
- Set the Chipset SATA Mode to RAID.
- Press the F10 key to save the BIOS settings and exit the BIOS Setup program.
OR
- Press the F2 key after the Power-On-Self-Test (POST) memory test begins.
- Select the Advanced menu, then the Drive Configuration menu.
- Set the Drive Mode option to Enhanced.
- Enable Intel® RAID Technology.
- Press the F10 key to save the BIOS settings and exit the BIOS Setup program.
Follow these steps to create a RAID volume:
- When the Intel® RST option ROM status screen displays during POST, press Ctrl and I at the same time to enter the option ROM user interface.
- Select 1: Create RAID Volume and press Enter.
- Use the up or down arrow keys to select the RAID level and press Enter.
- Use the up or down arrow keys to select the strip size and press Enter.
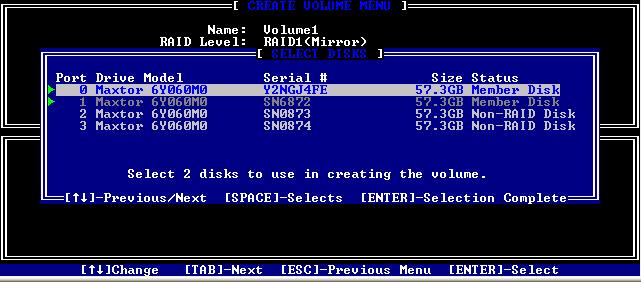
- Press Enter to select the physical disks.
- Use the up or down arrow keys to scroll through the list of hard drives and press Space to select the drive.
- Press Enter.
- Select the volume size and press Enter. You must select less than 100 percent of the available volume space to leave space for the second volume.
- Press Enter to create the volume.
- At the prompt, press Y to confirm volume creation.
- Select 4: Exit and press Enter.
- Press Y to confirm exit.
Install the Operating System on the RAID volume using the F6 installation method
| Note | The F6 installation method isn't required for Windows Vista* or Windows 7*. Skip to step seven below. |
Follow these steps to install the Intel® Rapid Storage Technology driver during operating system setup:
-
Press F6 when prompted by the message:
Press F6 if you need to install a third party SCSI or RAID driver.
The message displays during text-mode phase at the beginning of Windows XP* setup.
Note Nothing happens right after pressing F6. Setup is still loading drivers. Watch for the prompt to load support for mass storage devices. -
Press S to Specify Additional Device.
-
Insert the support disk when prompted by the message:
Please insert the disk labeled Manufacturer-supplied hardware support disk into Drive A:
The disk includes the following files: IAAHCI.INF, IAAHCI.CAT, IASTOR.INF, IASTOR.CAT, IASTOR.SYS, and TXTSETUP.OEM.
-
Press Enter.
-
Use the up and down arrow keys to select your controller from the list of available SCSI adapters, which might include:
- Intel® 82801GR/GH SATA RAID Controller
- Intel® 82801GHM SATA RAID Controller
- Intel® ESB2 SATA RAID Controller
- Intel® 82801R/DO/DH SATA RAID Controller
- Intel® 82801HEM SATA RAID Controller
- Intel® 82801IR/IO SATA RAID Controller
-
Press Enter to confirm and continue.
The drivers are now installed. Leave the disk in the drive as Windows setup copies the files from the disk to the Windows installation folders. When the copy process is complete, remove the disk. Windows setup is ready to reboot. -
Create a partition and file system on the RAID volume like you would on any physical disk.
Install the Intel® Rapid Storage Technology driver from Windows*
Install the Intel Rapid Storage Technology software package. The Intel® RST user interface can be used to create the second RAID volume.
- Download the latest version of Intel Rapid Storage Technology.
- Run the executable.
Create the second RAID volume using one of the following methods
Intel Rapid Storage Technology user interface
Follow these steps to create a second volume on a RAID array using the Intel Rapid Storage Technology user interface:
- Click Start/All Programs/Intel/Intel® Rapid Storage Technology.
- Click Create a custom volume.
- Select a volume type and click Next.
- Name the volume and click Yes: Array_xxxx (this creates a second volume on the existing array).
- Click Next.
- Click Create Volume.
- Click OK to the reminder that you need to partition your volume.
Option ROM
Follow these steps to create a second volume on a RAID array using the option ROM:
- When the option ROM status screen displays during POST, press Ctrl and I at the same time to enter the option ROM user interface.
- Select 1: Create RAID Volume and press Enter.
- Name the volume and press Enter.
- Use the up or down arrow keys to select the RAID level and press Enter.
- If required, press Enter to select the array. This is only required if there is more than one location available to create a volume (for example, two non-RAID hard drives and an array with available capacity). If this step is not required, skip to step 7.
- Select one of the member drives in the RAID array with available capacity and press Enter. The remaining drives are selected automatically (the image below shows the hard drives on Port 0 and Port 1 have available capacity).

- Use the up or down arrow keys to select the strip size and press Enter.
- Press Enter to create the new RAID volume.