Article ID: 000087498 Content Type: Install & Setup Last Reviewed: 11/02/2022

How to Customize the Splash Screen Image on Intel® NUC with Aptio V BIOS

Environment

OS Independent family

BUILT IN - ARTICLE INTRO SECOND COMPONENT
Summary

How to change the default splash screen image on Intel® NUC's with the Aptio V BIOS.

Description

Unable to customize the BIOS Splash Screen Image.

Resolution

You can change the splash screen to the image of your choice by using iCHLogo and iFlashV tools. To do that you need to create .cap BIOS file using iCHLogo and then update target system BIOS using iFlashV tool.

Note
  1. Download and unzip iChLogo.zip.
  2. Ensure that your logo file meets the below requirements:
    File typeNotes
    .BMP
    • Supports 16, 256 and 24-bit (16,777,216) colors
    .JPG
    • Restart intervals are supported
    • The X-density/Y-density should be 1:1
    • Doesn't support "Progressive encoding"
    • Only supports YUV 1:1:2 (color component sampling 1:1:2)
    .PNG
    • 8 bit grayscale
    • 8 bit indexed color
    • 8 bit RGB color
    • 16 bit RGB color
  3. Copy the logo file you just created to the corresponding folder:
    1. If you're using a 32-bit Operating system, copy the file to: \iChLogo\iChLogoWin\Ia32
    2. If you're using a 64-bit Operating system, copy the file to: \iChLogo\iChLogoLnx\X64
  4. Download the .cap BIOS file that you want to customize, from download center, and copy it to the corresponding folder:
    1. If you're using a 32-bit Operating system, copy the file to: \iChLogo\iChLogoWin\Ia32
    2. If you're using a 64-bit Operating system, copy the file to: \iChLogo\iChLogoLnx\X64

      Example folder structure for the Intel® NUC 10 Performance kit -- NUC10i5FNK and Windows 10, 64-bit.
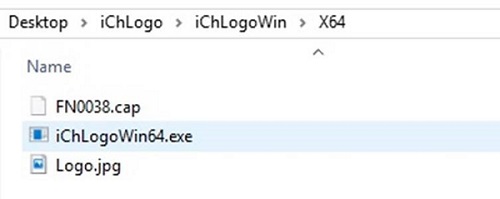
      Screenshot

  5. Open an elevated command prompt and navigate to the folder. To open the elevated command prompt:
    1. Press the Windows key.
    2. In the search box, type cmd.
    3. Right-click the Command Prompt App and choose Run as Administrator.
    4. Click Yes to run the Windows Command Prompt as Administrator.
  6. Run the following command: iChLogo /i <name of your input .cap file> /o <name of your output .cap file> /r <name of your logo file> /f
    This command will generate a new capsule file (.cap file) with your custom logo. Once the new capsule file has been generated, you need to update the BIOS on a target system for the change to take effect.
  7. Download and unzip iFlashV.zip on your target machine.
  8. Copy the capsule file you just created to the corresponding folder, for example: \iFlashV\iFlashVWin\X64\
  9. Open the elevated command prompt and navigate to the folder referenced above
  10. Run iFlashV <outCapsuleFile> /k1 (This will update the splash screen to the new image without flashing the BIOS).
  11. Reboot and you will see updated BIOS splash screen.

Related Products

This article applies to 6 products