Description
Some users may encounter an issue where they are unable to use the Internet even though they appear to be connected through either Wi-Fi or Ethernet. Restarting the computer will, in some cases, fix the problem temporarily.
These updates have removed entries from the Windows® 10 registry, which instructed the operating system to release used ports when all ports are exhausted. Ports are a list of finite virtual numbers that are necessary for any network connection. If all ports are open and not released, this creates the effect of being connected to an Internet connection without the operating system having the ability to open new ports. Applications and services that were already connected may or may not continue to function, at least partially, while the user is unable to browse the Internet or connect to anything else.
Resolution
| Note | Before troubleshooting this issue with the suggestions below, make sure you have clean-installed the latest Killer Control Center and device drivers. You can do this by following our clean-install guide. |
| Note | Microsoft may have corrected this issue in the patch for Windows® 10 1809. You may now be able to resolve this issue by manually checking for updates. You can do this by clicking Start, then type Update and click Check for Updates, then click the Check for Updates button. If your machine has updates, they should then download and install. If the updates have not resolved the issue, restart your machine and check for updates again. Do this until there are no new updates after a fresh restart to make sure you have all available Windows Updates. If this does not help, proceed to the registry fix below. |
On Windows 1803 or earlier and some builds of Windows 10 1809 the registry fix below can resolve this problem by replacing these registry entries. Here is a step-by-step guide:
- Click Start.
- Type regedit and press Enter.
- Click File > Export… and then save the file to a place you will remember. This file is your registry backup. If anything goes wrong, you can double-click this file from your machine, and it will restore your current registry settings. The export may take a moment.
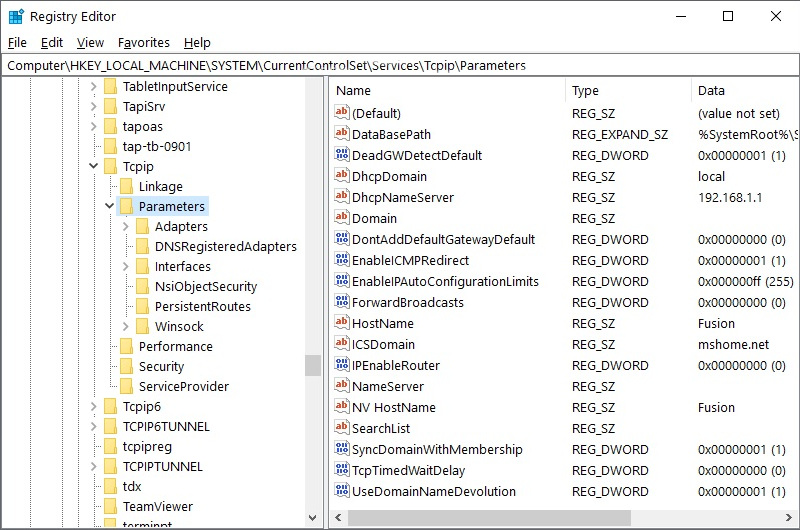
- Once the export is finished, copy this line – HKLM\SYSTEM\CurrentControlSet\Services\Tcpip\Parameters – and paste it into the white space directly below File – Edit – etc., and press Enter, which should navigate you to the correct location in the registry, as seen below. (Right-click on the image and open image in a new tab to expand.)

- With Parameters remaining highlighted on the left side, right-click the empty white space on the right and click New > DWORD (32-bit).
Even though nearly all Windows 10 installs are 64-bit, DWORD (32-bit) is the correct selection. - Name it TcpTimedWaitDelay and press Enter.
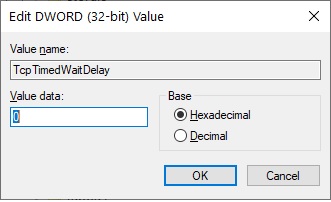
- Double-click the newly created TcpTimedWaitDelay and change the Value to 0000001e. Leave the Base setting as Hex. It should look like the screenshot below.

- Click OK.
- Repeat steps 5-8, creating the following keys:
- Name: MaxUserPort
Value: 0000fffe
Base: Hexadecimal - Name: TcpNumConnections
Value: 00fffffe
Base: Hexadecimal - Name: TcpMaxDataRetransmissions
Value: 00000005
Base: Hexadecimal - Click File > Exit
- Restart by clicking Start > Power > Restart and test.
- Name: MaxUserPort
If the issue returns, future updates of Windows may overwrite these changes. Unfortunately, the best remedy will be to re-input these registry keys if you find that they are missing with future updates.
If you have followed all of the troubleshooting steps above and are still experiencing issues, contact support. Make sure you include a diagnostic so that we can analyze your specific situation appropriately.