How to Configure the Baseboard Management Controller (BMC) for Remote Monitoring and Control for Intel® Server Boards and Intel® Server Systems

Documentation

Install & Setup

000007913

01/13/2023

Where do I configure the Baseboard Management Controller (BMC)?

The process is performed from within the BIOS of the Intel® Server Board only.

How do I configure the BMC?
  1. Turn on the system and press F2 to access BIOS during POST.
  2. Go to the menu and select Server Management.
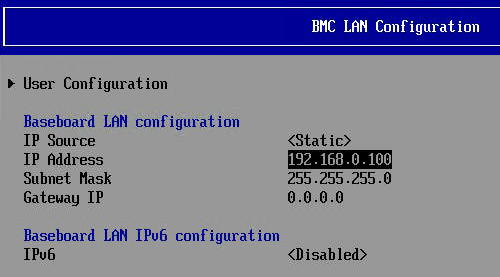
  3. Select BMC LAN configuration:
    example image
  4. Under Baseboard LAN configuration, set IP source to Static, and then enter the preferred IP address.
    Note

    The preferred IP address is the address used from the browser at the client computer.

  5. Set appropriate value for the Subnet mask. The Gateway IP address can be left blank.
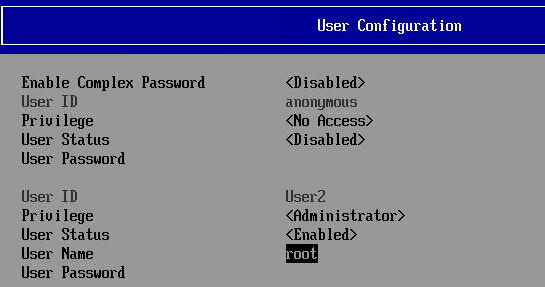
  6. Scroll to the top and select User Configuration:
    example image
  7. Scroll down to User ID and select the value, in this case root. Use user name to enter at the web console from the client computer.
  8. Under Privilege, select Administrator. For Status, select Enabled.
  9. Create a password. The password is case sensitive and accepts special characters for maximum security. Enter the password twice for confirmation.
  10. Press F10 to save BIOS changes and exit.
  11. From the client computer, open a browser and enter the static IP address from step 4. The BMC web console launches.
    Note

    Make sure to type https:// then the IP address before hitting Enter.

  12. Enter the user ID and password to allow monitoring of the system and basic remote control.

See How do I set up Remote Management to Intel Servers? for more details.

Related topics
Self-help Guides for all Intel® Server Products
User Guide for Intel® Remote Management Module 4 (Intel® RMM4) and Integrated BMC on Intel® Server Boards and Intel® Server Systems Based on Intel® 62X Chipset
For firmware updates and troubleshooting tips