Overview
This tutorial shows how to build an Intelligent Queue Management System for retail checkout using the OpenVINO™ toolkit and Ultralytics YOLO* v8 with a Jupyter* Notebook. See actual benchmark data and be able to perform real-world benchmarks on your own setup.
Through deep learning and computer vision for object detection, businesses can gain real-time insights into their operations and improve efficiency and customer satisfaction. The OpenVINO toolkit can help you overcome common restrictions in deployment, such as increasing the number of usable cameras on the same system. The OpenVINO toolkit minimizes the time it takes to process input data to produce a prediction as an output, letting you process more frames and speed up decision-making.
This application focuses on today's fast-paced retail environment where customer satisfaction is king. This application detects customers in a queue and provides real-time analytics data. This data allows stores to reroute customers to minimize lines and wait times, staff can appropriately streamline the checkout process, and thus enhance customer satisfaction.
Furthermore, this solution can be applied to any problem that requires object detection, counting of objects, and decision-making.
Prerequisites
- Python* 3.8 or later installed on your system.
- Git installed on your system.
- A webcam or IP camera connected to your system.
- Supported hardware that aligns with the OpenVINO toolkit system requirements.
Note This tutorial was demonstrated on an Intel® Core™ processor, Intel Atom® processor (formerly code named Alder Lake), a 4th gen Intel® Xeon® Scalable processor (formerly code named Sapphire Rapids), and an Intel® Flex dGPU.
Step 1: Clone the Repository
To clone the Intelligent Queue Management repository to your system and install libraries and tools, use the following command:
sudo apt install git git-lfs gcc python3-venv python3-dev

git clone –b recipes https://github.com/openvinotoolkit/openvino_notebooks.git openvino_notebooks
This clones the repository into the folder, openvino_notebooks, and downloads a sample video. Next, navigate to the folder:
cd openvino_notebooks/recipes/intelligent_queue_management
Pull the video sample:
git lfs pull
This application uses Python* to set up a virtual environment. If you do not have the virtual environment package installed, run the following:
sudo apt-get update
sudo apt-get upgrade
sudo apt-get install python3-ven
If you have a CPU with an integrated graphics card from Intel, to enable inference on this device, install the Intel® Graphics Compute Runtime for oneAPI Level Zero and OpenCL™ Driver. The command for Ubuntu* 20.04 is:
sudo apt-get install intel-opencl-icd
Next, prepare your virtual environment.
Step 2: Create and Activate a Virtual Environment
To avoid affecting things globally on your system, it is a best practice to isolate a Python project in its own environment. To set up a virtual environment, open the terminal or command prompt and navigate to the directory where you want to establish the environment. Then, to create a new virtual environment, run the following command:
For UNIX*-based operating systems like Linux* or macOS*, use:
python3 -m venv venv
For Windows*, use:
python -m venv venv
This creates a new virtual environment, venv, in the current folder. Next, activate the environment you just created. The command used depends on your operating system.
For UNIX-based operating systems like Linux or macOS, use:
source venv/bin/activate
For Windows, use:
venv\Scripts\activate
This activates the virtual environment and changes your shell's prompt to indicate as such.
Step 3: Install the Requirements
The Intelligent Queue Management application has a number of dependencies that must be installed in order to run. These are listed in the included requirements file and can be installed using the Python package installer.
To install required Python libraries including the OpenVINO toolkit and YOLO* v8, use the following command:
python -m pip install --upgrade pip

pip install -r requirements.txt
All dependencies and requirements are now installed. Next, you will optimize and convert the models before running the application.
Step 4: Launch Jupyter* Notebook
For ease of production deployment, scripts are included in the repository alongside a Jupyter Notebook. These scripts contain the same code as the notebooks and enable you to convert models and run the Intelligent Queue Management application directly from the command line, which is particularly helpful for automating and scaling your AI solutions in a production environment.
This tutorial uses a Jupyter Notebook.
Before converting and optimizing the YOLO v8 model, to launch JupyterLab, inside the intelligent_queue_management notebook, run the following command:
jupyter lab docs
JupyterLab opens the docs directory that contains the notebooks.
Step 5: Convert and Optimize the Model
Open the convert-and-optimize-the-model notebook in the docs folder. The notebook contains detailed instructions to download and convert the YOLO v8 model. This prepares the model for use with the OpenVINO toolkit.
The following notebook snippet demonstrates how to convert the model using the export method:
# export model to OpenVINO format

out_dir = det_model.export(format="openvino", dynamic=False, half=True)
- det_model represents the YOLO v8 object detection model.
- format is set to openvino to export the model in OpenVINO format.
- dynamic parameter is set to False, indicating that you're exporting the model with fixed input sizes (that is, a static model). A static model does not allow changes in the dimensions of the input tensors between different inference runs.
- half is set to True to use half-precision floating-point format (FP16) for the model weights.
This converts the YOLO v8 model to an OpenVINO intermediate representation (IR) format, allowing you to take advantage of the toolkit's capabilities to optimize the model and achieve better performance on a variety of hardware platforms. The IR format is a common format used by OpenVINO to represent deep learning models, enabling efficient inference across different hardware platforms.
Step 6: Optimize the Model Using the NNCF Post-training Quantization API
Before running the Intelligent Queue Management application, you need to optimize your model using the Neural Network Compression Framework (NNCF), a tool that offers advanced algorithms for optimizing neural networks in the OpenVINO toolkit with minimal accuracy drop.
This tutorial uses the NNCF 8-bit post-training quantization, which allows for model optimization without the need for a fine-tuning pipeline. This is applied to your YOLO v8 model as follows:
- Load the dataset for quantization: To effectively quantize the model, you need a representative dataset from the same domain as your original training data. Ideally, this should be a subset of the validation dataset. This dataset is used by the nncf.quantize function to adjust the model's parameters for optimal performance.
- Quantize the model with nncf.quantize: This function applies 8-bit quantization to the detection model, which reduces the computational and memory requirements of the model.
Note While the goal of quantization is to minimize the impact on accuracy, a slight drop in model accuracy may be expected. - Serialize the OpenVINO toolkit IR model: Use the openvino.runtime.serialize function to save the optimized model to the disk. This serialized model can then be loaded later for inference.
Next, quantize your IR model:
import numpy as np
 import nncf
 from torch.utils.data import DataLoader
 from torchvision import datasets
 from ultralytics.yolo.data import augment

from openvino import runtime as ov


# create the COCO validation dataset
 coco_dataset = datasets.CocoDetection("coco/images/val2017", annFile="coco/annotations/instances_val2017.json", ...)


# get the loader with batch size 1
 det_data_loader = DataLoader(coco_dataset, batch_size=1, shuffle=True)

# transform input function
 def transform_fn(data_item):
  # skip the label
  return data_item[0]


quantization_dataset = nncf.Dataset(det_data_loader, transform_fn)

# load model
 core = ov.Core()
 ov_model = core.read_model(ov_model_path)


ignored_scope = nncf.IgnoredScope(types=["Multiply", "Subtract", "Sigmoid"], names=["/model.22/dfl/conv/Conv", "/model.22/Add", ...])

# quantize
 quantized_model = nncf.quantize(ov_model, quantization_dataset,
   preset=nncf.QuantizationPreset.MIXED,  ignored_scope=ignored_scope)

# save to disk
 ov.serialize(quantized_model, str(int8_model_path))
Step 7: Run the Intelligent Queue Management Application
Open the run-the-application notebook in the docs folder. This notebook contains detailed instructions to run the Intelligent Queue Management application, analyze the video stream, and detect the number of customers in each region of interest (ROI).
Before running the application, load the optimized YOLO v8 model in OpenVINO format. To load the model, use the following code:
# initialize OpenVINO

core = ov.Core()

# read the model from file

model = core.read_model(model_path)

# compile the model for latency mode

model = core.compile_model(model, device_name="AUTO", config={"PERFORMANCE_HINT": "LATENCY"})
The notebook demonstrates how to run the Intelligent Queue Management application using the preprocessing, model loading, main processing function, and postprocessing steps discussed earlier. The application analyzes the video stream and displays the detected ROIs and the number of customers in each queue.
- Preprocessing: The first step in the application involves preprocessing the input video stream. This process includes resizing the video frames and adjusting the color space to match the input requirements of the model.
- Postprocessing: After detecting the customers in the queue, the application needs to postprocess the results. This includes filtering the detected objects based on the confidence threshold and the object class, such as highlighting only people.
- Main Processing Function: The main processing function in the notebook is responsible for running the application, processing the video stream, and detecting customers in the queue. The function uses the loaded YOLO v8 model and the OpenVINO toolkit to perform object detection and queue analysis.
In this application, the zones.json file is used to define the ROIs in the video stream. These ROIs represent specific queue areas in the video, helping the application to focus on them while ignoring other areas. The file contains an array of JSON objects, each representing an ROI with a unique ID, a set of points defining the polygonal region, and an optional label to describe the area. This configuration file is essential for the application to accurately monitor queues in the video stream.
To run the application, set the video_path, model_path, zones_config_file, and customers_limit using the following code:
video_path = "../sample_video.mp4" # Provide Path to the video file or camera number (0, 1, 2, etc.)

model_path = "../model/yolov8m_openvino_int8_model/yolov8m.xml"

zones_config_file = "../zones.json"

customers_limit = 3
queue_management is a function that uses the OpenVINO toolkit to perform object detection on a video file and count the number of customers in each zone based on the detected objects. To call the queue_management function, use the following code:
queue_management(video_path, model_path, zones_config_file, customers_limit)
The queue_management function takes four arguments: the path to the video file, the path to the model file, the path to the JSON file containing the zone definitions, and the maximum number of customers allowed in a zone at any given time. The function displays the output video with the detected objects and zone annotations overlaid, and sends an alert notification to store management if any zones are over capacity.
The application then begins to analyze the video stream and detects the number of customers in each ROI. The results are displayed in the terminal, and a graphical interface shows the video stream with the detected ROIs and the number of customers in each queue. To stop the application, press q or esc at any time.
You now have a fully functional Intelligent Queue Management system that can be used in retail checkout scenarios to improve customer satisfaction and increase sales.
Step 8: Performance Benchmark with Benchmark_App
To evaluate the effectiveness of your YOLO v8 model optimization, use the OpenVINO toolkit benchmark_app, which provides insight into the model's real-world performance, and allows you to plan for deployment.
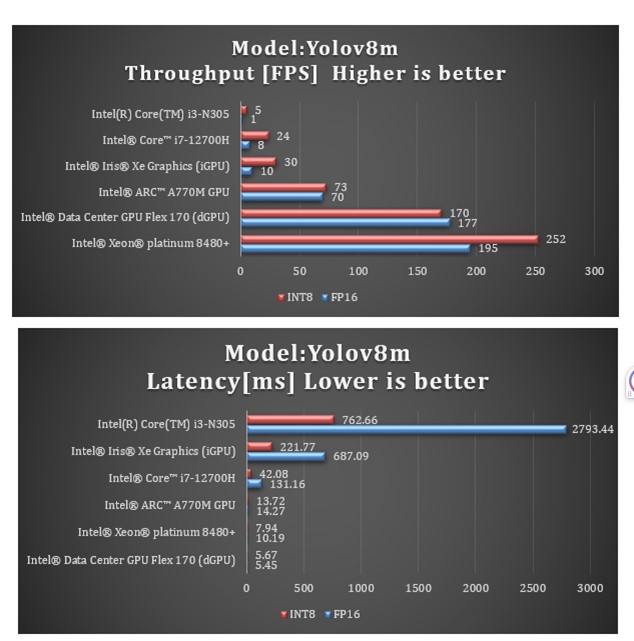
The benchmark results for the YOLO v8m model using the OpenVINO toolkit version 2023.0.0 on the 4th generation Intel Xeon Scalable processor are as follows:
Throughput:
- FP16: 252 FPS
- int8: 195 FPS
Latency:
- FP16: 7.94 ms
- int8: 10.19 ms
These results demonstrate that using int8 quantization (NNCF) yields the highest throughput in terms of FPS. In practical scenarios, such as a store checkout lane where 1080p cameras are typically used at a frame rate of 30 FPS, the YOLO v8m model with a throughput of 252 FPS could theoretically handle approximately eight cameras simultaneously (252/30 = ~8) on a 4th generation Intel Xeon Scalable processor.
Note These figures represent the model's theoretical maximums, and actual performance may vary depending on various factors. It's recommended to test the model in your deployment environment to understand its real-world performance.
The benchmarking was conducted on 4th generation Intel Xeon Scalable processors, which provide the hardware infrastructure for running the YOLO v8m model efficiently.
To run the benchmarking, use the following command:
!benchmark_app -m $int8_model_det_path -d $device -hint latency -t 30
Replace $int8_model_det_path with the path to your int8 model, and $device with the specific device you are using (CPU, GPU, and so on). This command performs inference on the model for 30 seconds, providing insights into the model's performance.
Note The input data shape is not explicitly defined in this command, but the -hint latency option is used to optimize the model for low latency.
For a comprehensive overview of available options and to explore additional command-line options, run benchmark_app --help.
Conclusion
You have learned how to use the OpenVINO toolkit to create an Intelligent Queue Management application using YOLO v8 object detection to count people at retail checkout. This gave you real-time data to reroute customers and minimize wait times.
While this tutorial used the OpenVINO toolkit to create an Intelligent Queue Management System for retail checkout, the possibilities with object detection are vast. For example, a queue of people can occur in situations beyond a checkout, and you’re not limited to only detecting people. For your next application, you can apply the core principles in this tutorial toward new possibilities, like detecting cars to ease traffic congestion on a highway, or even route people at a concert venue.
If you have any questions or things you would like to share, join the discussion on GitHub* or the Intel Community Support Channel. To learn more about developing with the OpenVINO toolkit, see the documentation.
For more detailed information on performance benchmarks, visit GitHub.