The Plan
Virtual Reality (VR) is poised to exponentially change the way experiences will be remembered. Already, almost every major global event is riding the VR wave. The pace of progress is conspicuous given the periodicity of these events. The Winter Olympics is held every four years, and in that timespan, Intel covered the 2018 Winter Olympics live in VR. The jump in just four years.
VR coverage for events is picking up. GoPro covered the Tour de France and the Bastille Day Celebrations in VR. Intel covers the PGA, NFL, NBA and MLB live in VR. Making a direct gain from this trend is the travel and tourism industry, too. The Tourism industry sees a major marketing, promotional and outreach opportunity in VR tourism, or Virtual Reality Tourism (VRT). However, the definitions seem to be fast changing.
It is by now an accepted rationale, that user-generated videos (UGVs) are more favoured by potential travellers and tourists than professionally-created videos. The argument is simple – the technology professional-quality videos has widespread. Yes, studios and companies can provide quicker turnarounds, but that is secondary to viewers, especially those who are looking up content to plan their next holiday. A UGV's differentiator is its sincerity, and that builds the much required connect.
This problem is largely addressed by two methods – tourism business either hire real travellers to sample their destinations, or these businesses move to higher technologies. That’s where VR came in, but now even generating VR content has become an easy task. With how easily accessible VR content has become, and how personalised VR content creators are making these experiences, it seems to only be a matter of time before we pick up our headsets, check out our destination and then book our tickets. Way to go, and surely not a long way.
This status quo is what got us geared up to dream, design and develop a demo application for VRT. The potential is endless, and this level of personalisation is still being simultaneously invented and discovered. In our pre-research, we ended up identifying three key aspects for a viable 360˚ videos for tourism:
- Viewers look for unpretentious takes on destinations. Any hint of branding, marketing or for even window-dressing isn’t encouraged.
- They are looking for the raw truth. If a certain destination is mostly crowded, they want to experience how crowded it is at its peak, and when it isn’t.
- Lastly, better-quality experiences lead to higher recall.
We believe the first two aspects don’t have a workflow or a process that brings it out in 360˚ content. One needs to be transparent and observant, and it’s as easy as said. For the third, like we mentioned earlier, there are quite a few software and hardware that can help you record. However, this is a purpose this article could serve.
So we drew our maps, packed our bags and set off, to discover how to literally view new lands through a new lens – personal, candid, honest and up-close. To begin with, here’s a list of essentials we’ve identified for the invigorating journey that VR and 360˚ movie-making.
Travel Essentials
On our journey to get travellers their destinations to them, we packed:
- Intel® Core™ i7-8700k C.P.U.
The Intel® Core™ i7-8700k is the extra processors with this generation, the improved fabrication architecture, the overclocking capabilities, makes production a seamless process.
Check the complete specification list and compare it to other Intel processors, Intel® Core™ i7-8700k.
- nVidia GeForce* GTX 1080
Our personal opinion, but the GTX 1080 seems to best complement the i7-8700K computational capabilities for VR movies and videos. It works well, adequately supporting heavy editing.
- GoPro Omni
The Omni is a rigid rig of six Hero4 cameras (sold separately). It also is easy to manage the SD cards and batteries. This coupled with the Omni Importer software for a quick and valuable rough stitch made our entire shoot easier.
- Sennheiser Ambeo VR Spatial Sound Microphone
The Ambeo VR Mic scores on multiple fronts: It’s sleek, ergonomic yet sturdy, plenty of support out-of-the-box, and its tetrahedral designs and engineering seems to be why it capture the minutest of sound details in the environment, which is apt for our use case.
- Zoom F8 Field Recorder
This Recorder is ergonomic, has eight input channels, recording an additional two channels (stereo mix) simultaneously, with a 192 kHz capacity at 24-bit resolution. It also supports phantom power, a requirement for the Ambeo VR mic.
- Autopano Video and Giga 3.0
Autopano’s implementation of Scalable Invariant Feature Transform, or scale-invariant feature transform (SIFT), makes for one of the smartest stitching we’ve seen; we’ve been using Autopano for a while now, and its eased our workflow considerably.
- Reaper 5.76
Working with Ambisonics and large-scale VRT applications and movies requires a sound workstation that’s lean, has a good number of SFX options, can convert to almost any media, and support a high number of channels and plug-ins. The Reaper 5.76 fits the bill.
- AMBEO A-B Format Converter (v1.1.2) Plug-in for Windows*
The Ambeo A-B Format Converter is as sleek, minimal, intuitive and effective – The plug-in provides an output in a matter of a few clicks.
- Spatial Workstation (VST) – Windows – v3.0.0
This Facebook* Audio 360 product is a bundle of goodness – right from its feature list and capabilities, to its intuitiveness and ease of use. It also works superbly well with the Reaper.
- Adobe After Effects CC 2018 (15.0.1)
This product has been our list ever since we started out with 360˚ videos and movies. Its VR Comp Editor in its more recent versions, Cube Map, Sphere-to-Plane, Rotate Sphere, and its easy-to-use converter and bank of VR-ready effects makes it a good choice.
- Oculus Rift* and Touch (Hardware)
With a simple and quick set-up, and the comfort we noticed many of our test-users have in using the controls (touch) made this a simple choice.
- Oculus Integration for Unity* SDK 3.4.1
This is a mandatory selection if the Oculus is the chosen hardware. However, the level of documentation available for the Oculus and this SDK, and the flexibility in the SDK itself makes this a convenient choice.
- Unity Editor (version 5.6.4f1)
Though this isn’t the latest version, this serves well for our bare minimal requirements. It’s also easy to develop, experiment and deliver.
Our Map
Given all this potential, we simplified our demo application’s flow:
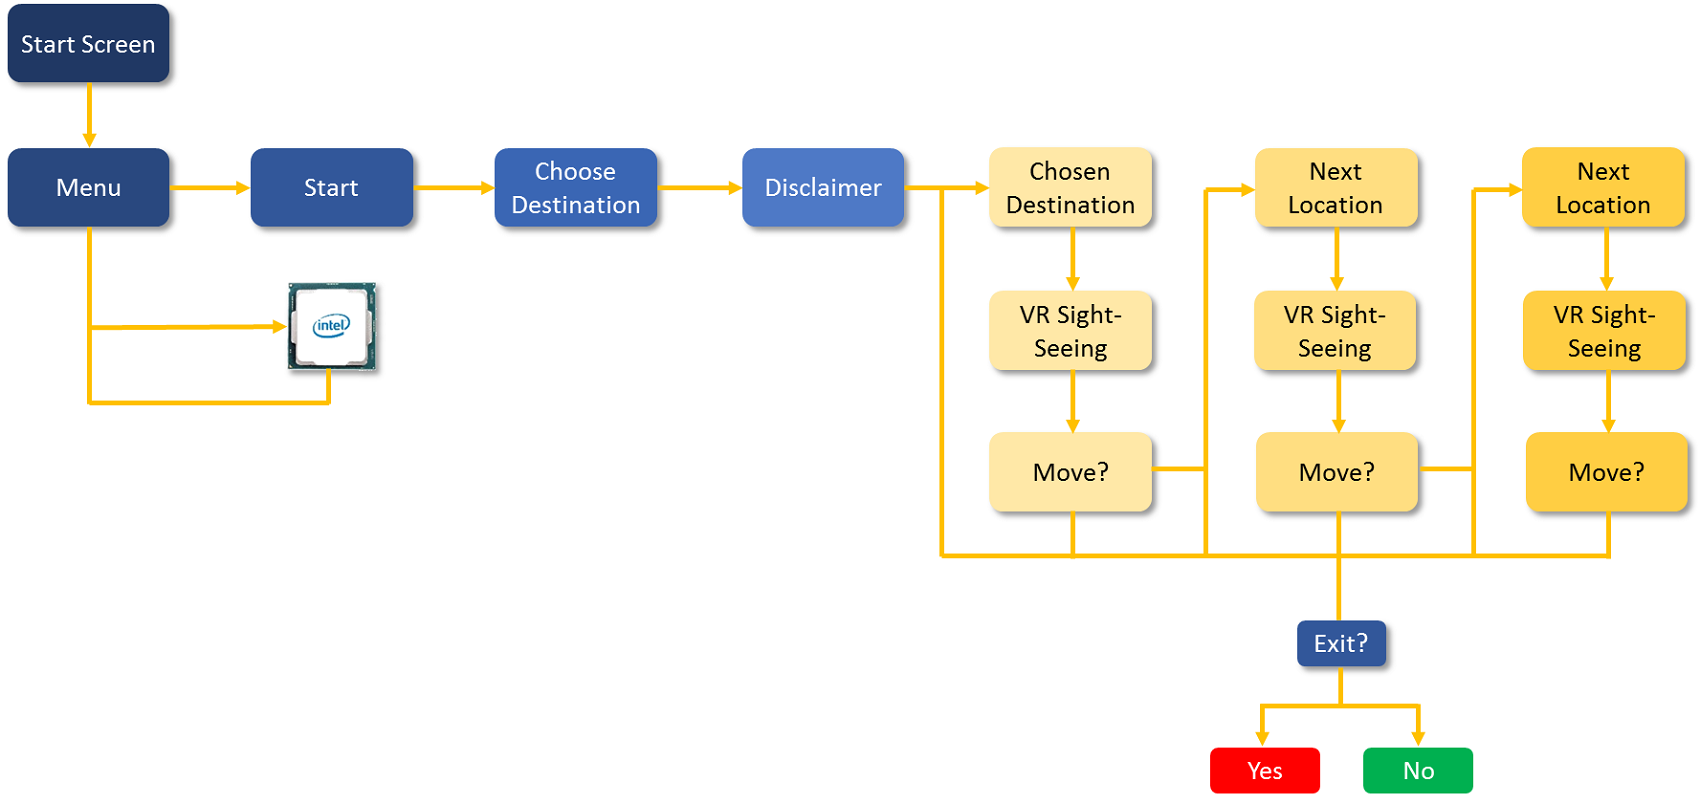
Figure 1. The Flow of our Demo VRT Application
We concede there’s a lot more that can be done with the application. However, this being a demo, we allowed ourselves to dedicate much of our attention to the production work-flow, and it’s been quite the epic adventure. Much of our learning is what we’ve tried to share through this article.
This demo has been developed for the for the following end-user specifications:
- Intel® Core™ i5-6400k C.P.U., any 6th Gen processor, equivalent or higher
- nVidia GeForce GTX 970, equivalent or higher
- 8 GB RAM
- 1 GB free space
- Oculus Rift and Touch
- Oculus App Version 1.20.0.474906 (1.20.0.501061)
- Windows® 10
The GoPro Omni with its Hero4s gave us some really good quality shoots, which were more than complemented by the Ambeo VR mic. The quick stitching and polishing with the Autopano Video and Giga helped us deliver visible results with a lot of the time saved, while the Reaper and the Ambeo A-B converter played small but significant roles in sound conversion, while maintaining its crispness. The Spatial Workstation simplified the process so easily, it could be managed by the non-video specialists on the team too, while the new functionalities in the Adobe After Effects 2018 saved much of our visualising bandwidth with its real-time previews. Lastly, the biggest backstage influence was the i7-8700k, which carried out heavy processes with minimal lag and latency.
On the Road
Shooting a VRT 360˚ video has an easy workflow – Set up the rig, shoot and record, stitch and import, edit. The problem is, a lot of teams tend to miss on the finer details, which tends to make the process a tedium. Though our hardware helped in covering many of these finer details in our case, we still adhered to these steps:
Shooting your movie
Pre-production
Much of the troubles faced when shooting in VR can be avoided with these simple pre-production checks.
Your designs
One of the biggest challenges to VR is that there’s no place to hide the equipment and the crew. While this may illicit a laugh, think of it… Where do you position your lights and reflectors? Should the director be part of the supporting actors, or sit under the camera?
The ideal solution is to plan on paper – light source(s), camera, props and staff positions, movements, etc. In most VRT videos, directors can blend with the crowd. It works as a good Easter egg too.
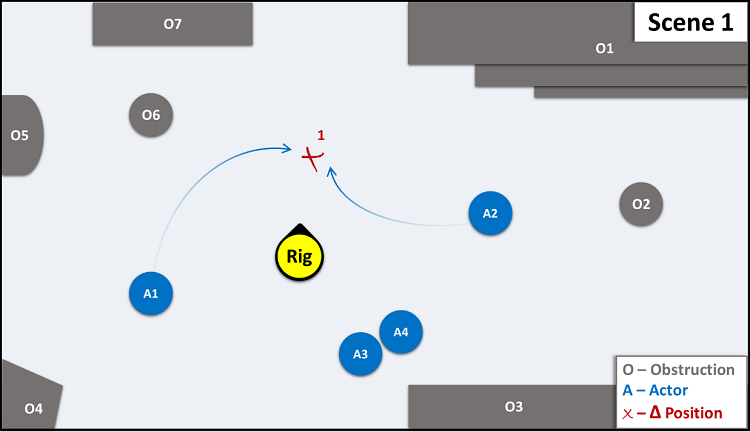
Figure 2. A Scene Map
Note: Shape’s shadows make it clear the Light Source is at the top, and spread out over the scene.
More importantly, most VR cameras are known to have a low battery capacity, while most use cases’ environments, especially VRT’s, may allow for a very limited shooting time. With your designs and plans in place, the number of shots can be limited to the required minimum.
Your hardware
In our case, since we used the GoPro Omni, we were saved of the following set-up steps. However, hardware being the primary receptors for your project, it calls for specific attention, that can be described as:
i. Be Loyal: Once you have made your choice of hardware (including cables), ensure it is the only type used, i.e. don’t mix Hero 5s and 6s, SD card brands or classes, or old and new cables, etc.
ii. Be Personal: Uniquely label each hardware – it’s ideal to maps to the camera, i.e. the rig slot, SD card and cables for camera ‘5’ will all be labelled ‘5’.
Production
With the set-up in place, you are ready to shoot. Here are some suggestions to avoid your no last-minutes hiccoughs.
Your camera
Firstly, it is best advised to sync all your camera’s date and time with your system. Not everyone will need to do this every time, but it’s best checked. However, the following steps are advised for all events:
i. Name all your cameras in the setup, as per the labelling you followed, or vice-versa.
ii. Format all SD cards, and keep them empty
iii. Recommended settings are generally 60 FPS and flat colours – anything below 60 tends to cause motion sickness, and non-flat colours may be difficult to stitch; colours can be added/enhanced and FPS transcoded if need be, post-production.
iv. Fully charge all of your cameras.
v. Ensures the rig is safe, sturdy, and especially in the case of VRT, at a vantage point.
vi. Most importantly, set the camera’s height at your viewers’ average eye-level.

Figure 3. Steps in Readying your Camera in Production
Your shoot
i. Once the rig is set up, test the camera syncing and motion by rotating the camera when recording first. The GoPro Omni Import software provides with a good quality rough stitch, but you aren’t using such a software, it’s best if you can test it.
ii. Overheating is still a worry with most cameras. So it is best to maintain a recording time below 10 minutes, and keep the rig away from direct sunlight as far as possible. If any of your cameras do heat-up, switch all cameras off and resume shooting only after they have all cooled down.
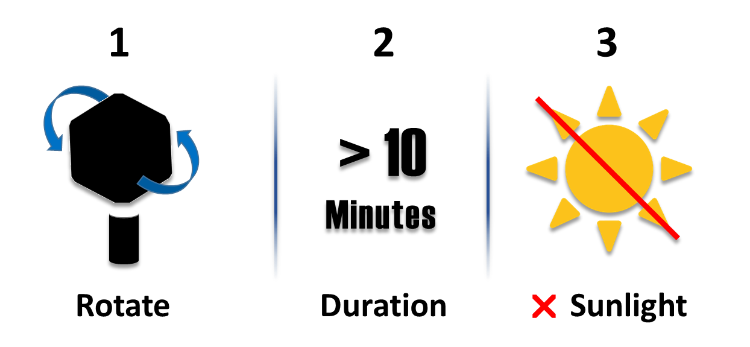
Figure 4. Checks to Follow while Shooting
It is largely accepted that a viewer’s average attention span is 3-5 minutes, and is lesser for VR (some peg it at a minute, but we think it may be pushed higher for certain use cases). However, there still doesn’t seem the need to continuously record at a camera angle for more than 2-3 minutes in any use case we know of, except when recording events.
Post production
This is where you’d be better off with a high-end system. While mid- or low-range capacity systems work too, a higher-end system, any day, is more responsive, and allows you to multi-task and finish tasks faster.
Your files
Following a systematic file management process helps avoid confusion about missing or duplicate scenes. It also helps to easily edit the entire scene.
If you have imported your videos correctly, then the naming convention will be as per camera.
Here are four simple steps you should then follow:
i. Import all your videos as in the same order you labelled your cameras (first camera 1, then camera 2, and so on).
ii. Review, if need be, all the raw footage, and rename or tag the videos that make the final cut.
iii. Create a folder structure in you editing station, with a folder per scene.
iv. Move all the shortlisted videos to the designated scene structure.
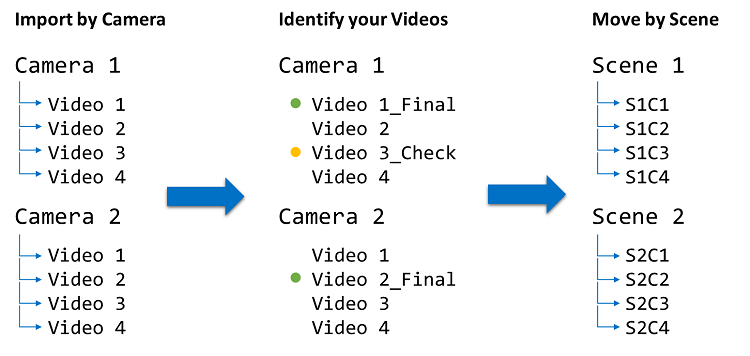
Figure 5. Steps to Follow to Efficiently Manage your Files
As an additional step, consider renaming files to include the scene number to it, since file 3 on the Cam 1 may not correlate to Cam 4’s file 3.
Raw files for VRT are usually manageable, but if you are making a movie, we recommend the 360CamMan. It’s pegged as one the first VR file-management tools, and can help you do so in minutes. You will find their complete documentation in Introducing 360CamMan V2: The Latest in VR Media Management Software.
Your movie
Kolor’s AutoPano Video, acquired by GoPro in 2015, is a highly recommended tool to seamlessly stitch your videos together, since it automates much of your arrangement and set up. You can find the all the details on how use the tool in Autopano Video - Synchronization
To simplify the entire process, they commendably use Scalable-Invariant Feature Transform, or SIFT based algorithms to ascertain what the best match of your selected raw files are. However, they need that little push from you:
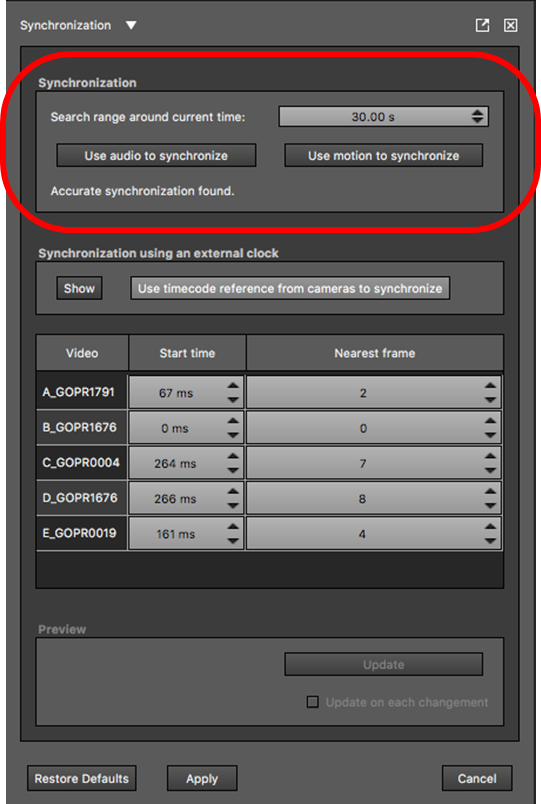
Figure 6. The Synchronization Panel. Image sourced from Kolor
i. You can synchronize based on audio (in our article’s flow, you will see more about it ahead), or motion (the step where you rotate the camera). Given your production and shooting process, you will need to inform the software which is the better option.
ii. Select the approximate time where your actual recording begins – usually, this will be a little after recording begins, since not all cameras can be remotely controlled.
It is advisable to provide a 5-10 second buffer before the actual time of your actual scene, which you can always take off once the video is stitched for you.
While both options are good, we’ve observed that Autopano is more accurate when using motion as the reference. If the synchronise-with-motion option may be off, you can use the equally brilliant AutoPano Giga. When AutoPano Video stitches your videos, it automatically adds Control Points, or logical points of overlap between videos. Through AutoPano Giga, you can add additional Control Points, there by fine tuning the stitch. You can view the complete documentation of the same, Autopano Video - How to fix the foreground.
Your finishing touches
Finally, import your final video file into a video editor, and add elements as you would in a regular video. In our demo application, we’ve added small text boxes to provide a basic description of the place, using the Adobe After Effects CC, 2018.
Recording your audio
It’s a simple argument to make in favour of audio dynamics in VR: As our medium allows viewers to look wherever they want to, sound works as the best cue to indicate where the user should look.
Let’s first look at a types of sound technology, to better appreciate the sound best suited for VR. For the sake of brevity, we’ll limit ourselves to Monophonic or Monaural, Binaural or Stereophonic Sound, and Ambisonics.
Introduction
Sound generated in any real environment, comes from multiple positions of source, with a level of reverberation, amplitude, and in some cases, projections. Through varied primary and secondary senses, we interpret the location, intensity, and in many cases the vector of the source too.
Monophonic sound
Monophonic sound is the earliest attempt at reproducing sound technologically, through a single channel, i.e. it provided all the sounds as if from a single point or source. However, this quickly evolved to Binaural and Surround sound, which uses two or more channels.
Binaural and stereophonic
Many of the cues we use to position the sound source depend on the shape, positions and make of ears, and also the make of our head. That is to say, people with big and denser heads (we mean this scientifically only), with larger, spaced out ears, hear sound differently from people with different features, but clearly not different enough to disagree with each other.

Figure 7. A 2D Representation of Methods of Sound Output
For a better understanding, imagine you’re a friend playing an instrument, marching left to right, then right to left. There is a marked a difference in your perception each time she/he crosses you, isn’t it? These multiple channels are to emulate this differentiation between the left and right ear.
We’ve clubbed Binaural and Stereophonics because they are multi-channelled, and speaker-oriented. The higher the number of channels (5.1, 7.1), the more options for the audio engineer to place sounds directed to those speakers. In Binaural production, a Head-Related Transfer Function is used to algorithmically emulate how we would hear the sound in a real environment. In fact, as you may already know, the latest Binaural recorders actually have a 3D model of a head and ears on them, complete with an ear canal and a mic placed within it.
Ambisonics
When it comes to VR, the drawback with such sound is that however you change your position or orientation across the (X, Y, Z) axes, you’d still hear it as if you haven’t moved at all. Ambisonics comes in, since the ‘70’s, so sound engineers are more concerned with where and how the sound is positioned in the recording environment, to emulate the same dynamics in the final output. Note that they don’t rely on the speakers, how you position them, or given most HMDs today, your headphones to make the decision using decoders; it’s the virtual emulation of sound that matters.
To sum it all up, despite multiple channels, all sound techniques deliver sounds on a plane for a fixed point, except Ambisonics; Ambisonics includes the third dimension and user-driven mobility.
In this article, we will discuss only first-order Ambisonics, which is recorded using four channels in what is called the A-format – raw sounds recording the sound dynamics as is, with a channel for a mic (the Ambeo VR Mic is a combination of four mics). This is later decoded to the B-format for final output. B Format is a W-X-Y-Z representational sound render in the sound sphere, where X, Y, and Z are the three axes for sound patterns, and W is the summation output, with a fixed sound pressure.
As an oversimplification, think of the sound source in Ambisonics as an archer, with X-Y-Z defining her/his position, and the W the force with which the arrow is shot.
For the sub-sections ahead, we will cover the tips and workflow for recording Ambisonics for VR. For a specific tutorial on how to use the Ambeo VR mic.
Pre-production
Like in setting up for the shoot, there are minute details that you need to pay attention to, for a smooth and easy production and post.
Your designs
The biggest strength of Ambisonics also becomes one of its weaknesses in certain use cases; it didn’t apply to our specific use case within VRT, though. Ambisonic mics, and especially the Ambeo VR Mic, powerfully record all the ambient and environment sound. This would mean in your set design or your recce for VRT, there are primarily two considerations you should make:
i. Are there sounds in the environment that you do not require (air conditioner or other machines)? If so, then the best alternative would be to take the source out of the set. If that isn’t possible, then move it far away from the mic, or vice versa. If that isn’t possible too (it seems like a likelihood for certain use cases), specifically record them using the ideal position through the VR mic, and take it off in post-production.
ii. On the other hand, are there sounds that you’d like to highlight (Dialogues, SFX, Musical Instruments)? If so, it is recommended they are independently recording using Lavalier on your scene or otherwise too; your Ambisonic mic can provide the context. You can always spatialize such audio using spatializer plugins. Also, we’ve noticed that overlay between the Lavalier and the Ambisonic mic provides for a better experience.
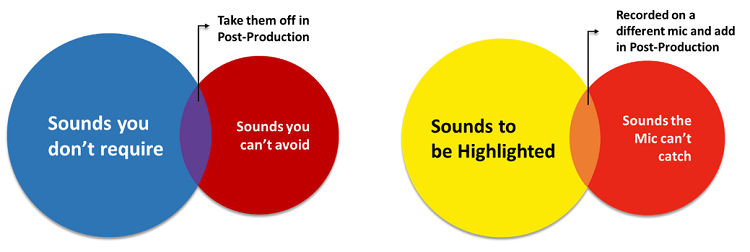
Figure 8. Planning your Sound-Design Requirements
Your hardware
Since we were using the Ambeo VR mic, most of the steps were already managed for us. However, these nitty-gritties may save a lot of hassles, and hence recommended by most in the industry. They can be tersely summarised as:
i. Be Loyal: Ambisonics is recorded on four channels, which means you would need four XLR outputs and a field recorder with four channels, besides the gain link. Ensure you connect the correct output to the correct slot, by labelling them.
ii. Be Power-ready: While the Ambeo VR Mic has XLR cables out-of-the-box with a gain link, they are phantom powered. Check those setting for your specific hardware too.
iii. Be Apposite: When it comes to gain, its best your field recorder not only allows for a unified controller, but also has a digital display. This would ensure that all the channels have the same gain, and you can be absolutely sure what that value is.
Production
Your microphone
In any VR experience, the microphone is the viewer’s ears. While that is common knowledge, if there are varying degrees of this statement’s implication, it applies the most in VR. That’s why, it’s best that the mic is as close the camera as possible.
i. Check with your Director of Photography what the ideal place for the mic is, since depending on the requirement and/or the environment, you can use any of these three options – above, beside or below. Most go with below, since it easiest to keep the mic outside the shot. For all other options, you can use a Magic Arm or any other suspension option, as long as it still is away from the shot, and close to the camera.
ii. The alignment is absolutely important. While in our VRT use case, we kept it upright so we could capture all sounds equally, some use cases may require the mic to be tilted. This should be fine, as long as the mic’s top and centre matches the camera’s, and it’s in Camera-1’s direction.
If you’ve noticed by now, the camera will come in the way of recording. While now-a-days you do get cameras with inbuilt mics, the issue still remains to some measure. There’s seldom anything you can do about it, but we’ve never felt it dampening the experience.
iii. Check for handling noise and wind protection; such issues get magnified in Ambisonics.
iv. Use a tone generator to test each of the channels. We are not insinuating the absence of a perfect recorder in the market; consider this a standard check, so you don’t end up discovering this issue in your studio, since Ambisonics are cumbersome to correct, and Ambisonic-compatible SFX aren’t freely available in the market yet.
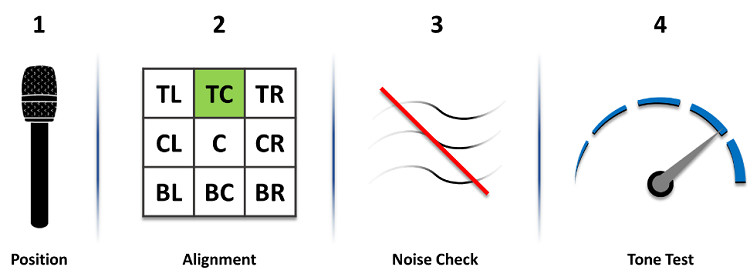
Figure 9. Steps to Set-Up your Mic
Your recording
There are a few more checks to be carried out before we can start recording. To state some important steps:
i. Set the mic to record 24 bits, with a sample rate to 48 kHz.
ii. Once you’ve set-up, get the room response, or as referred to technically, a convolution reverb – use a clap board or clap from around the mic, or use a balloon or a sine sweep so you can map the sound of the room for your post production.
iii. Also, monitoring while recording is still an issue in Ambisonics. The hard but required method to do so is by making a quick test after each set-up or adjustment. That is, take your files, convert it to stereo and/or Binaural and test it once at least. In a few possible cases in VRT, the environment may not always be too dynamic; we recommend having a dry-run in the same settings before the actual shoot.
The simpler, yet tedious way would be to wirelessly transfer from your recorder, but currently, all known outputs are in stereo, so you can’t verify the Ambisonics real-time. However, on the positive side, at the least you can check if any channel is clipping.
iv. Lastly, once the camera and the mic are recording, clap before you take a shot – if you’ve read the Camera Shooting section of the document, it should be before you rotate the camera; if you’ve read the section that covers stitching, you’d know it’s relevance there too.

Figure 10. Steps to Follow just before Recording
Post production
At this risk of being redundant: Most Ambisonic files are absolutely heavy, and requires using core-intensive applications. You may have to multi-task with the necessary plugins, too. Given high responsiveness is a criticality here, we can’t stress enough on the importance of a high-end processor.
Your files
Like in the case of your video files, it’s a necessary step to avoid any chance of overlap. It may not be as intensive as the videos, given that there’s just one mic as opposed to many cameras, but there may be possible mismatch between the audio and video:
So, once all the files are imported:
i. Review all the raw footage, and rename or tag the audios to match their respective video files, across cameras.
ii. Create a separate folder structure in your audio work-station, with a folder per scene.
iii. Move all the shortlisted audios to the designated scene structure.
As an additional step, consider renaming the files to include the scene number.
Your audio’s processing
Your audio is currently in the A-format; it needs to be converted to the B-format. We used the AMBEO A-B format converter plugin, which made it a rather easy process, that Sennheiser has captured very well.
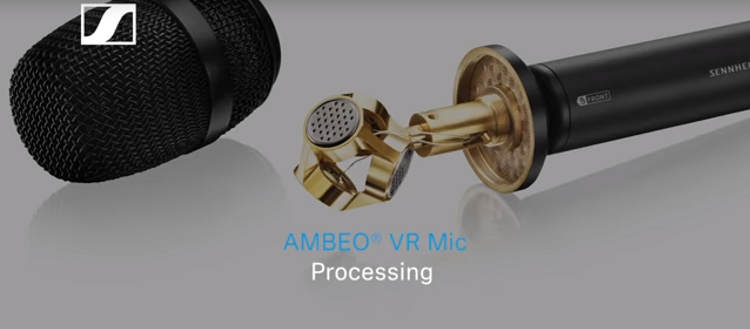
Video: AMBEO VR Mic for 360 and VR videos - Processing

Figure 11. The Ambeo A-B Format Converter Plug. Image Sourced from Sennheiser
Here are the steps that need to be completed, in any order:
- Set the correction filter ‘On’, as recommended. It would automatically adjust the frequencies for a uniform output.
- You can opt to cut out the lower frequencies if need be.
- Select the microphone position: there are pre-sets at the bottom, or you can use the interactive dial or number field for the exact angle.
- And finally, select the output format you need, which would be AmbiX.
Your Audio Integration.
You now have your four-channel, AmbiX format audio file, readied and available in your work station. Once this is here, we need to render it in the it into a .tbe (Two Big Ears) file that can be included into your custom application build into Oculus.
In our VRT demo application, we could afford to solely rely on the Ambisonics mic input, and didn’t have to specially convert any stereo/mono file into the AmbiX format. If that’s of interest to you, check this Sennheiser Tutorial:
Video: AMBEO VR Mic for 360 and VR Mixing
For the complete, detailed documentation on how to use the Facebook Spatial Workstation (VST) – v3.0.0, including the next step.
So, once all your required files are ready in the B-format, you need to render sound files to a .tbe. We used the Audio 360 Encoder. Since we would integrate the video, audio and interactions via Unity.
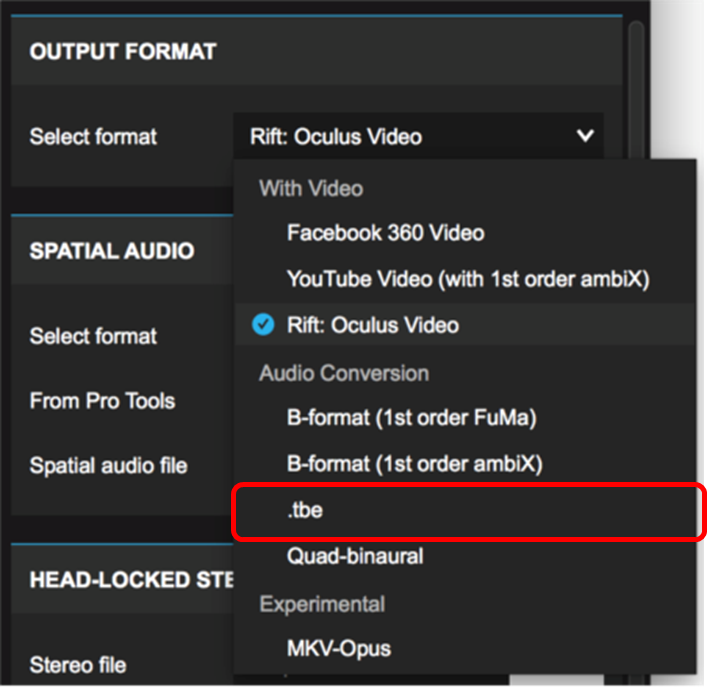
Figure 12. Rendering the Audio for the Application. Source: Facebook Incubator
Adding interactivity
In our demo application, we went through the process mentioned up to this point in the article, thrice over, since we had three 360˚ videos to demo. A look at our application flow will tell you that you can move from location to the next, with a simple selection interaction.
This interaction was developed in Unity, using objects colliders that triggered the next video, depending on the choice.
New Lands, New Sight
A lot of our process was slimmed down, given that we were making a demo application. Having said that, we are eager to implement the lessons learnt in our next application.
Firstly, we used to think implementing Ambisonics was a difficult task, till we actually began implementing it. While we aren’t debating the commercial aspects, just the implementation is a much simpler workflow than we initially thought it to be, which brings in an urgent discussion.
As of this article, much of the proliferation of VR experience and 360˚ movies seem to be focused on off-beat experiences, stunning visuals, beautiful concepts and the likes. Barring the higher budget movies and videos, not many seem to pay attention to the audio. While visuals can’t be discounted for, audio provide the experience an edge, given how much it accentuates the experience. While we did notice the more recent attempts pay ample attention to audio, we believe there are a lot more of us that need to catch up. We are sure it will be sooner than later.
However, we like the idea of Ambisonics being the guide to a viewer’s attention, which is vital in full-fledged VRT applications – imagine a guide accompanying you on one of your virtual trips, and asking you to follow her/him by clicking on a hotspot.
About the interactivity, VRT can fuse together with the oft experimented concept of interactive movies. Tools like Unity serve well to add simple interactivities, which can positively impact such an experience, beside personalising it too. This will just be moving from one, locked position to the next, which is in itself one of the better experiences. However, the future where we can move within a video isn’t too far…
Intel has already adopted Volumetric Recording for a true-360˚ experience. Along with Hype VR, Intel’s CEO Brian Krzanich and Ted Schilowitz, co-founder of Hype VR, made a thrilling demonstration of the same at the CES 2017, and this year again demonstrated how Intel uses the same in its Live VR transmissions. Schilowitz states that it’s about 3GB per frame… We doubt this volume of data generation is to drop much, and computational power and storage capacities are surely to increase by the time volumetric cinematic recording technology reaches us.
With this, we see the need for a powerful processor. Perhaps, they’d make a debatable difference for smaller applications like our demo. However, dealing with larger projects, multiple applications and plug-ins tying into each other, and TBs of content call for an unhampered multi-tasking.. Tapping into such software and hardware capabilities, and it’s only a matter of time before we begin take our viewers to the Mars…
So, where are you planning your next trip to?
About the Author
Jeffrey Neelankavil is a communications’ design and technologies enthusiast, and is part of the Intel-Tata partnership for VR technologies.