The Intel® Vision Accelerator Software package is optimized for edge inference on the Gen 3 Intel® Movidius™ VPU (code names Keem Bay and Shamrock Bay).
Requirements
You must have the following on your IA Host system before using the instructions in this guide.
- One Gen 3 Intel® Movidius™ VPU (PCIe* card)
- One of the following processors:
- 6th, 7th, or 8th generation Intel® Core™ processor
- 6th, 7th, or 8th generation Intel® Xeon® processor
- Intel® Pentium® processor N4200/5, N3350/5, N3450/5 with Intel® HD Graphics
- At least 16 GB RAM
- At least 64 GB hard drive
- An Internet connection
- Ubuntu* 18.04 LTS kernel version 5.4
- Python* 3.6 pip installed
- The proxy settings must be correctly set if your Host system is behind a firewall. Make sure GIT, pip, and APT are configured to use the proxy settings.
You must also be to log on to the Host system as root and be familiar with executing Linux* commands.
How to Install the Intel® Vision Accelerator Software
This guide explains how to:
- Confirm the Ubuntu installation.
- Set the Gen 3 Intel® Movidius™ VPU to enable flashing.
- Download the Intel® Vision Accelerator software package.
- Extract the software package.
- Install the software package.
- Set the Gen 3 Intel® Movidius™ VPU to Ready Mode.
- Run sample applications.
Step 1: Confirm the Ubuntu Installation
Verify your IA Host system has a clean installation of Ubuntu Linux 18.04 with kernel version 5.4.
Step 2: Prepare the Gen 3 Intel® Movidius™ VPU for Flashing
The installation uses the PCIe connection between the IA Host system and the Gen 3 Intel® Movidius™ device to flash a Yocto image to the VPU.
In this step you configure the VPU to enable the ability to flash. This step requires changing the physical DIP switches on the device to “ROM recovery mode.”
To enable ROM recovery mode to flash the device:
- Power off the IA Host system.
- Set the VPU BOOT DIP switch pin 5 to 0 as shown below.
- Connect the VPU device to the IA host system through PCIe x4 port or above.
- Power on the IA Host system.
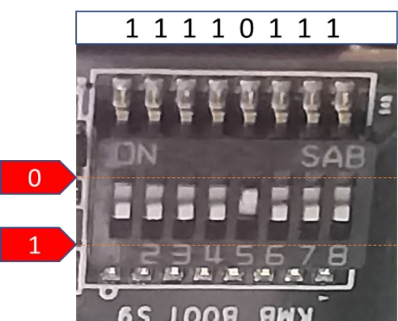
| DIP Switch | 1 | 2 | 3 | 4 | 5 | 6 | 7 | 8 |
| Setting | 1 | 1 | 1 | 1 | 0 | 1 | 1 | 1 |
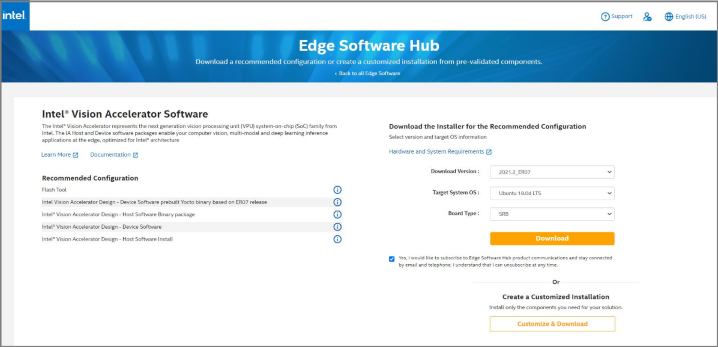
Step 3: Download the Intel® Vision Accelerator Software Package
- Go to the Intel® Edge Software Hub download page.
- Select the Intel® Vision Accelerator Software package download.
- On the download page select:
- Download Version: 2021.2_ER07
- Target System OS: Ubuntu 18.04 LTS
-
Board Type: SRB
- Click Download.
Click Download - Write down the Product key displayed during the download. You must have the Product key to install the software. Contact help through the Support Forum if you don't see the product key.
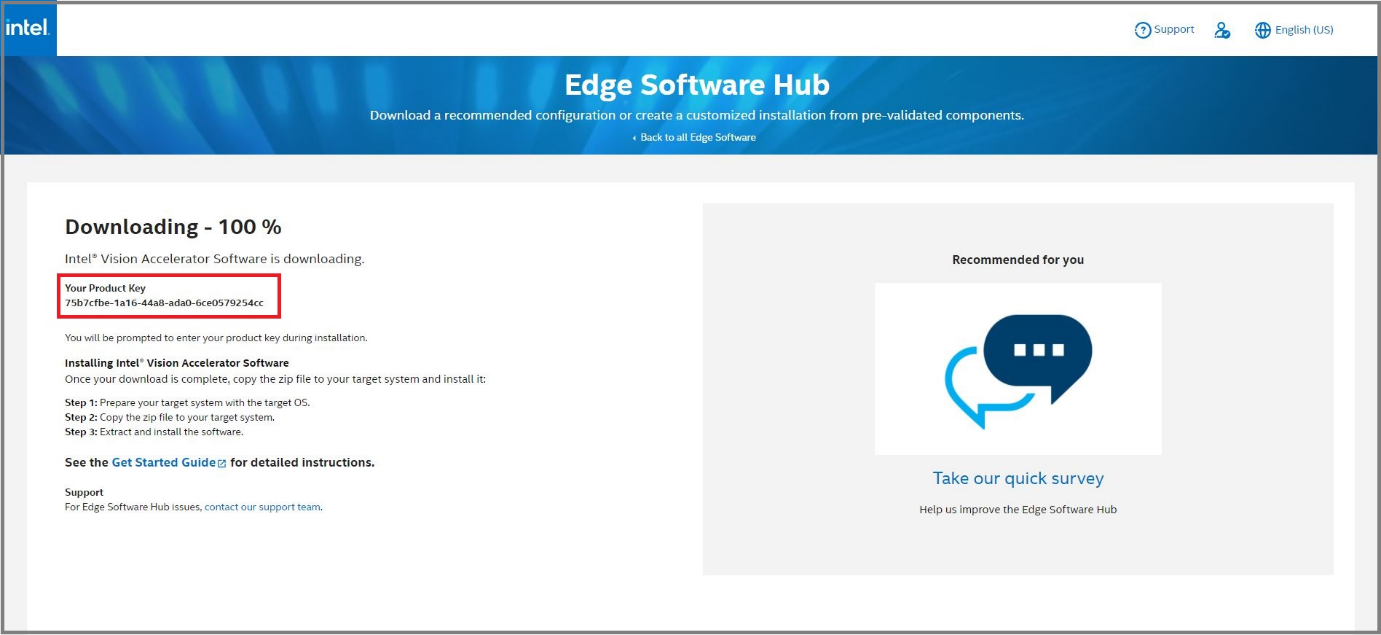
Write Down the Product Key - Close the Downloading window.
The download file name is edge_insights_kmb.zip.
Step 4: Extract the Software
- Open a new terminal.
- Switch to root user:
# sudo su - Extract the package that you downloaded:
# unzip edge_insights_kmb.zip
Step 5: Install the Intel® Vision Accelerator Software
The installation takes 30-60 minutes depending on your Host system and Internet connection speed.
- Type three commands to start the installation:
# cd edge_insights_kmb # chmod 775 edgesoftware # ./edgesoftware install - Type the product key when prompted:
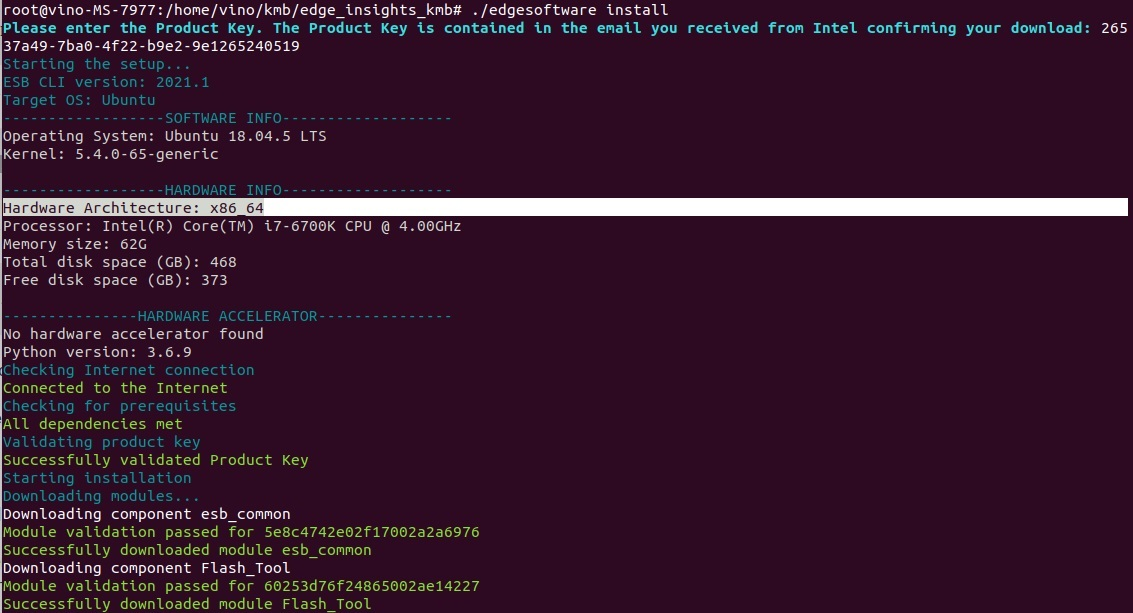
Type the Product Key - Based on components you select and your system configuration, you might be prompted for additional actions.
- Manually intervene if the Qt5.14 package is not installed.
When complete, the installation status of each module displays:
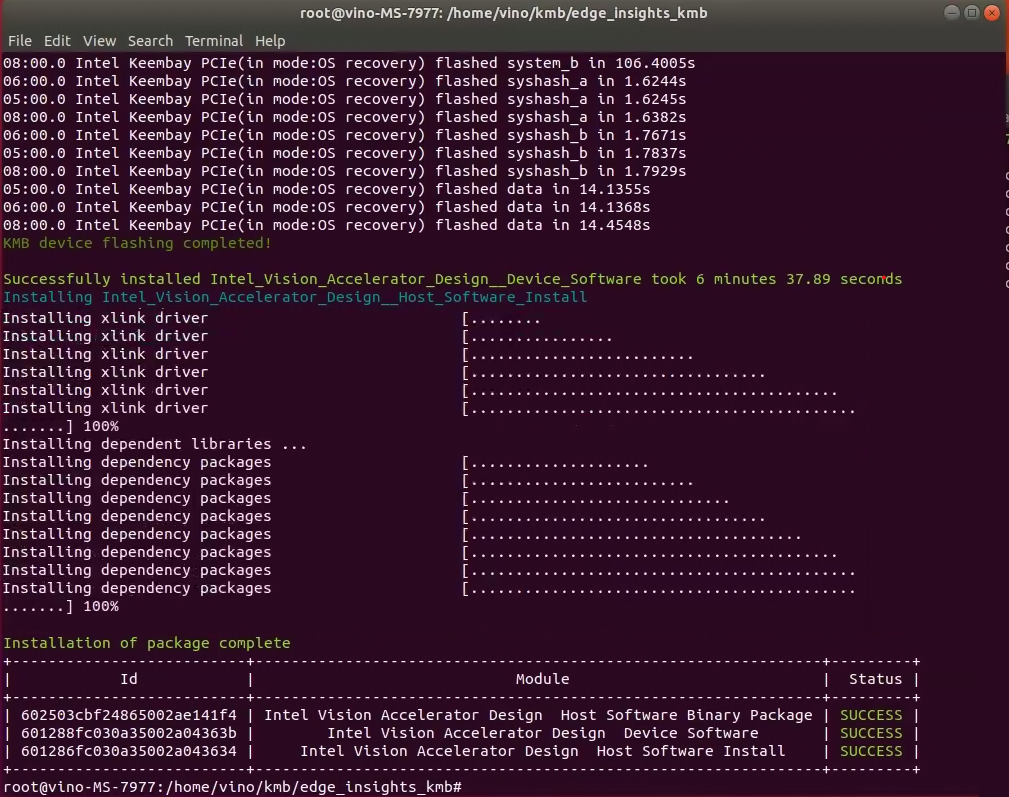
You are ready to set the VPU to Ready Mode.
Step 6: Set the Gen 3 Intel® Movidius™ VPU to Ready Mode
- Power off the Host system.
- Set VPU BOOT DIP switches 5 and 8 to 0 (On) as shown in the image below.
- Power on the Host system.

| DIP Switch | 1 | 2 | 3 | 4 | 5 | 6 | 7 | 8 |
| Setting | 1 | 1 | 1 | 1 | 0 | 1 | 1 | 0 |
Step 7: Run the Sample Applications
Advanced Mode
- Start the hddlunite service:
# cd /opt/intel/vpu_accelerator_samples/hddlunite # source ./env_host.sh # bin/hddl_scheduler_service & # bin/SetHDDLMode -m a - Start a new terminal to run the demo:
# cd /opt/intel/vpu_accelerator_samples/advanced/
# source ./env_host.sh
# ./run.sh config/s8_avc.json
Bypass Mode
- Start the hddlunite service:
# cd /opt/intel/vpu_accelerator_samples/hddlunite # source ./env_host.sh # bin/hddl_scheduler_service & # bin/SetHDDLMode -m b - Start a new terminal to run the demo:
# cd /opt/intel/vpu_accelerator_samples/bypass/
# source ./env_host.sh
# ./run.sh ./config/s8_avc.json
Streaming Mode
- Start the hddlunite service:
# cd /opt/intel/vpu_accelerator_samples/hddlunite # source ./env_host.sh # bin/hddl_scheduler_service & # bin/SetHDDLMode -m s - Start a new terminal to run the demo:
# cd /opt/intel/vpu_accelerator_samples/streaming/
# source ./env_host.sh
# ./run.sh ./config/s8_avc.json
Next Steps
Visit the product page for more information about the Gen 3 Intel® Movidius™ VPU.
For more information about using and running demo applications and configurations, see Chapter 3 of the Gen 3 Intel Movidius VPU IA Host HDDL Software GSG.
Troubleshooting
- Make sure you are using a fresh, clean installation of Ubuntu 18.04 LTS with kernel version 5.4. Earlier software, especially Docker* and Docker Compose*, can cause issues.
- If you lose Internet connectivity at any time, the installation may fail.
- If your product activation key doesn’t work, contact help through the Support Forum.
- If you're unable to resolve your issues, go to the Support Forum.
Legal and Disclaimers
You may not use or facilitate the use of this document in connection with any infringement or other legal analysis concerning Intel products described herein. You agree to grant Intel a non-exclusive, royalty-free license to any patent claim thereafter drafted which includes subject matter disclosed herein.
No license (express or implied, by estoppel or otherwise) to any intellectual property rights is granted by this document.
All information provided here is subject to change without notice. Contact your Intel representative to obtain the latest Intel product specifications and roadmaps.
The products described may contain design defects or errors known as errata which may cause the product to deviate from published specifications. Current characterized errata are available on request.
Intel and the Intel logo are trademarks of Intel Corporation or its subsidiaries in the U.S. and/or other countries.
*Other names and brands may be claimed as the property of others.
© Intel Corporation. All rights reserved