A dynamic linking library (DLL) contains one or more subprograms that are compiled, linked, and stored separately from the applications using them. Multiple applications can use a single instance of a DLL at the same time. You cannot directly run the DLL executable but you can use its implementation in several applications.
This article guides you to create and use the DLL with the Intel® DPC++/C++ Compiler using a command prompt and Microsoft Visual Studio* on Windows*.
Prerequisites
- Check if your system meets the software and hardware requirements from the Intel oneAPI DPC++/C++ Compiler System Requirements.
- Download either the Intel® oneAPI Base Toolkit or a stand-alone version of the Intel oneAPI DPC++/C++ Compiler.
Build the DLL Using Visual Studio*
- Create a new C++ DLL project by setting the language to C++ and the project type to Library.

For example, in Project name, enter DLL1.

- To declare the functions your DLL exports, create a header file.
- Copy the following code into your DLL header file (framework.h):
When you define the macro PROJECTNAME_EXPORTS, the PROJECTNAME_API sets the __declspec(dllexport) modifier on the function declarations that tells the compiler and linker to export a function or variable from the DLL when used by other applications.
To declare the functions for exporting using DLL, use the following statement inside the header file:
The following is an example of the header file:
framework.h
- To add an implementation to the DLL, create a .cpp file, and then add the function definitions.
The following is an example C++ program: dllmain.cpp
- Go to the solution explorer, and then do the following:
a. Select Project Name > Properties.
b. In the left pane, under Configuration Properties, select General.
c. In the body pane, under General Properties, select Platform Toolset, and then select Intel oneAPI DPC++ Compiler 2022.
d. Select OK.

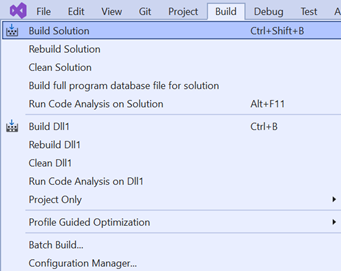
6. In the menu, select Build to build the project to create the .DLL and .lib files.

The output is as follows:

As shown in the previous screenshot, this creates the DLL library.

Create a Client Application That Uses a DLL Implementation in Visual Studio
- Create a new C++ console project.


- Write the source code that uses DLL functionalities. And include your own Dynamic Linking Library header file (for example, framework.h) in source code.
- In the solution explorer:
a. Select Project Name > Properties.
b. Under Configuration Properties, select General.
c. Under General Properties, select Platform Toolset, and then select Intel® oneAPI DPC++ Compiler 2022.
d. Select OK.

- To add the DLL header and to include the path:
a. Right-click the project, and then select Property Pages. A window appears.
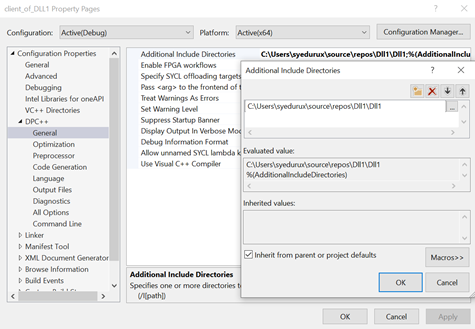
b. In the left pane, select Configuration Properties > DPC++ > General.
c. In the body pane, under Additional Include Directories, enter the path to the DLL header file (for example: framework.h).

- Include the DLL header file (for example: framework.h) and use its functions in your client application.
The following example uses the DLL function Compute(): Client_of_DLL1.cpp - To add the DLL import library to your project:
a. In the left pane, select Configuration Properties > Linker > Input > Edit. The Additional Dependencies window appears.
b. To add the DLL .lib file (for example, Dll1.lib) to the list, type the name in the top box.
c. Select OK.
-
To enter the location of .lib file:
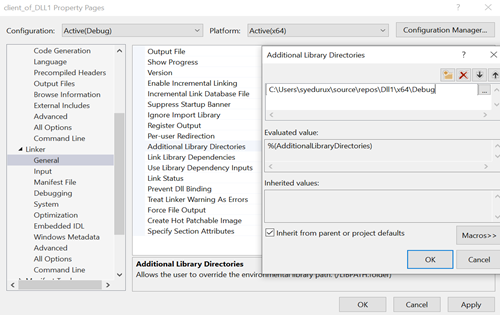
a. In the left pane, select Configuration Properties > Linker > General > Additional Library Directories. The Additional Library Directories window appears.b. In the top box, enter the path to the location of the .lib file.

-
To copy the DLL file to the current working directory that contains the client executable, use the postbuild event option:
a. In the left pane, select Configuration Properties > Build Events > Post-Build Event > Edit.b. Enter the following command:

- To build the application, in the menu, select Build > Build Solution.
The output is as follows:

- To debug the code, select Local Windows Debugger.

The output is as follows:

Create & Use the DLL Using a Command Prompt
- Open a command prompt, type cmd, and then press OK.
Tip You can open a command prompt by pressing the Windows+R keys.

- Initialize the oneAPI environment as shown in the following screenshot:

- To create a DLL, use the following command: For example:
The output is as follows:

The following files generate:

-
To use the DLL inside another application, use the following command:
For example:
This command generates a client_of_DLL1.exe file.
- To run the executable file, copy the .dll file (for example dllmain.dll) to the current working directory.
- Run the program.
