Overview
AI Suite for Visual Analytics (also known as Intel Edge AI Box) Software toolkit is a modular, containerized reference architecture and a toolkit for AI pipeline prototyping and Platform Measurement to kickstart your visual AI solution development. It supports accelerated media processing and inferencing with Intel ingredients such as OneVPL, Libva (VAAPI), Intel® Distribution of OpenVINO™ toolkit and Intel® Deep Learning Streamer framework. It also includes enhanced version of OpenCV and FFMpeg to speed up your Edge AI solutions development. Configure your application end-to-end with flexible AI capacity and reference video analytics pipeline for fast development.
Select Configure & Download to download the package and the software listed below.
![]()
Prerequisites
- Programming Language: Python, C, C++
- Available Software:
- Intel® Distribution of OpenVINO™ toolkit 2024.1.0 (for Base Container), 2024.0.0 (for DLStreamer container) and 2023.3.0 (for OpenCV/FFMpeg Container)
- Intel® Deep Learning Streamer 2024.0.1
- Intel® oneAPI Video Processing Library
- Intel® oneAPI Deep Neural Networks Library
- OpenCV 4.8.0 (limited features)
- Intel® FFmpeg Cartwheel 2023Q3 (limited features)
- XPU-Manager, Node-Exporter, Prometheus, and Grafana for CPU and GPU telemetry
Recommended Hardware
See the Recommended Hardware page for suggestions.
Target System Requirements
- 11th, 12th, or 13th Generation Embedded Intel® Core™ processors
- Intel® Core™ Ultra Processors
- 12th generation Intel® Core™ Desktop processors with Intel® Arc™ A380 Graphics
- Intel Atom® Processor X7000 Series (formerly Alder Lake-N)
- Intel® Processor N-series (formerly Alder Lake-N)
- 4th Gen Intel® Xeon® Scalable Processors
- Operating System:
- Ubuntu* Desktop 22.04 (fresh installation)
- Preferred Ubuntu* 22.04.3 LTS (fresh installation) for Core and Core Ultra platform
- Preferred Ubuntu* 22.04.4 LTS Server (fresh installation) for Xeon platform
- Ubuntu* Desktop 22.04 (fresh installation)
- At least 80 GB of disk space
- At least 16 GB of memory
- Direct Internet access
Ensure you have sudo access to the system and a stable Internet connection.
How It Works
Intel® Edge AI Box reference architecture forms the base to create a complete video analytic system for lightweight edge devices. This package supports the 11th, 12th, and 13th generation embedded Intel® Core™ processors, Intel® Core™ Ultra Processors, 12th generation desktop Intel® Core™ processors with Intel® Arc™ A380 Graphics, Intel Atom® processor X7000-series,Intel Atom® process N-series (formerly Alder Lake-N) and 4th Gen Intel® Xeon® Scalable Processors.
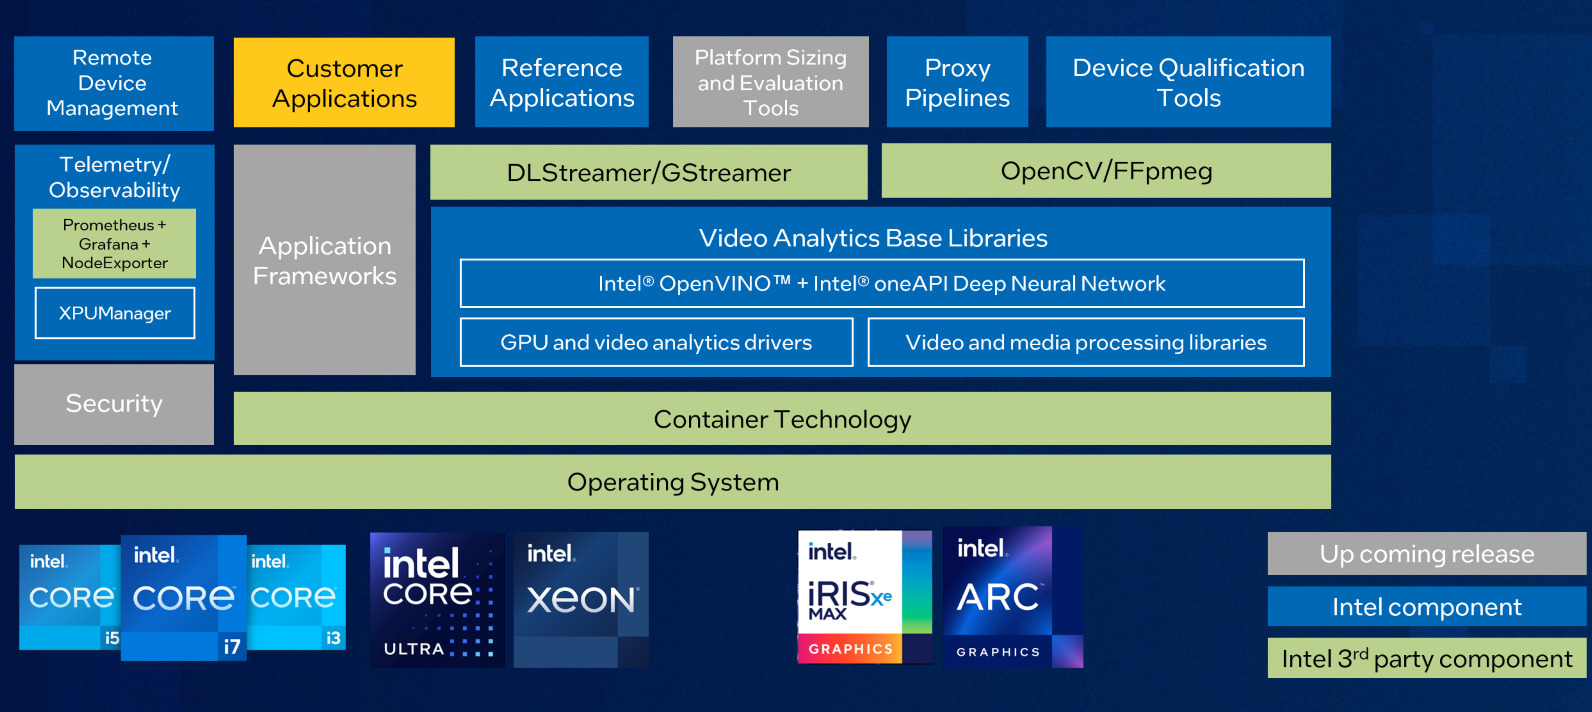
The core of Intel® Edge AI Box reference architecture is a suite of containers. The Video Analytics (VA) Base Library container includes OpenVINO™, oneDNN, and GPU drivers for accelerated inferencing and media processing. Base-devel extends the VA Base Library container:
|
Container |
Content |
|
Base |
VA Base Library (contains OpenVINO 2024.1.0 runtime) |
|
Base-devel |
VA Base Library and OpenVINO 2024.1.0 developer tools |
| OpenCV FFmpeg | Ubuntu 22.04, OpenCV, FFMpeg, OpenVINO 2023.3.0 |
|
DLStreamer |
Ubuntu 22.04, DLStreamer/GStreamer, OpenVINO 2024.0.0 runtime, and developer tools |
Get Started
Prerequisite
- Perform a fresh installation of Ubuntu Desktop 22.04 on the target system.(For Core and Core Ultra platform, Ubuntu 22.04.3 LTS is preferred, for Xeon platform, Ubuntu 22.04.4 LTS Server is preferred)
Note for Xeon platform: AI Box expects a pure CPU configuration on Xeon Platform, all benchmarks will run on CPU. If your system has graphic card, please unplug the graphic card before installing AI Box package.
- Install Thingsboard (Optional)
Follow these steps if you want Remote Device Management feature
- Use another system, install Thingsboard using steps in the link here
- Launch http://<thingsboard_system_IP>:8080
- Enter the default tenant credential as specified in the Thingsboard installation guide.
- At left bar section, select Entities-> Devices
- Click ‘+’ button to add device
- Provide a device name for your Intel ® Edge AI Box
- Click ‘Next: Credentials’
- Take note the Device Access token. Click Add
During ./edgesoftware install, you will be prompted to enter the Thingsboard system IP address, server port (default 1883) and the Device Access Token during Edge AI Box installation below.
Install the Package
-
Select Configure & Download to download the Intel® Edge AI Box package.
Configure & Download
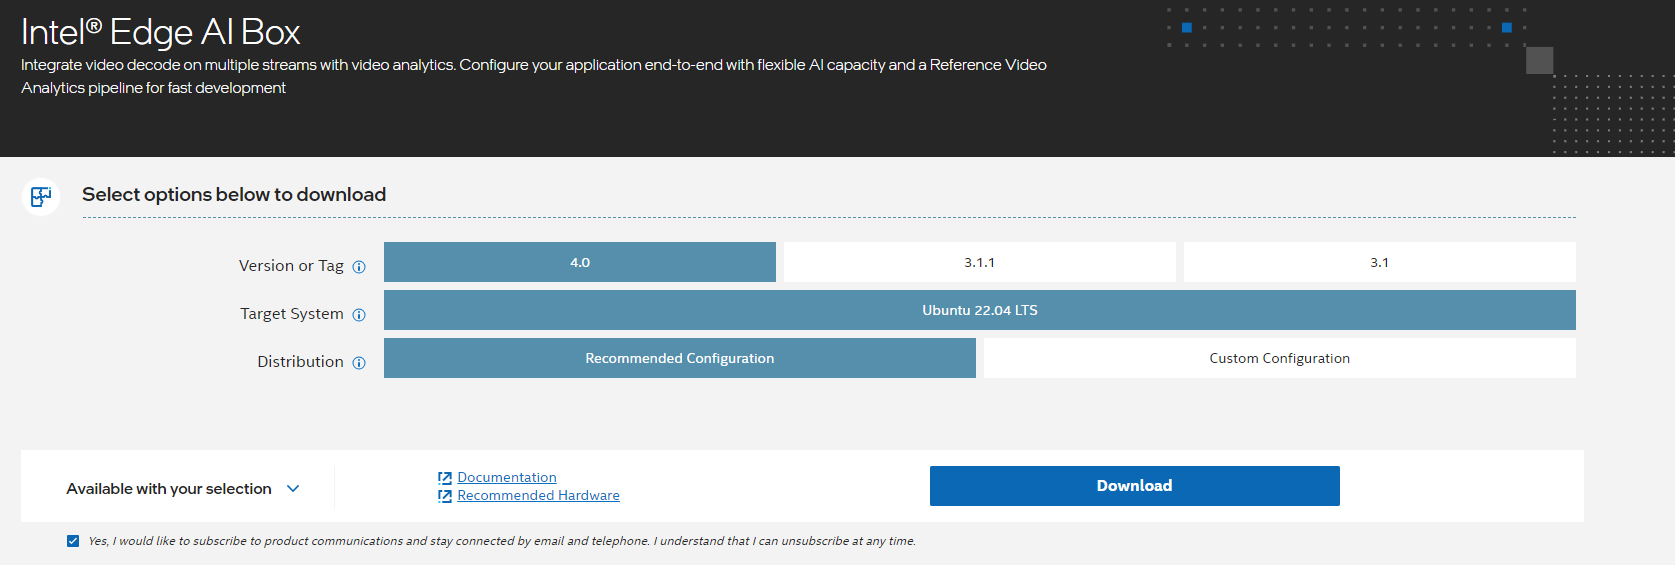
- Click Download. In the next screen, accept the license agreement and copy the Product Key.
- Transfer the downloaded package to the target Ubuntu* system and unzip:
NOTE: Please use the same credential that was created during Ubuntu installation to proceed with the installation for Intel® Edge AIBox
- Go to the intel_edge_ai_box/ directory:
- Change the permission of the executable edgesoftware file:
- For Atom and Core platform, if your OS kernel is 6.5.0-35-generic, check if ‘echo $LC_IDENTIFICATION’ does show *UTF-8. If no, then proceed the following steps:
- Install the Intel® Edge AI Box package:
- When prompted, enter the Product Key. You can enter the Product Key mentioned in the email from Intel confirming your download (or the Product Key you copied in Step 2).
Note for People’s Republic of China (PRC) Network:
-
If you are connecting from the PRC network, the following prompt will appear during bmra base installation:

-
Type No to use the default settings, or Yes to enter the local mirror URL for pip and apt package managers.
-
Similar prompt will appear during bmra base installation:

-
Type Yes to avoid download failure in the PRC network. Below follow up prompts will appear:

-
Type No to use the default GitHub mirror and dockerhub mirror. ** If you want to enable RDM and XPU Manager under PRC network, you need to type Yes to enter an available dockerhub mirror.
-
Next, you can choose whether to install XPU Manager, if you type Yes, please make sure you have replaced the default dockerhub mirror in previous step:

-
The following prompt will appear when installing AIBox Samples, type Yes to use default GitHub mirror:

-
For Atom and Core platform, it will prompt to reboot the system if your kernel is not 6.5.0.35-generic. After reboot the system, go to step 6 again to check $LC_IDENTIFICATION. Then install again with command ./edgesoftware install
- If you choose to enable Remote Device Management feature, type Yes and enter the ThingsBoard server IP, port and access token from prerequisite Step 4 above. If you want to enable it under PRC network, please make sure you have replaced the default dockerhub mirror in previous step.

- When prompted for the BECOME password, enter your Linux* account password.

- When prompted to reboot the machine, press Enter. Ensure to save your work before rebooting.

- After rebooting, resume the installation:
- After the ESDQ is installed, you will be prompted for the password. Enter the password to proceed.

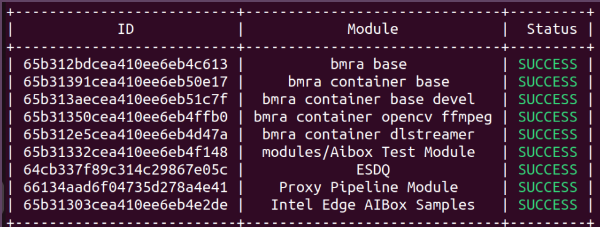
- When the installation is complete, you will see the message “Installation of package complete” and the installation status for each module.
- Reboot the system:
Run Benchmarks with Device Qualification Tools
Prerequisite: We recommend connecting 2x 4K monitors to run the benchmarks.
The Intel® Edge Software Device Qualification (Intel® ESDQ) infrastructure is used to run the test suites. All Intel® Edge AI Box tests are invoked as arguments to the Intel® ESDQ infrastructure. For the complete Intel® ESDQ CLI, refer to Intel® ESDQ CLI Overview.
Find the available Intel® Edge AI Box tests:
Execute all device qualification tests and generate the complete report:
For more details on running the device qualification tools, refer to Intel® Edge Software Device Qualification for Intel® Edge AI Box.
Proxy Pipelines
AI Box 4.0 provides 3 Proxy pipelines, each pipeline has 2 execution modes:
- Benchmark Execution: Run benchmark using Intel® ESDQ tools to find the max number of AI inference channels that the platform can support, as listed in the previous section.
- Custom Execution: Run customized pipelines with config files. You can specify the number of inference streams, the models used to run pipeline and MQTT broker address and topic to send inference metadata. This section will introduce how to modify the config files and run pipelines.
Smart NVR Proxy Pipeline
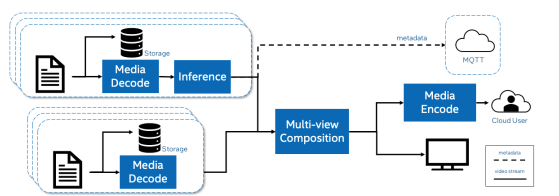
Smart NVR pipeline contains the following process:
- Decodes 25 1080p H264 video channels
- Stores video stream in local storage
- Runs AI Inference on a subset of the video channels
- Sends Inference metadata to MQTT broker
- Composes decoded video channels into multi-view 4K video wall stream
- Encodes the multi-view video wall stream for remote viewing
- Display the multi-view video wall streams on attached monitor (4k monitor is preferred)
How To Run Smart NVR Pipeline
- Go to this directory:
- You may change pipeline configuration in this file

Refer to custom_models/README.md for more information
- To run pipeline:
Headed Visual AI Proxy Pipelines
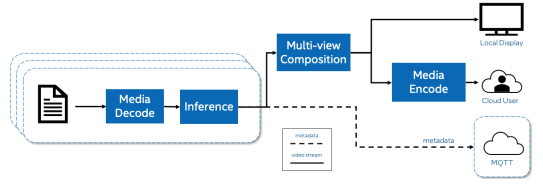
Headed Visual AI Proxy Pipeline contains the following process:
- Decodes a specified number of 1080p video channels
- Runs AI Inference on all video channels
- Composes all video channels into a multi-view video wall stream
- Encodes the multi-view video wall stream for remote viewing
- Display the multi-view video wall stream on attached monitor (4K monitor is preferred)
How To Run Visual AI Proxy Pipeline
- Go to this directory
- You may change pipeline configuration in this file:

Refer to custom_models/README.md for more information
- To run pipeline:
VSaaS Gateway with Storage and AI Proxy Pipelines
VSaaS Gateway with Storage and AI Proxy Pipeline contains the following process:
- Decode a specified number of 1080p h264 video channels
- Stores video stream in local storage
- Runs AI inference on all video channel
- Sends inference metadata to a MQTT broker
- Transcodes the video channels to h265 for remote consumption

How To Run VSaaS Gateway with Storage and AI Proxy Pipeline
- Go to this directory
- You may change pipeline configuration in this file:

Refer to custom_models/README.md for more information
- To run pipeline:
Remote Device Management (RDM)
Note: Only available if you select Yes to install RDM feature during installation.
The Intel® In-Band Manageability Framework is software which enables an administrator to perform critical Device Management operations over-the-air remotely from the cloud. It also facilitates the publishing of telemetry and critical events and logs from an IoT device to the cloud enabling the administrator to take corrective actions if, and when necessary. The framework is designed to be modular and flexible ensuring scalability of the solution across preferred Cloud Service Providers.
AI Box support in-band remote device management with the ability to:
- Trigger reboot
- Update system APT packages
- Update container images from remote registries
Setting up RDM in Thingsboard
Setup Dashboards
- Open http://<thingsboard_server_ip>:8080 and login with tenant account
- Go to Dashboards -> Click ‘+’ and select ‘Import dashboard’

- Click ‘Browse File’ and navigate to following path to add these 2 json files 1 at a time.
- You should be able to see these 2 dashboards:

Add Widgets
- Next is to add widgets. Go to Resources -> Widgets Library
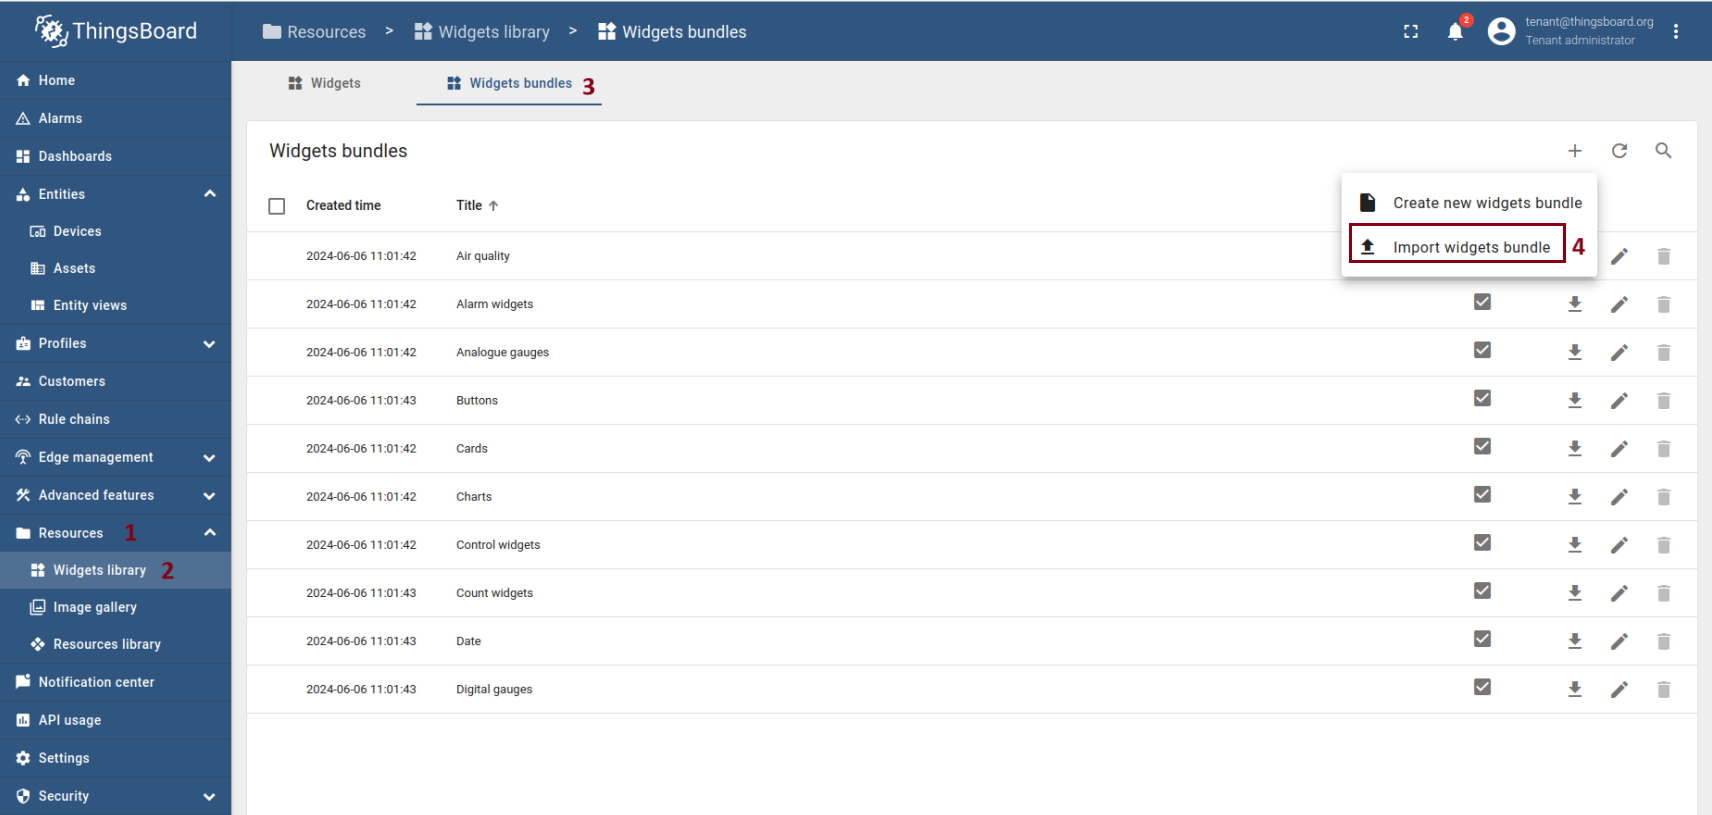
- Navigate to following path to add json file
Change Dashboard Profile
- Select Dashboard -> INB-Manageability Devices -> Edit Mode

- Entity Aliases --> Edit Aliases

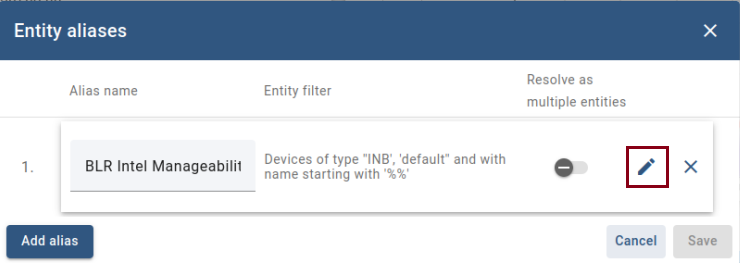
- Add ‘Default’ in Device Profile and Save
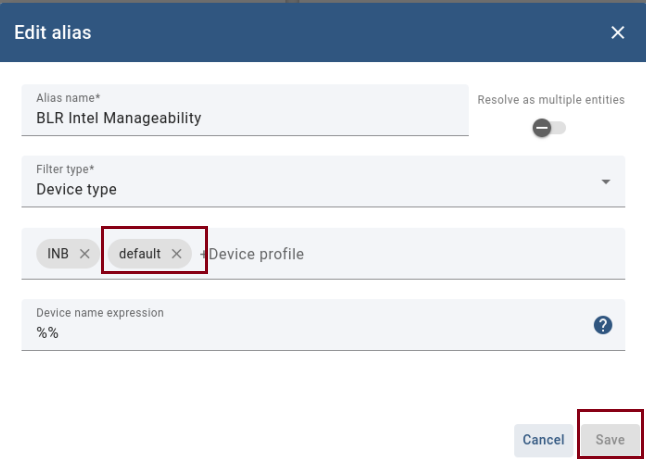
- Save Dashboard

- Repeat the same steps for Dashboard ‘Intel Manageability Batch’
How To Use Thingsboard
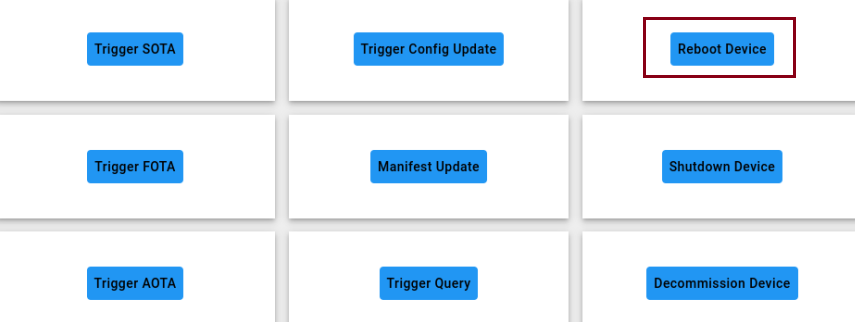
Reboot Device
- Go to Dashboards -> INB-Intel Manageability Devices
- Click ‘Reboot Device’. The device will be reboot remotely
Update System APT Packages
- Go to Dashboards -> INB-Intel Manageability Devices
- Click ‘Trigger SOTA’
- Command selects ‘update’. Click Send

Add Container images from registries
- Go to Dashboards -> INB-Intel Manageability Device
- Click ‘Trigger AOTA’
- App select ‘docker’ and Command select ‘pull’
- For this example, container tag we enter ‘python’. Click Send
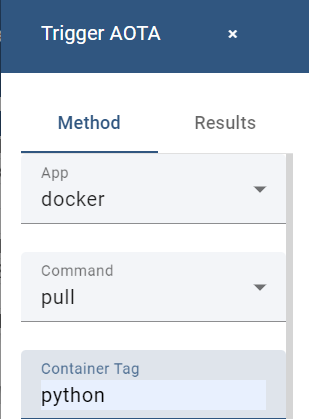
*If you not able to see ‘Send’ button at the bottom, zoom out the webpage.
- This action will pull python docker image and start container.
Telemetry of CPU and GPU Utilization
After installing the Intel® Edge AI Box, telemetry will automatically start during system power-up. You can visualize the CPU and GPU utilization through a dashboard.
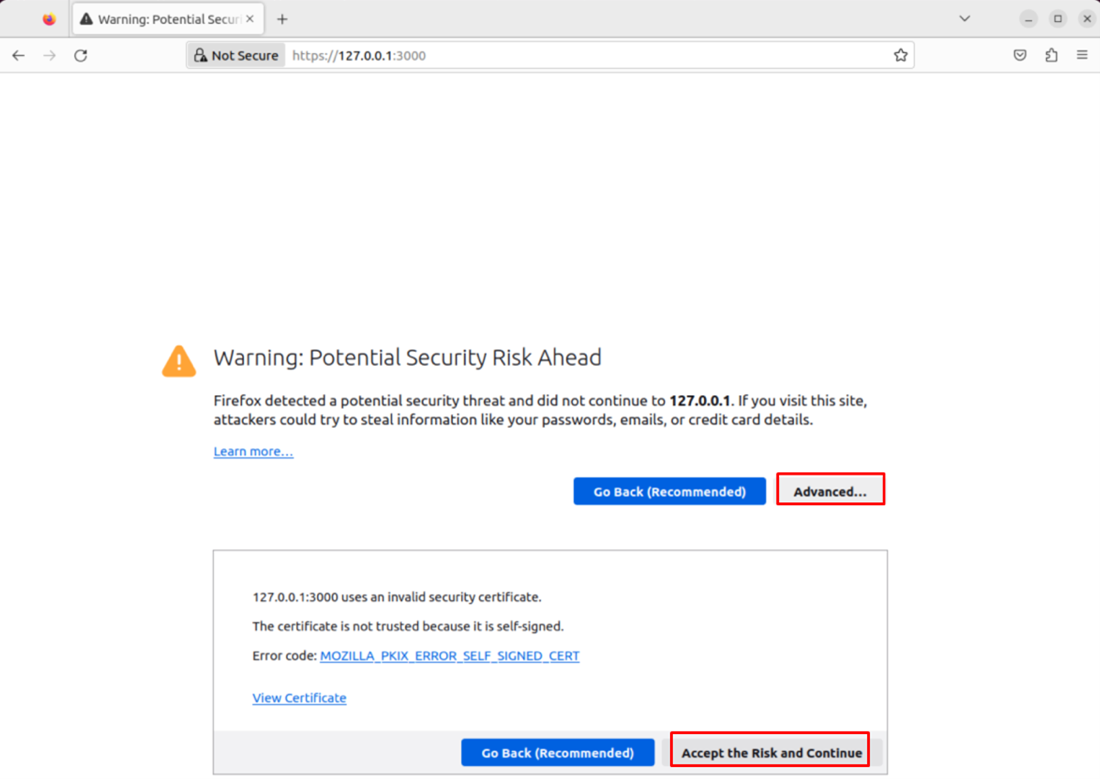
- From your web browser, go to https://127.0.0.1:3000. Log in with the default credentials:
- Username: admin
- Password: admin
- For Xeon platform, Ubuntu Server OS does not have GUI. Follow steps below to launch the dashboard:
- In another windows/linux system, open command prompt or terminal and run following:
- Launch browser and access https://127.0.0.1:3000
NOTE: If you see the Potential Security Risk Ahead warning, click Advanced and then Accept the Risk and Continue.
- After logging in for the first time, when prompted, change your password.
- If you are connected to the device remotely, use the following command to forward port 3000:
- Then, log in to https://127.0.0.1:3000 from your local browser.
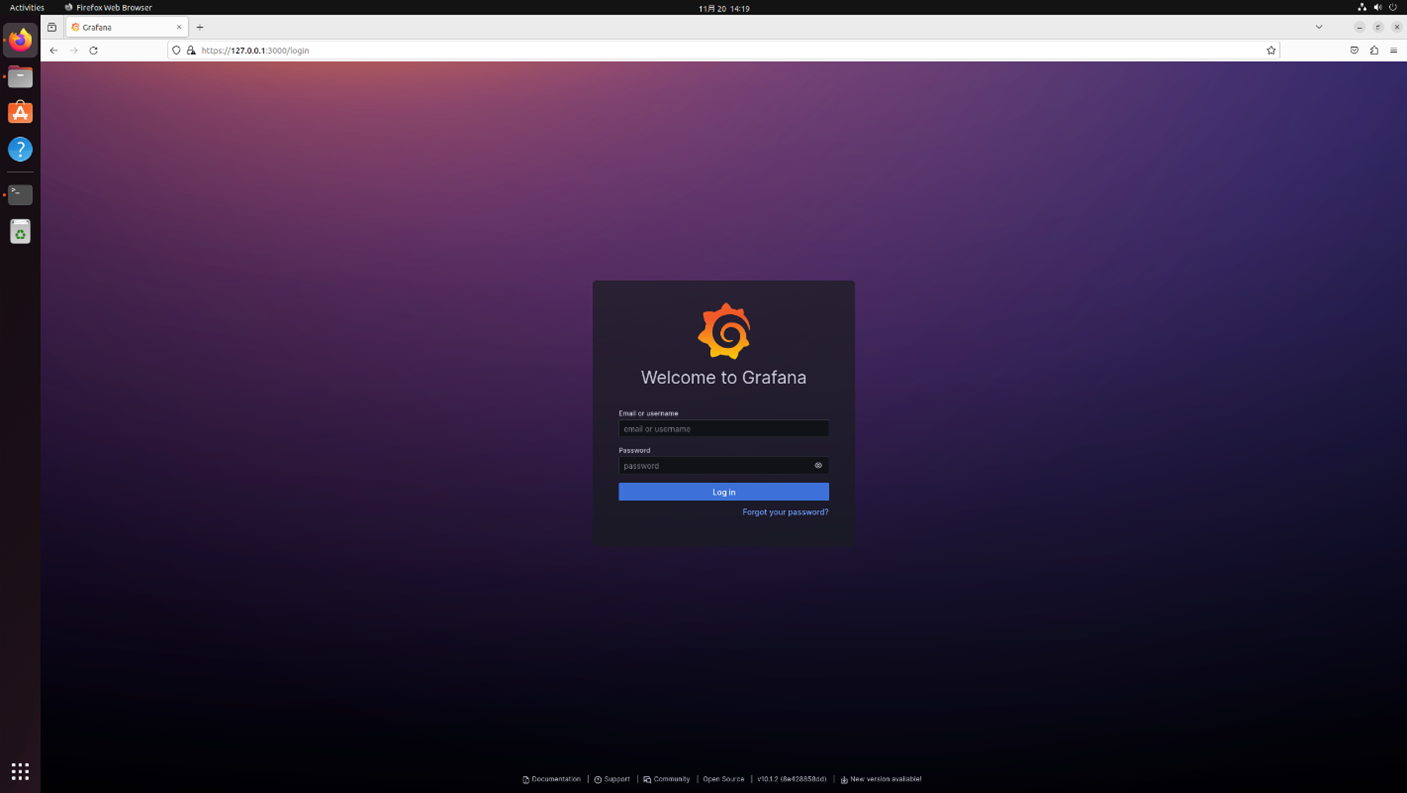
- After logging in, click the top left menu. Navigate to Home > Dashboards > General to see the available dashboards.
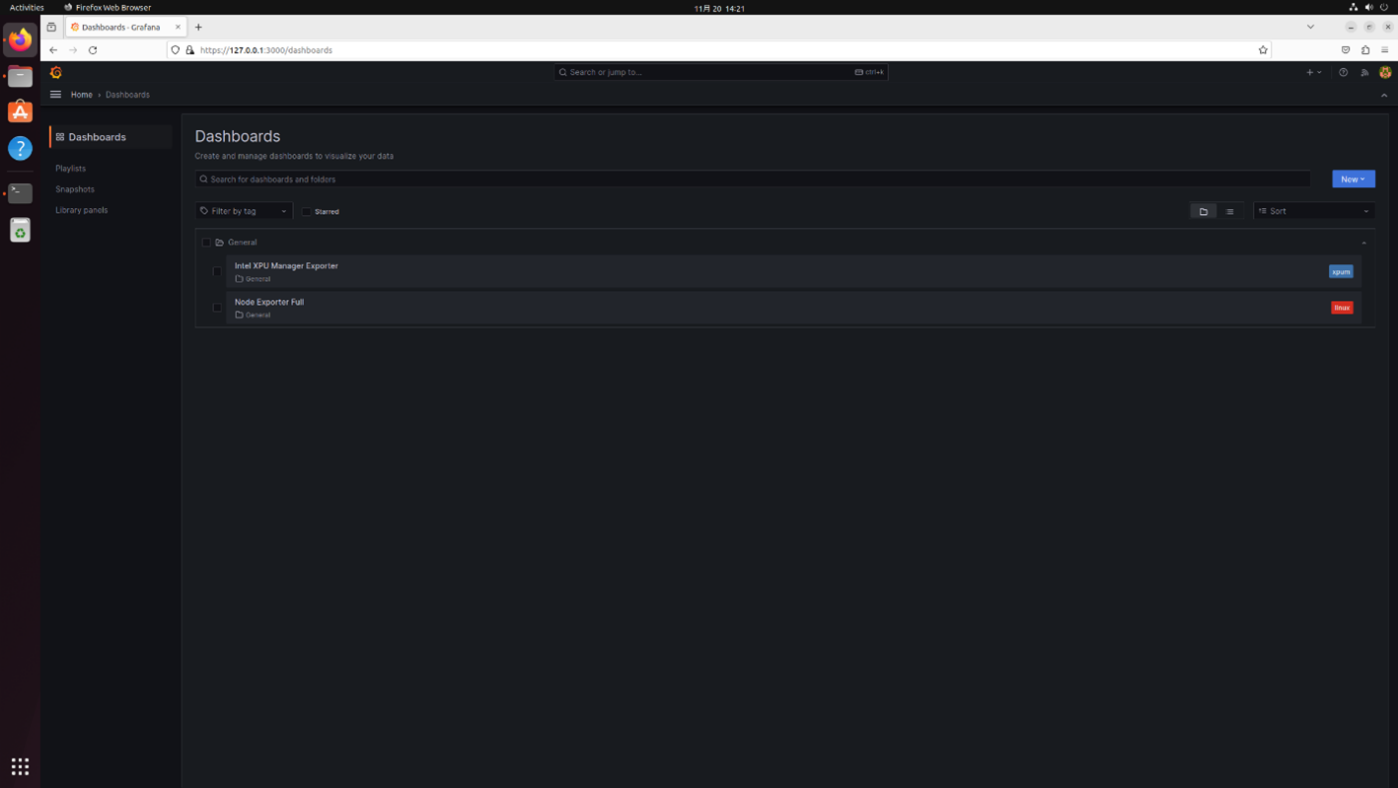
- Select Node Exporter Full to view the CPU and OS telemetries.
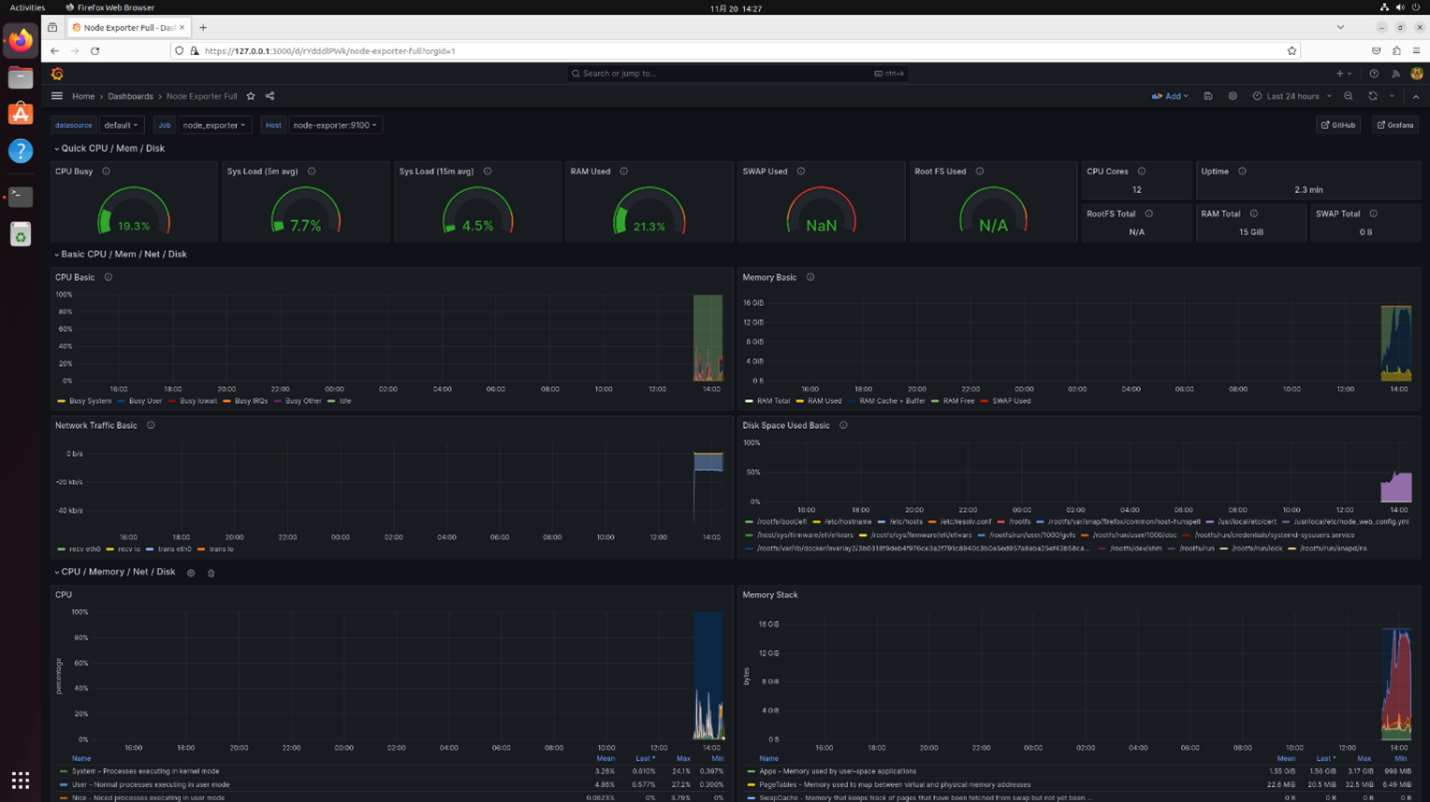
-
Select Intel XPU Manager Exporter from the dashboard to view the GPU telemetrics.
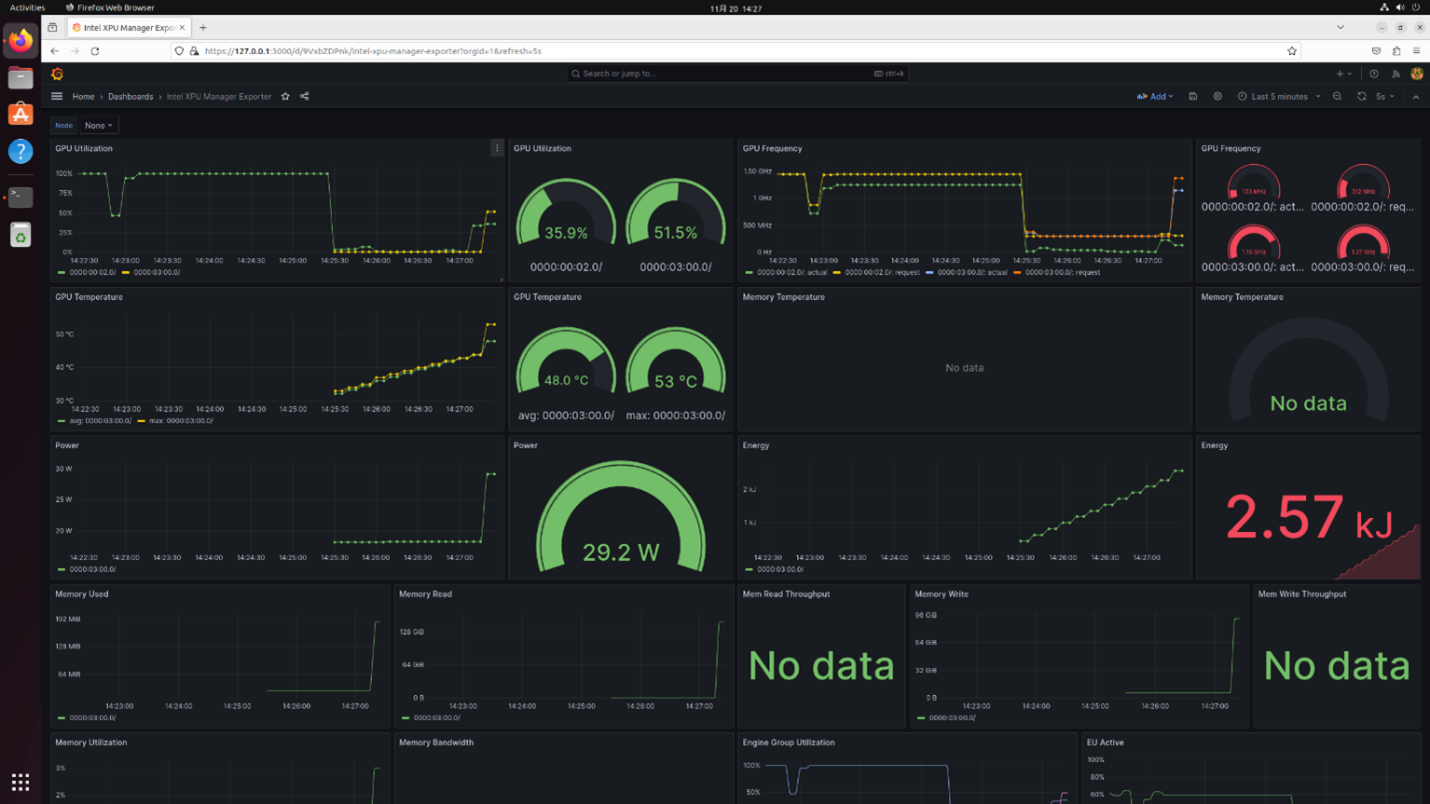
Note: For Xeon platform, all benchmarks will run on CPU, so GPU telemetry will be "No data"
For Core Ultra platform, GPU telemetry will be "No data" due to a known issue
-
To stop the telemetry, run the following command:
-
You can also start the telemetry manually:
NOTE: The aibox_monitor.sh script is in $HOME/.local/bin/. You will be able to run the script without specifying the complete path.
Run Reference Application
NOTE: If you run reference applications over SSH sessions, set DISPLAY environment as following: export DISPLAY=:0
This Reference Application is not supported on Xeon Platform, please use Core or Core Ultra Platform to run it.
Multi-channel Object Detection
This reference application is the containerized version of the demo of the same name available in the OpenVINO Model Zoo. The container is called multi_channel_object_detection:4.0
The following command runs the application using the default bottle-detection.mp4 video, duplicated four times:
To run in dGPU, change to GPU.1 and change export DEVICE to DEVICE=/dev/dri/renderD129.
Things to Try
Replace -i /home/aibox/bottle-detection.mp4 with -i rtsp://camera_url to connect to an IP camera.
Specify multiple camera sources by -i rtsp://camera1_url,rtsp://camera2_url,....
Use VA Base Library Containers
The core of Intel® Edge AI Box reference architecture is a suite of containers. The VA Base Library container includes OpenVINO™, oneDNN, and GPU drivers for accelerated inferencing and media processing.
These containers are available on the platform for your projects, and the corresponding Dockfiles are in /opt/intel/base_container/dockerfile.
| REPOSITORY | TAG | IMAGE ID | CREATED | SIZE |
|---|---|---|---|---|
| aibox-opencv-ffmpeg | 4.0 | 236118f0ca6d | 4 days ago | 4.95 GB |
| aibox-dlstreamer | 4.0 | a397a9786ee9 | 4 days ago | 15 GB |
| aibox-base-devel | 4.0 | f6b0ee7ecddd | 4 days ago | 13 GB |
| aibox-base | 4.0 | 724fd64df066 | 4 days ago | 1.98 GB |
Sample Usage 1 - Multi-Channel Object Detection Using YOLOv3
The following docker file is used to build the multi-channel object detection in the Reference Implementation package. The file uses aibox-base-devel:4.0 to download models from the OpenVINO model zoo and aibox-opencv-ffmpeg:4.0 to compile the demo.
For more details, install the Intel® Edge AI Box package and go through the intel_edge_aibox/Intel_Edge_AI_Box_4.0/Intel_Edge_AIBox_Samples/multi_channel_object_detection_yolov3 directory.
Sample Usage 2 – Video Decode and Tiled Display
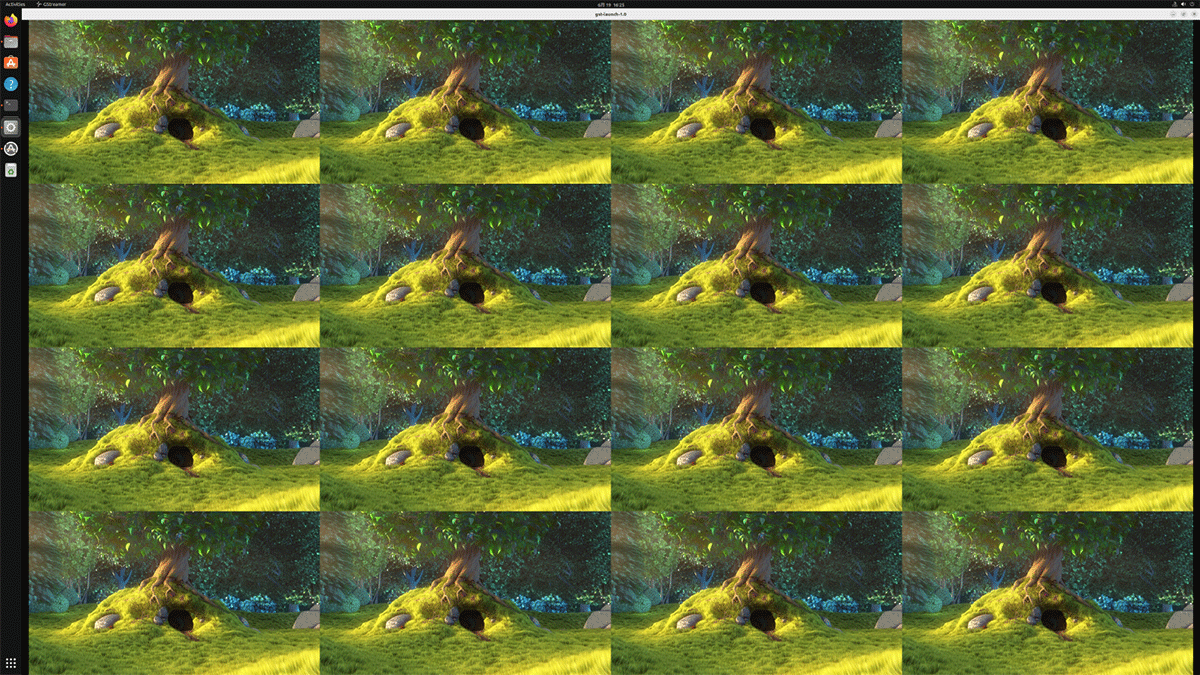
The following sample shows the use of the aibox-dlstreamer: 4.0 container for streaming and media processing. This sample decodes 16 video files using VAAPI and composes them for display on a 4K resolution (3840x2160) monitor.
Note: This sample is not supported on Xeon platform, please use Core or Core Ultra platform to run it.
- You can use your video or download a sample video from https://vimeo.com/644498079. The following sample uses Big_Buck_Bunny.mp4 from the /videos directory.
- In your home directory, create a file decode.sh and add the following code:
- Assign execute permission to the file:
- Execute the decode script:
Here is the result:
Sample Usage 3 – OpenVINO Model Benchmark
The following sample shows how to download a model, convert the OpenVINO model, and run a benchmark using the aibox-base-devel: 4.0 container.
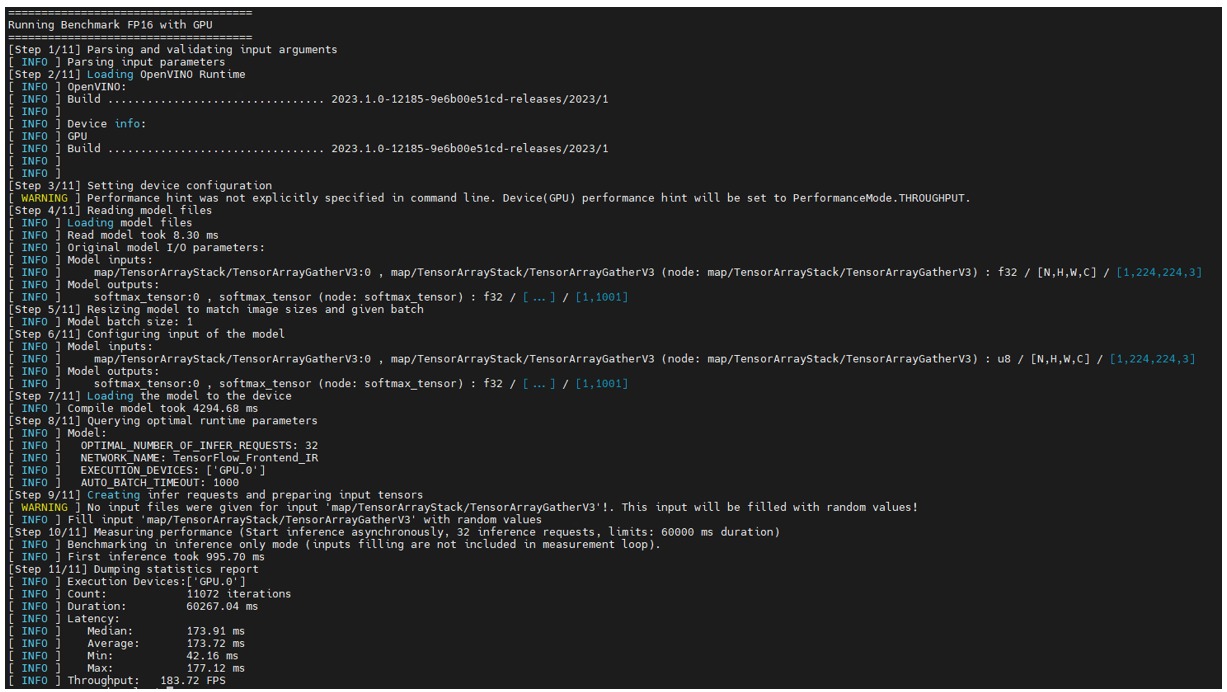
- In the home directory, create a file openvino_benchmark.sh and add the following code. You may change the model name and target device. In this sample, the model is resnet-50-tf, and the target device is GPU.
- Assign execute permission to the file:
- Run the following docker command:
Here is the sample output:
Known Issues
[AIBOX-293]: Report.zip is empty when first time to generate the report
[AIBOX-420]: Permission Issues Found During Installation with new user ID
[AIBOX-623]: No Data in Intel XPU Manager Exporter on MTL Platform
[AIBOX-624]: MODULE_STDERR Occurred During EAB4.0 Installation. Workarounds refer to Troubleshooting. Workarounds refer to Run The Application in Intel® Edge Software Device Qualification for Intel® Edge AI Box.
[AIBOX-629]: GPU Telemetry data is Too Low in ESDQ Report of MTL Platform.
- As the system is being automatically updated in the background, you may encounter the following errors:

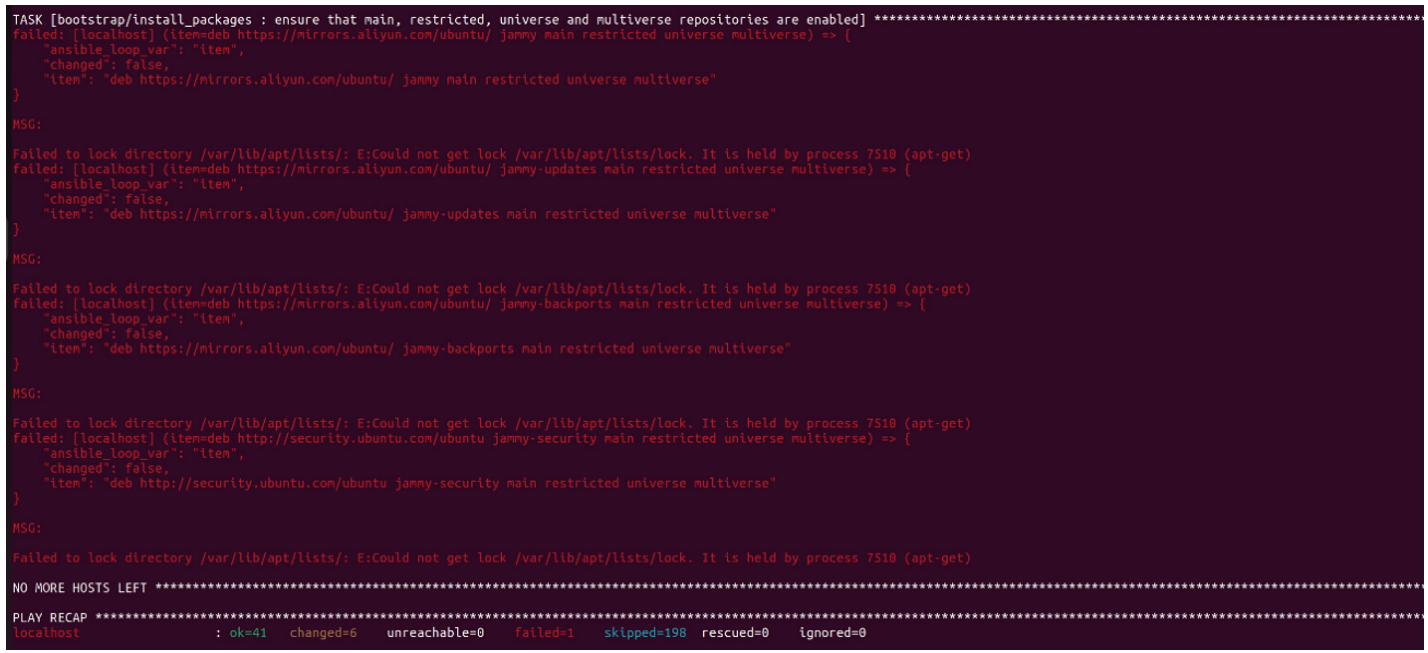
To resolve this issue, reboot and manually update the system. Then, rerun the installation:
- If the network quality is poor, you may encounter the following error:
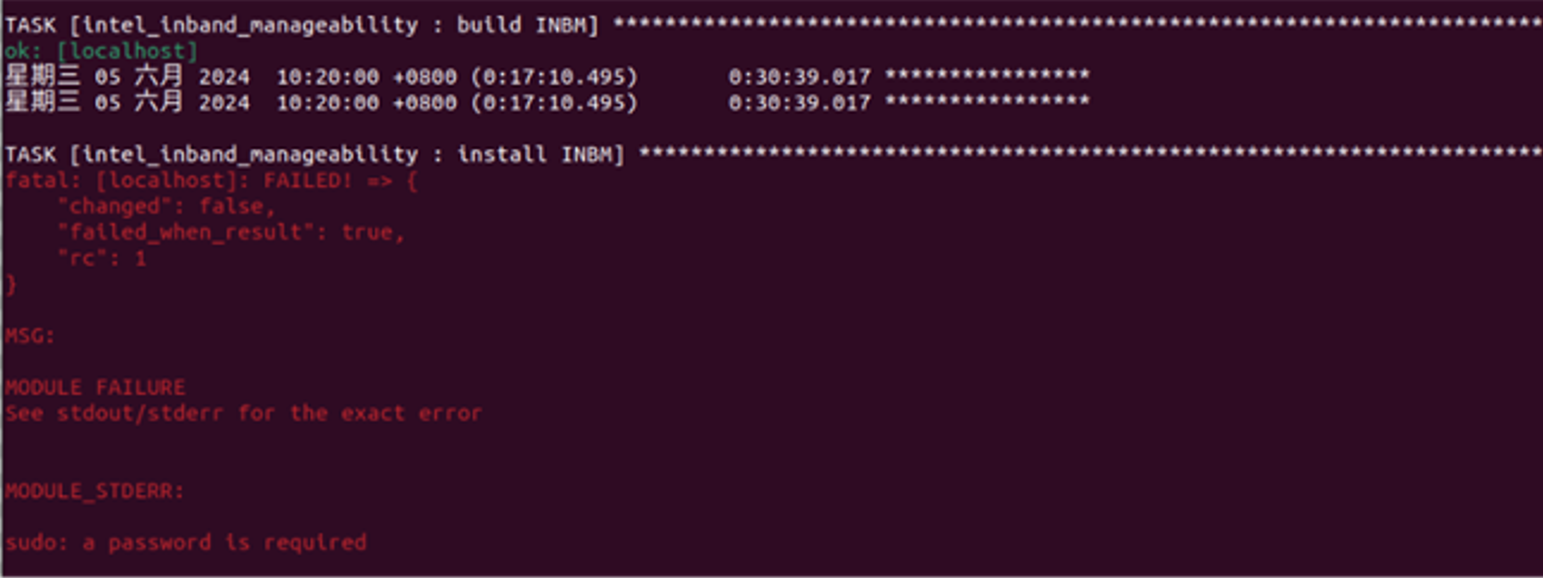
To resolve this issue, you can configure to run sudo without entering a password before installing:
Navigate to “# User privilege specification” section and add the following line to grant the current user sudo privileges without requiring a password:
Please replace USER with your actual username.
After adding the line, save and exit, then reinstall the AIBox package.
If you’re unable to resolve your issues, contact the Support Forum.
Current Version: 4.0
- Added INT8 models in OpenVINO benchmark
- Added NPU support in OpenVINO benchmark
- Replaced Video Decode Performance Benchmark with Media Performance Benchmarks
- Replaced Video Analytic Pipeline Benchmark with domain specific proxy pipeline benchmark
- Added Proxy Pipelines
- Added telemetry information in benchmark report
- Added graph results in benchmark report
- Added Intel Core Ultra and SPR-SP platform support
- Added Remote Device Management
- Updated OpenVINO to 2024.1.0 (for Base containers), 2024.0.0(for DLStreamer container), and 2023.3.0(for OpenCV/FFMpeg container)
- Updated FFMpeg to 2023q3
- Updated DLStreamer to 2024.0.1
Version: 3.1.1
- Fixed h264 file size issue that causing opencv-ffmpeg BKC validator failed
- Fixed Python binding missing for OpenCV
- Fixed sycl_meta_overlay plugin not found when using aibox_dlstreamer container as base image
- Added locale encoding to fix bmra_base ansible-playbook
- Fixed ESDQ hung error when prompt for user input for "parted"
- Fixed installation failed on headless devices
- Fixed ESDQ Test module error with "-h"
- Fixed ESDQ Test module report generation error
Version: 3.1
- Updated to OpenVINO 2023.1 and 2023.0 (only available in the dlstreamer container)
- Updated to DLStreamer 2023.0
- Updated to OpenCV 4.8.0
- Updated to FFMPEG cartwheel 2023q2
- Updated to GPU driver stack 20230912
- Added CPU and GPU telemetry and observability