Intel® Software License Manager User's Guide

ID 658380
Updated 1/10/2020
Version Latest
Public

author-image

By

1. About this Guide

This guide helps you get started using the Intel® Software License Manager with your Intel® Software Development Product. 
Related Publications

2. About the Intel® Software License Manager

The Intel® Software License Manager is a collection of software components that helps you manage your license file(s) in a multiple-user environment. Before you can use Intel® Software Development Products, you must have the correct license installed. The Intel® Software License Manager can be downloaded separately from your product if you purchased a floating license. 
This document describes the installation and use of the Intel® Software License Manager for supported platforms.
The Intel® Software License Manager’s primary function is to serve a finite number of license seats concurrently to a larger number of users of a software product. You only need the Intel® Software License Manager when you have a floating license (see License Types).

2.1 Current Version

The current version of Intel Software License Manager available for download is 2.10.0. This uses Flexera Flexlm version 11.16.4.

NOTE: The 2020 release of Intel Parallel Studio and its components require the license server manager to be at Flexlm version 11.16.4 or higher. The 2019 release of Intel Parallel Studio and its components require the license server manager to be at Flexlm version 11.15.1 or higher. The 2018 release of Intel Parallel Studio and its components require the license server manager to be at Flexlm version 11.14.1 or higher.  

2.2 Supported Platforms

The Intel® Software License Manager is supported on the following platforms:
  • Microsoft Windows* for IA-32 and Intel® 64 architectures
  • Linux* IA-32 and Intel® 64 LSB (Linux Standards Based) compliant architectures
See the Release Notes for supported OS versions. Note that OS X* is no longer supported.
More information about downloading the Intel® Software License Manager package that best matches your license host server OS can be found in the Intel® Software License Manager downloads section of this guide.
NOTE: The minimum LSB 3 requirement for installing and using the Intel® Software License Manager is that the shared object ld-lsb.so.3 (32-bit systems) or ld-lsb-x86-64.so.3 (64-bit systems) is located in /lib (32-bit) or /lib64 (64-bit). 
Please refer to the installation section to setup the shared library if it is not in place on your system.
You can run the Intel® Software License Manager on any supported platform, with Windows*, Linux*, or OS X* applications running on separate network nodes. For example, you can install the Intel® Software License Manager and license file on a Linux* operating system to manage floating licenses for Windows*, Linux*, or OS X* applications.

2.2 Floating License

With the floating license, users run the Intel® Software Development Product on their local system, and the license served by the Intel® Software License Manager runs on a central server.  The floating license is used in multiple-user environments, and the
Intel® Software License Manager monitors the number of concurrent users (counted) permitted in the license file. 
The sample counted floating license file below is for Intel Parallel Studio XE Professional Edition for Fortran and C++ Linux*. 
Floating License Sample:
 
SERVER licserver 00270e00ffff 27009
VENDOR INTEL
PACKAGE IF83F2F10 INTEL 2018.0515 E4AB5E0CA283 COMPONENTS="AdvXEl \
ArBBL CCompL Comp-CL Comp-FL Comp-OpenMP Comp-PointerChecker \
DAAL-L DbgL FCompL MKernL PerfAnl PerfPrimL StaticAnlL \
ThreadAnlGui ThreadBB" OPTIONS=SUITE ck=147 SIGN=BC6DBB4847FA
INCREMENT IF83F2F10 INTEL 2018.0515 permanent 2 73866154322D \
VENDOR_STRING="SUPPORT=COM \
https://lemcenter.intel.com" HOSTID=ANY \
PLATFORMS="i86_r i86_re it64_lr it64_re amd64_re i86_mac \
x64_mac" BORROW=169 DUP_GROUP=UH ck=108 SN=SMSA6W6KC6M5 \
SIGN=1E20119EACBA
The essential components of the sample license file are listed below along with their corresponding values:
  • Host name: licserver. It must contain the host name returned by the OS.
  • Host id (lmhostid): 00270e00ffff
  • Port Number: 27009. This the port used by lmgrd.
  • Vendor: INTEL.  This is the name of the vendor daemon to use.  To specify the port used by the INTEL daemon, specify it on this line with: port=28519.  Otherwise it will use a port assigned by the OS.
  • Supported Software Products: AdvXEl (Intel® Advisor for Linux*), Comp-CL (Intel® C++ Compiler for Linux*), Comp-FL (Intel® Fortran Compiler for Linux*), etc.
  • Older license files may not have feature codes used by newer product versions.
  • Supported Product Platforms: i86_r, i86_re (Linux* on IA-32 architecture), it64_lr, it64_re (Linux* on IA-64 architecture), i86_mac (Intel®-based systems running OS X*)
    • This is the platform running the product, and does not restrict the platform used for the license manager.
  • Intel Support Expiration Date:  2018.0515 (May 15, 2018)
    • The support expiration applies to access to product updates and support.  Products built after the support expiration date are not supported by the license.
  • Product Expiration Date: permanent (Never expires)
    • The license will always support products built before the support expiration date, even if the support expiration date has passed.
  • License Count: 2.
    • Two licenses can be checked out simultaneously.
Note: While host name and port numbers can be changed, editing many parts of the license file renders the entire license file invalid.  References to IA-64 architecture platforms are for legacy purposes only.  

2.3 Technical Support

Every new product purchase or renewal of an Intel® Software Development Product includes one year free product updates and priority support in the Online Service Center. 

2.4 Client/Server Backward Compatibility

The Intel Software Licensing Manager MUST BE the latest version to support the new Intel product version.   Please make sure to download the latest ISL Manager when you upgrade to a newer product version.   The older ISL manager will not support newer product version.  

3. Registration and Downloads

Before installing the Intel® Software License Manager, you must have a registered license.  Registering the license links it to you, but does not associate it with a particular server until you activate it.  

3.1 License Registration

If you have not registered your license, you may do so in the Intel Registration Center by following the steps in this guide: Steps to register a floating license
You may also activate your license at this time if your license server is not connected to the internet for remote activation.

3.2 Intel® Software License Manager downloads

The Intel® Software License Manager can be installed on Windows* or Linux* machines regardless of the OS indicated on your floating Intel® Software Development Product licenses.  It is important that you have the latest version.
Please follow the instructions here - Where can I download Intel® Software License Manager servers? 
The most recent version of the User Guide for the Intel® Software License Manager is also available from the web site.

4. License Activation and Configuration

License activation is the process of assigning a server or set of three servers to a license to be served by the Intel® Software License Manager.  The license can be configured to use different ports and change other settings.

4.1 Activation

The Intel Software License Manager installer will automatically activate a license with default settings if it has internet connectivity.  If your license server does not have connectivity, you can manually activate the license in the Intel Registration Center.  Activation requires the host name and host ID of the server(s) to be serving the license.

4.1.1 Host Name and Host ID

The host name and host ID are system-level identifiers used to identify the system on which you install the Intel® Software License Manager and license file.   
It is strongly recommended that you run the lmhostid utility to obtain the hostid value it will use for license validation. The lmhostid utility is installed in the same location as the Intel® Software License Manager.
If you have not installed the license manager, use the instructions below to find the host name and host ID of the system.  If multiple IDs are displayed, choose the one associated with eth0.  If the host name command returns a fully qualified domain name, you must use it to configure the license.
4.1.1.1 Microsoft Windows*
  1. From the Start menu, click Run...
  2. Type cmd in the Open: field, then click OK.
  3. Type ipconfig /all at the command prompt, and press Enter.
In the resulting output, host name is the value that corresponds to Host Name, and host ID is the value that corresponds to Physical Address.
For example, if the output of ipconfig /all included the following:
Host Name . . .  . . . . : mycomputer
. . .
Physical Address . . . . : 00-06-29-CF-74-AA
The host name is mycomputer and the host ID is 00-06-29-CF-74-AA.  Note, the host ID will be entered without the dash character.
4.1.1.2 Linux*
  1. Run the hostname command to display the host name.  If the fully qualified domain name is shown, then the license file must use it.
  2. Run the command /sbin/ifconfig eth0 to display the hardware address. 

For example, if the /sbin/ifconfig eth0 command returns

HWaddr 00:D0:B7:A8:80:AA

then the host ID is 00D0B7A880AA.

4.2 Configuration

There are several settings you can change in the Intel Registration Center to configure your license file.

4.2.1 Ports

The license manager uses two ports – one for each daemon it runs.  Both of these ports MUST be open and unblocked. 
When changing either port, you must ensure:
  • The port numbers in all license files match on both the license host server and client systems.
  • The license server is restarted to read the updates.
  • The INTEL_LICENSE_FILE environment variable on the client systems is pointing to the correctly updated license file or port@host.
You may need to add a port exception to allow the FlexNet Publisher* license server daemon, the Intel® Software License Manager vendor daemon, and the application using these daemons to communicate. See the OS vendor documentation for more information on adding port exception to the system firewall.
4.2.1.1 lmgrd
This is the primary daemon for the license manager.  It listens for license checkout requests and routes them to the correct vendor daemon.  The default port used by the Intel® Software License Manager is 27009.  This can be changed in the Intel Registration Center.
It is specified in the first line in the license file:
SERVER licserver 00270e00ffff 27009
4.2.1.2 INTEL daemon
This is the daemon used to serve licenses for Intel developer products.  It can be specified in the license file, or assigned by the OS each time lmgrd is started.  To prevent the INTEL port from changing at lmgrd startup and potentially being blocked by a firewall, it is recommended to specify this port in the license file.  You can do this by opening the license file in a text editor and adding the following bold text to the VENDOR INTEL line:
VENDOR INTEL port=<port>
To verify which port is used by the license manager, look in the license manager log file.  
  • In Windows*, this is typically located at C:\Program Files\Intel\licenseserver\Iflexlm.log
  • In Linux* and Mac OS*, this is typically located at /opt/intel/licenseserver/lmgrd.log
The log file will show the port number as follows:
14:16:16 (INTEL) (@INTEL-SLOG@) ===============================================
14:16:16 (INTEL) (@INTEL-SLOG@) === Vendor Daemon ===
14:16:16 (INTEL) (@INTEL-SLOG@) Vendor daemon: INTEL
14:16:16 (INTEL) (@INTEL-SLOG@) Start-Date: Tue Oct 03 2017 14:16:16 Pacific Daylight Time
14:16:16 (INTEL) (@INTEL-SLOG@) PID: 23500
14:16:16 (INTEL) (@INTEL-SLOG@) VD Version: v11.14.1.1 build 201886 x64_n6 ( build 201886 (ipv6))
14:16:16 (INTEL) (@INTEL-SLOG@) 
14:16:16 (INTEL) (@INTEL-SLOG@) === Startup/Restart Info ===
14:16:16 (INTEL) (@INTEL-SLOG@) Options file used: None
14:16:16 (INTEL) (@INTEL-SLOG@) Is vendor daemon a CVD: No
14:16:16 (INTEL) (@INTEL-SLOG@) Is TS accessed: No
14:16:16 (INTEL) (@INTEL-SLOG@) TS accessed for feature load: -NA-
14:16:16 (INTEL) (@INTEL-SLOG@) Number of VD restarts since LS startup: 0
14:16:16 (INTEL) (@INTEL-SLOG@) 
14:16:16 (INTEL) (@INTEL-SLOG@) === Network Info ===
14:16:16 (INTEL) (@INTEL-SLOG@) Listening port: 55294
14:16:16 (INTEL) (@INTEL-SLOG@) Daemon select timeout (in seconds): 1

4.2.2 Redundant Server Setup

The Intel® Software License Manager supports a triad configuration for back-up and redundancy.  This requires the use of three servers defined in the license file, two of which must be active to serve licenses.  
To set up a redundant server configuration:
  1. Identify the three servers you will use to run the license manager.  
  2. Go to the Intel Registration Center and open the license file for modification.
  3. Check the box to enable the three server configuration.
  4. Enter the host ID and host name for each server.  These IDs and names must be unique.
  5. Submit the changes and download the updated server license file.
  6. Download and install the latest Intel® Software License Manager package on each server named in the license file.  
  7. Ensure that all three servers are running the license manager to establish a quorum.
  8. Install or run the licensed product on a client machine as you would for a single server configuration.  The license file used by the client must contain all three server names above the VENDOR line.

4.2.3 License Borrowing

License borrowing allows users to hold a license seat for a limited amount of time, such as when working offline.  This will completely consume a license seat until it is returned to the server.
Borrowing is enabled when the license contains the keyword BORROW.  It will also include the maximum borrow time, which is defaulted to 169 hours.  To change the maximum borrow time, or disable licensing borrowing, you must contact support to get a new license file generated.

5. Installing the Intel® Software License Manager

5.1 Windows* Installation

Follow the steps below to install the software for the Intel® Software License Manager on Windows* systems:
  1. Download the latest Intel® Software License Manager for Windows* that matches your environment (w_isl_server_<ver>.exe).
  2. Run the self-extracting executable downloaded in the previous step.
  3. Accept the license agreement to continue with the installation.
  4. To configure the license manager, you must provide a serial number or license file:  ISLM Install SN
    1. To use a serial number, you must be connected to the internet.  
      1. If you have already activated your license, select the same host ID you provided to the registration center.  This will generate the license file in a default folder used by the license manager.
      2. If you have not activated your license, select either host ID.  This will automatically activate your license with the server’s host name and host ID you selected, along with default port values for the license manager daemons.
    2. To use a license file, browse to the location of your activated license file.
    3. The license manager installer uses C:\Program Files (x86)\Common Files\Intel\ServerLicenses as the default license folder.  It will automatically detect licenses in that location.  You can also set environment variable LM_LICENSE_FILE to point to a folder or license file.
  5. If there are any invalid license files in the default license folder or LM_LICENSE_FILE, be sure to remove them.
  6. Finish the installation process. The license manager is installed in C:\Program Files\Intel\licenseserver and should start automatically as a service.  It will create a log file named Iflexlm.log in the install folder.
  7. The Intel® Software License Manager service runs as the Local Service account.  This may have insufficient privileges to create the log file in step 6, resulting in the license manager being unable to start.  In this case, it is necessary to either change the Intel® Software License Manager service Log On account to Local System, or change the log file path to a folder writeable by the user account.  See this article for more details.
  8. Ensure that the ports used by the license manager services are not blocked.  There are two:
    1. Lmgrd port – this is specified in the license file and has a default value of 27009.
    2. INTEL port – this may be specified in the license file as: VENDOR INTEL port=<port>.  As of December 2017, this is defaulted to 28519 in the Intel Registration Center.  If it is not, then the OS will assign it when the license manager is started or restarted.  Check the log file for the value.

5.2 Linux* Installation

Follow the steps below to install the software for the Intel® Software License Manager on Linux* systems:
  1. Place the downloaded package <l|m>_isl_server_<ver>_<architecture>.tar.gz in the directory to which you wish to extract its files.  This need not be the same location in which you plan to install the Intel® Software License Manager files.
  2. Extract the files from the package with the following command:
    tar -zxvf <l|m>_isl_server_<ver>_<architecture>.tar.gz
  3. Run one of the following scripts from the directory created to begin installation:
    1. install.sh – command line
    2. install_GUI.sh – graphical interface

5.2.1 Command Line Installation

  1. Select the elevation mode for the installation.
  2. Accept the license agreement to continue with the installation.
  3. To configure the license manager, you must provide a serial number or license file:  ISLM Install Step 3
    1. To use a serial number, you must be connected to the internet.
      1. If you have already activated your license, select the same host ID that you provided to the registration center.  This will generate the license file in a default folder used by the license manager.
      2. If you have not activated your license, select a host ID.  This will automatically activate your license with the server’s host name and host ID you selected, along with default port values for the license manager daemons.
    2. To use a license file, enter the name and path of your activated license file.
    3. The license manager uses /opt/intel/serverlicenses as the default license folder.  It will automatically detect licenses in that location.  You can also set environment variable LM_LICENSE_FILE to point to a folder or license file.
  4. If there are any invalid license files in the default license folder or LM_LICENSE_FILE, be sure to remove them.
  5. Start the installation.  The default install location is /opt/intel/licenseserver.  To change it:
    1. Select the Customize installation option:  ISLM Install Step 4a
    2. Select the Change installation directory option:  ISLM Install Step 4b
  6. Finish the installation process. The license manager should start automatically as a service with default options. To restrict access to license manager utilities, see the options listed under section 6.2.1 Start the license manager (lmgrd).

5.2.2 Graphical Installation

  1. Select the elevation mode for the installation.
  2. Accept the license agreement to continue with the installation.
  3. To configure the license manager, you must provide a serial number or license file:  ISLM Install Config
    1. To use a serial number, you must be connected to the internet.
      1. If you have already activated your license, select the same host ID that you provided to the registration center.  This will generate the license file in a default folder used by the license manager.
      2. If you have not activated your license, select a host ID.  This will automatically activate your license with the server’s host name and host ID you selected, along with default port values for the license manager daemons.
    2. To use a license file, browse to the location of your activated license file.
    3. The license manager uses /opt/intel/serverlicenses as the default license folder.  It will automatically detect licenses in that location. You can also set environment variable LM_LICENSE_FILE to point to a folder or license file.
  4. If there are any invalid license files in the default license folder or LM_LICENSE_FILE, be sure to remove them.
  5. Start the installation.  The default install location is /opt/intel/licenseserver.  To change it:
    1. Click the Customize button:  ISLM Install Summary
    2. Change the Destination folder:  ISLM Install Destination
  6. Finish the installation process. The license manager should start automatically as a service.  It will create a log file in the installation folder named lmgrd.log.
  7. Ensure that the ports used by the license manager services are not blocked.  There are two:
    1. Lmgrd port – this is specified in the license file and has a default value of 27009.
    2. INTEL port – this may be specified in the license file as: VENDOR INTEL port=<port>.  If it is not, then the OS will assign it when the license manager is started or restarted.  Check the log file for the value.

5.2.3 Starting the Intel® Software License Manager automatically on Linux* after reboot

There are two ways to set up the Intel® Software License Manager to start automatically.
5.2.3.1 Add the startup command to the system startup files
For Linux*, add the following steps to the system startup files (which may be /etc/rc.boot, /etc/rc.local, /etc/rc2.d/Sxxx, /sbin/rc2.d/Sxxxx, or the startup files in the /etc/init.d/rcX.d directories, where X is 1, 2, 3, or 5) to ensure that the Intel® Software License Manager server starts after reboot. It is important that the network has been initialized before the license server is started. Ensure that there is a white space (“ ”) between each argument. It is not necessary for server startup be done as root.
cd <server-directory>
`pwd`/lmgrd –c `pwd`/<licensefile> -l `pwd`/<log file>
or
$(pwd)/lmgrd –c $(pwd)/<licensefile> -l $(pwd)/<log file>  (non-csh)
Ensure that the change directory is set to the one created in Step 1 above. The
-c <license file> should point to the license file copied to the server directory from the registration e-mail. Use the full path to the license file, including the full license file name.
The -l <log file> will capture information that will be useful for debugging unanticipated server or license check-out problems. Use the full path where the log file should be created, including the log file filename.
5.2.3.2 Use Systemd
To use system:
1. Create a file in /etc/systemd/system called flexlm.service which contains the following:
[Unit]
Description=Intel Licensing Manager 
After=network.target network.service
[Service] 
Environment=LICENSE_FILE=<licensefile>
Environment=LOG_FILE=<logfile>
WorkingDirectory=/opt/intel/licenseserver/
ExecStart=/opt/intel/licenseserver/lmgrd -c $LICENSE_FILE -l $LOG_FILE
Restart=always
RestartSec=30
Type=forking
[Install]
WantedBy=multi-user.target
2. To test the service, run:
$ systemctl start flexlm.service 
$ systemctl status flexlm.service
3. If it is working, run the following to start the service at startup:
$ systemctl enable flexlm.service 

5.3 Using Multiple Licenses

You can serve multiple licenses with a single installation of the Intel® Software License Manager as long as the following is true:
  • Each license has the same server host ID and host name
  • Each license uses the same lmgrd and INTEL vendor daemon ports
Essentially, the first two lines (or four for redundant server set-up) of the license files must match.

5.3.1 Separate License Files

The preferred method of serving multiple licenses is to use separate files.  Although the license manager installer only accepts a single serial number or license file, you can restart it with the path to a folder containing multiple license files to serve them all.  All licenses should use file extension .lic.  To start the license manager with a folder path, either:
  • Run the command lmgrd –c <path to license folder> -l <path to log file>
Or
  • Set environment variable LM_LICENSE_FILE to the license folder path, such as /opt/intel/serverlicenses
  • Run lmgrd –l <path to log file> 

5.3.2 Combining License Files

You can combine multiple licenses into a single file.   This is recommended if you want to ensure the order in which the licenses are used, such as serving the more restrictive licenses first.  However, you need to take care in modifying the license file as to not invalidate it.
To combine license files, use a text editor to open the first license file.  Then copy all lines under the VENDOR line from the second file and append them to the first.  Repeat for each license file you want to include, taking care not to include duplicate SERVER or VENDOR information.

6. Managing the Intel® Software License Manager

6.1 Windows* Utilities

The Intel Software License Manager for Windows package has a few utilities for configuration and status checks.

6.1.1 Intel® Software License Manager Configuration (ilmconfig.exe) 
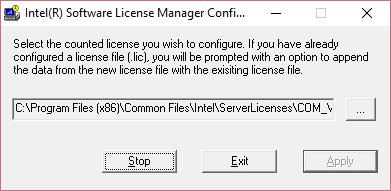
The ILM configuration utility is provided by Intel to allow quick starting, stopping, and license rereading of the Intel Software License Manager.  It is accessible from the Start menu from All apps -> Intel® Software Development Products -> Configure Intel® Software License Manager Utility, or by running ilmconfig.exe in the license manager install directory.   ilmconfig.exe
6.1.1.1 License file
This value is defaulted to the license entered during the license manager installation.  To change it, press the “…” button to browse to the license file you want, and then click “Apply.”  
6.1.1.2 Start
If the license manager is not running, the left-most button will be labeled “Start.”  Use this button to start the license manager.  This will also write to the debug log file or create it if it doesn’t exist.  This log file must have write permission for the user starting the license manager.
6.1.1.3 Stop
If the license manager is running, the left-most button will be labeled “Stop.”  Use this button to stop the license manager.
6.1.1.4 Apply
This button is only available if the license file has changed or been reselected after using the “…” button.

6.1.2 LMTOOLS.exe

LMTOOLS is a tool provided by Flexera Software LLC for configuration and management of the license manager. From this utility you can view the system settings, start and stop the license manager, reread the license file, check the license server status, configure the paths used by the license manager, and configure the borrowing capability.
6.1.2.1 Launch and Usage
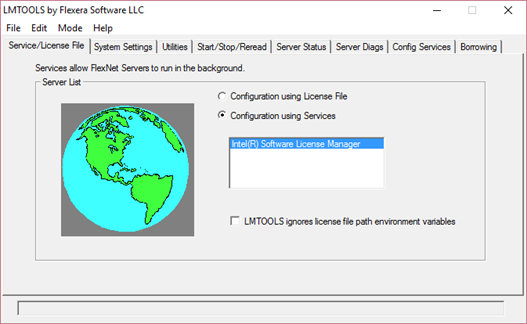
LMTOOLS can be run by browsing to the Intel Software License Manager install folder and running lmtools.exe.  It requires administrator privileges.    LMTOOLS Service/License File
6.1.2.2 System Settings
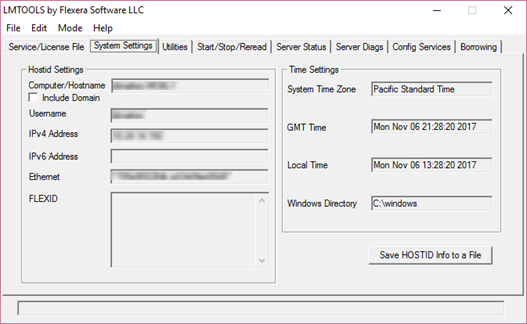
This tab displays the host settings used to verify the server license.  The host ID on the license must match one of the Ethernet IDs.   LMTOOLS System Settings
6.1.2.3 Start/Stop/Reread
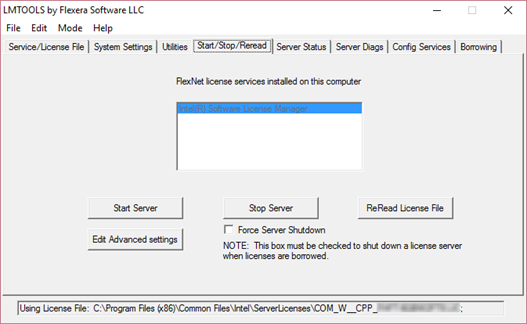
From this tab you can start, stop, or reread the license file.   LMTOOLS Start/Stop/Reread
6.1.2.4 Server Status/Server Diags
Use these tabs to view the status of the license manager and/or get troubleshooting information. 
Server Status
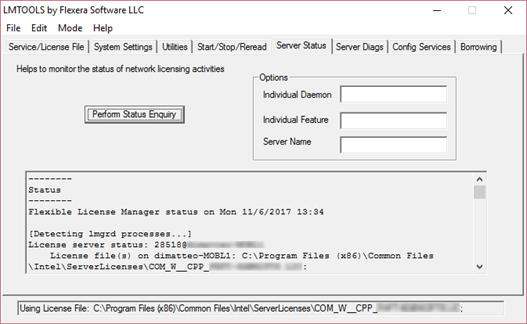
Click the “Perform Status Enquiry” button to view the status of the license server using the license file named at the bottom of the dialog box.  It will display the number of total license seats for each component and the number currently checked out.  LMTOOLS Server Status
Server Diags
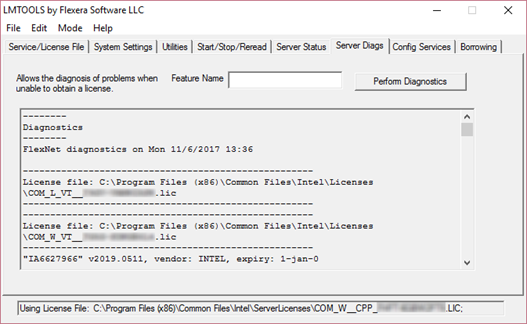
Click the “Perform Diagnostics” button to get a list of available licenses on the system, including non-floating licenses.  Enter a code in the Feature Name field, such as Comp-CW, to see which licenses grant that feature.   LMTOOLS Server Diags
6.1.2.5 Config Services
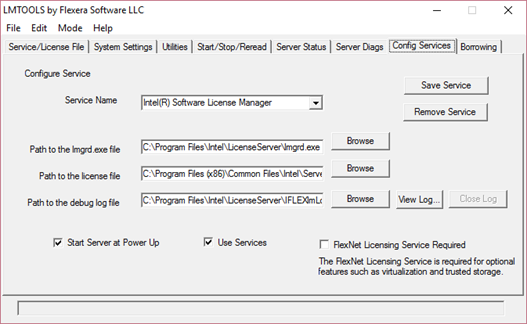
This tab allows you to change the names and locations of the files used by the license manager, and enable/disable the automatic startup of the license manager at system power up.  After making any changes to this tab, click the “Save Service” button to save them.  LMTOOLS Config Services
Path to lmgrd.exe file
This is the location of the primary license manager process.  The default location is C:\Program Files\Intel\LicenseServer.
Path to the license file
This is the path to the license file read by the license manager.  It is important to make sure this path only contains valid server license files.  It should not contain non-floating, disabled, duplicate, or client license files (floating licenses containing USE_SERVER).  The default is C:\Program Files (x86)\Common Files\Intel\ServerLicenses.
Path to the debug log file
The license manager writes all output to this debug log file, including start-up, status checks, and license checkouts.  It is created automatically when lmgrd is started.  The user starting the license manager must have write privileges for this file – lmgrd will not use administrator privileges even if the user has them.  If the user launching lmgrd does not have write access to this file, they may get an error stating that the license is invalid.
Start Server at Power Up
Check this box to automatically start the license manager service at system start-up.  It is only enabled if the Use Services box is also checked.
Use Services
Check this box to run the license manager as a service.
FlexNet Licensing Service Required
Check this box to enable the FlexNet licensing service.
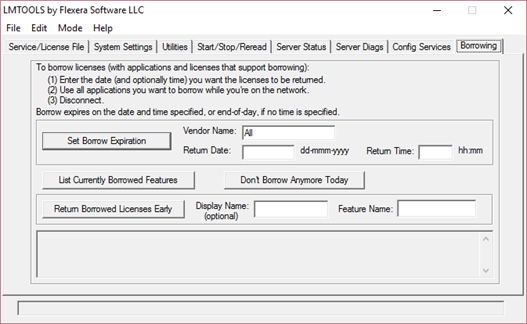
6.1.2.6 Borrowing
Use this tab to manage license borrowing.  The license file must contain the BORROW keyword, as configured in the Intel Registration Center.    LMTOOLS Borrowing

6.1.3 lmgrd.exe

Lmgrd is the primary process for the Intel Software License Manager.  To run it manually through the command-line:
  1. Open a Command Prompt as administrator
  2. Move to the license manager install directory
  3. Run lmgrd with options –c <license file> and –l <log file>
cd <install-directory>
lmgrd –c <path to license file> -l <path to log file>

6.1.4 Lmutil.exe

Lmutil is used by LMTOOLS to run license manager commands related to status checks and borrowing.  It can be run manually as an administrator in the command-line.

6.2 Linux* Utilities 

Unlike the Intel Software License Manager for Windows*, the Linux version does not contain graphical tools for monitoring and configuring the license manager.  These actions must be run in the command-line using two utilities.

6.2.1 Start the license manager (lmgrd)

The lmgrd process launches the license manager for a given license file or folder.  This is the daemon provided by FlexNet to serve licenses for multiple vendors.  The settings used by lmgrd are determined by the license file(s):
  • The port used by lmgrd is defined in the top line, defaulted to 27009.
  • The daemon to serve licenses for a particular vendor (INTEL) is defined in the second line.  The port for the INTEL daemon may also be defined in this line, otherwise it will be assigned by the OS when lmgrd starts.
  • Both ports used by lmgrd and the INTEL daemon must be open.
The license file or folder can be specified in environment variable LM_LICENSE_FILE or directly in the lmgrd command.  If using a folder, the license files must contain extension .lic.
To run lmgrd, execute the command:
 lmgrd –c <license file> -l <log file> 
Both the –c and –l arguments are optional.  If –c is not specified, it will use the value in LM_LICENSE_FILE.  If the log file is not specified, then all output will be written to stdout.
To restrict access to license manager utilities, the following options may be added to the lmgrd command:
-2 -p
Restricts usage of lmdown, lmreread, and lmremove to an administrator who is by default root. If there is a Unix* group called `lmadmin' then use is restricted to only members of that group. If root is not a member of this group, then root does not have permission to use any of the above utilities. 
-x lmdown
Disallow the lmdown command for all users. If lmdown is disabled, you will need to stop lmgrd via `kill pid' without the -9 argument. 
-x lmremove
Disallow the lmremove command for all users.

6.2.2 Check the license manager status (lmstat)

Lmstat will provide status information for a running license manager, including:
  • lmgrd version, port number, and license file used
  • INTEL daemon version
  • Total number of license seats available for individual components listed in the license(s)
  • Number of license seats currently in use for each component
To run lmstat, execute the command: 
 lmstat –a 

6.2.3 Check the host ID used by the license manager (lmhostid)

Lmhostid provides the host ID(s) used to validate the license file.  One (and only one) of the host IDs listed should be provided during activation of the license, and listed in the license file next to the host name.
To run lmhostid, execute the command:
 lmhostid

6.2.4 Reread the license file (lmreread)

Lmreread rereads the license file.  Use this when you’ve renewed or otherwise made changes to your license file.
To run lmreread, execute the command: 
 lmreread –c <license file>

6.2.5 Release a license seat (lmremove)

Lmremove releases a license seat from a particular user.  Use this command if a user is unable to return the seat to the license pool, such as due to a system crash.  First, run lmstat –a to determine the feature name, user name, and host name, such as:
Users of PerfAnl:  (Total of 7 licenses issued;  Total of 1 license in use)
  "PerfAnl" v2018.0914, vendor: INTEL, expiry: 1-jan-0
  platforms: i86_n  i86_r  i86_re  ia64_n  amd64_re  i86_mac  x64_n  x64_mac  , vendor_string: SUPPORT=COM https://lemcenter.intel.com
  nodelocked license locked to NOTHING (hostid=ANY)
    user1 hostname1 /dev/pts/0 (v2007.0901) (serverhost/27009 203), start Mon 11/13 12:26
Values for the above example:
  • Feature = PerfAnl
  • User name = user1
  • Host = hostname1
To run lmremove, execute the command: 
 lmremove –c <license file> <feature> <user name> <host>

6.2.6 Shut down the license manager (lmdown) 

Lmdown shuts down the license manager (lmgrd process) for a given license.
To run lmdown, execute the command:
 lmdown –c <license file>

6.2.7 Remove the license manager (uninstall.sh)

To remove the license manager:
  1. Run the uninstall.sh script to remove the installed files from the system.
  2. To permanently remove the Intel® Software License Manager, delete the lines that were added to the system startup files as described in section 4.2.3 of this guide.

7. Using the Client Application for the First Time

You must complete the following steps to use an Intel client application with the Intel® Software License Manager for the first time.

7.1 Installing the Client Application

The Intel® Software Development Product installers allow you to provide information to connect to the license manager in the following ways:

7.1.1 Use the client license file

This file only contains the information necessary to connect to the license server and uses the USE_SERVER directive.  This file will be generated if the user enters the serial number during installation, or it can be downloaded from the Intel® Registration Center. The license file would be in the following format:
SERVER <server name> <hostid> <port> 
USE_SERVER
where <server name>, <hostid>, and <port> all come from the SERVER line in the license file which was used to install the license server. 
If using a redundant server setup, all three servers should be listed.

7.1.2 Use the INTEL_LICENSE_FILE environment variable

Set the INTEL_LICENSE_FILE environment variable on the client system to port@host. This can be done through the product installer or manually.
If using a redundant server setup, all three servers should be listed, for example:
27009@host1:27009@host2:27009@host3
Use colons to separate multiple values in Linux*, and semicolons in Windows*.

7.1.3 Use the server license file

Using the full server license file is not recommended.  It must match the one used by the license server exactly.

7.2 License Check-out 

7.2.1 License Seat Allocation Overview

For an Intel® compiler product, the license seat is checked out (allocated) as soon as the application is started; and returned when the application work is “done”.
Note: For performance libraries (Intel® Integrated Performance Primitives, Intel® Threading Building Blocks, and Intel® Math Kernel Library), and some other Intel® Software Development Products, license check-out is only done during product installation.
All floating license seats are available on a first-come first-served basis for check-out by any number of products installed on client systems that have been configured to check-out floating license seats from the license host server system.
However, if all license seats are allocated for the requested product, additional users are forced to wait for one of the client systems to release a floating license seat. This is automatically done in our products, and means that some users may experience delays if all license seats are simultaneously allocated. The wait time for a license seat is forever, until a license seat is available, and is not configurable by end users. 
When all license seats are allocated, a new license check-out request will retry every 30 seconds until a license seat is available for the request. The license seat wait time may appear like the product is hung or that performance has suddenly degraded.

7.2.2 Check License Allocation Status

To determine how many floating license seats are checked-out, use the command lmstat:
On the license host server system, execute one of the following commands:
Linux*
lmstat -a -c <license file>
Windows*
lmutil lmstat –a –c <license file>
<license file> is the full path including filename to the floating license file.
 
On the client system, execute one of the following commands:
Linux*
lmstat -a
Windows*
lmutil lmstat –a

7.2.3 License Borrowing

License borrowing allows users to hold a license seat for a limited amount of time, such as when working offline.  This will completely consume a license seat until it is returned to the server.
To enable borrowing, the license file must contain the keyword “BORROW.”  This will set the maximum borrow time to a default of 169 hours.  Borrowing is only supported in single server configurations.
7.2.3.1 Borrow
To borrow a license from a client machine, follow these steps:
  1. Copy the lmutil component to the client machine.  
  2. Run lmutil lmborrow INTEL dd-mmm-yyyy [hh:mm]
    1. INTEL is the vendor daemon to borrow from
    2. The date is when the license will be returned, and must be less than the maximum borrow time specified in the license file.
  3. Run the application to check out and borrow the license.
  4. Verify that the license seat has been borrowed by running lmutil lmborrow –status
  5. Disconnect from the network to use the license without connecting to the license server.
7.2.3.2 Return
To return a license early from the client machine, run lmutil lmborrow –return <feature>.  Otherwise the license will be returned on the date specified in the first borrow command.

8. Troubleshooting

This chapter explains how to generate debug logs, lists the information you should provide when opening a support request, and provides solutions for some common problems.

8.1 Getting Online Support

You may visit the floating license FAQ first to search for an answer to your license manager problem.  If you don’t find a solution, continue on with the next section.

8.2 Creating Debug Logs for License Checkout Issues

If your licensing does not work properly, review the previous sections to verify the installation. If the problem persists after you verify correct installation, you should open a support case with Online Service Center.  There are a few logs and output data that are helpful in diagnosing licensing issues.

8.2.1 License Server Log

This is the log specified when running lmgrd, and will help to identify issues on the server side.
  • For Windows* this is typically located at C:\Program Files\Intel\licenseserver\Iflexlm.log
  • For Linux* and Mac OS*, this is typically located at /opt/intel/licenseserver/lmgrd.log

8.2.2 Client Log

To enable logging of licensing issues on the client side, set environment variable INTEL_LMD_DEBUG=<path to log file>.  This will generate detailed information on the license checkout. 
Follow these steps to create a log file to send to support: 
  1. Set INTEL_LMD_DEBUG.  If it is already set, please clear the log file it points to.
  2. Run the application with the license failure.
  3. Send the log file to support.
After you are finished gathering debug information, be sure to unset this environment variable.  Otherwise it will continue to write to the log file for each checkout, which may cause slow performance and result in a very large log file.

8.2.3 lmstat Output

The output of lmstat –a will provide the daemon versions and help determine whether there is a problem with the server or the client.

8.3 Server Issues

Server issues include problems running the license manager or serving licenses to remote clients.

8.3.1 License manager is not running

If the license manager will not install or start, the problem is typically caused by an invalid license.  You can find more information in the license server log.  If it doesn’t exist, then make sure the license file is valid.

8.3.2 License manager is not serving licenses

If the license manager is running but not serving or under-serving licenses, then it is either a problem with blocked ports or the license file.
8.3.2.1 Port Issues
If the two ports used by the license manager are blocked, then clients will be unable to connect and checkout licenses.  Determine the ports used by the lmgrd and INTEL processes.  The lmgrd port is defined in the license file and is defaulted to 27009.  The INTEL port may be defined in the license file, but if it is not then the OS will assign one when lmgrd is started.  Check the server log file to find this value.
Once you’ve identified the port numbers, make sure they are not blocked by a firewall.  You should be able to telnet to each port from a remote machine.
8.3.2.2 License File Issues
The license manager may appear to under-serve license seats if any of the following are true:
  1. The license file is outdated.  If the license has been renewed but the license file has not been updated on the server, then it may fail to serve seats for newer product versions, while able to serve older product checkouts.
  2. The license version is outdated.  Licenses are upgraded as newer products change the feature codes they use.  Even though a license for the 2015 product version is valid and current, it may not contain the right codes for newer product checkouts.  Upgraded licenses will always be backward compatible for older products.
  3. Multiple license files are used inefficiently.  The Intel® Software License Manager can serve licenses from a variety of license files and versions.  However, it may not serve those licenses in the most efficient order.  An example is if you have a license for two Composer Edition 2015 seats and one for two Composer Edition 2017 seats, for a total of four.  If requests for the 2015 version consume the 2017 seats, then requests for the 2017 version will have to wait.  That means two seats are being consumed out of a total of four.  To enforce the order of licenses used, combine the license files.

8.3.3 Verify Compatible Versions

In a complex installation of multiple FLEXlm* and/or FlexNet Publisher* licensed products, which include daemons from different vendors, a single lmgrd is used to manage the use of all licensed products. 
You can use any lmgrd whose product version (lmgrd -v) is greater than or equal to all of the vendor daemons’ product versions. If your lmgrd version is less than any of the vendor daemons’ versions, server startup failures may result.
Note: It is recommended that Intel license manager to be run on a separate lmgrd instance.  You need to specify a dedicated port in the Intel license and then run the lmgrd –c <vendor-license-dir-list>. 

8.4 Client Issues

Client issues generally involve slow checkouts or being unable to communicate with the license server.

8.4.1 Slow Checkouts

Check the following if the license checkout seems slow:
  • Old license server information or license files.  Check the following places for invalid licenses and delete any found:
    • INTEL_LICENSE_FILE environment variable - make sure port@host is correct and any folders specified do not contain invalid license files.
    • For Linux: /opt/intel/licenses
    • For Windows: [Program Files]\Common Files\Intel\Licenses
  • Slow DNS lookups.  Newer versions of the product always do DNS resolution before connecting to the license server, even with IP addresses.  Make sure that the fastest nameserver is called first, by checking nsswitch.conf and resolv.conf, for example.
  • INTEL_LMD_DEBUG is set.  If you are not actively debugging license checkouts, make sure this environment variable is not set.

8.4.2 No Checkouts

Problems with floating license checkouts are usually caused by issues communicating to the server or an invalid license. 
If there appears to be a problem connecting to the license server, check the server name specified in the license file or the INTEL_LICENSE_FILE environment variable.  Make sure the server name and port are correct, and if the full server license file is being used, that it matches the license file on the server exactly.
If the server information appears to be correct, try to telnet to the server name and port specified.  If this succeeds, then find the secondary INTEL daemon port and try to telnet to it.

8.5 Information Needed for Support Requests

When opening a support request, you should provide the following information to the support team:
  • Client Information
  • Intel Software License Manager Information

8.5.1 Client Information

  • Package ID of the product. This is the name of the file you downloaded and installed.
  • Name of client application with all parameters.
  • Operating system, architecture, kernel, glibc, and any service packs installed on the client system.
  • Values to which the LM_LICENSE_FILE and INTEL_LICENSE_FILE environment variables are set.
  • A copy of all license files used on the client system. It is important to copy the license files themselves rather than copy/pasting the contents as this can mask other potential problems with the files.
  • On Linux* or OS X*, set INTEL_LMD_DEBUG to /tmp/licensecheckout.log and on Windows*, set INTEL_LMD_DEBUG to C:\temp\licensecheckout.log and run the client. Once the client finishes execution, attach the licensecheckout.log to the support issue.
  • If you are opening a support request about a segmentation fault issue, attach the stack dump.

8.5.2 Intel Software License Manager Information 

  • The output of lmstat –a (Linux*) or lmutil lmstat –a (Windows*)
  • Operating system, architecture, kernel, glibc, and any service packs installed on the system on which the Intel® Software License Manager server is installed. 
  • The Intel® Software License Manager server file name that you downloaded and installed 
  • A copy of the server log file at one of the following locations, depending on your operating system: 
    • Windows*: <install drive>:\program files\common files\intel\flexlm\iflexlm.log
    • Linux*: <install location of servers>/lmgrd.log
  • A copy of the license file you used to start the server. It is important to copy the license files themselves rather than copy/pasting the contents as this can mask other potential problems with the files.
  • Values to which the LM_LICENSE_FILE and INTEL_LICENSE_FILE environment variables are set.