Overview
Learn how to integrate device services using sensor fusion and microservices with this automated checkout reference implementation. The prototype simulates the hardware components and user actions in a retail use case: monitoring the inventory and operating conditions of a retail cooler or cabinet.
The software uses:
Sensors: Different sensor devices trigger events, such as user authentication, customer interaction with the machine, or a change in machine temperature.
Middleware: The bus of the middleware, EdgeX* Foundry, sends these events back to the main application as an event message. Microservers assemble the information to manage inventory and machine health.
Data Reconciliation: The data is then reconciled to generate an inventory delta, finalize billing, or switch the machine to a maintenance mode based on telemetry.
Select Configure & Download to download the reference implementation and the software listed below.
- Time to Complete: Approximately 30-45 minutes
- Programming Language: Google Go* programming language 1.18
- Available Software:
- EdgeX Foundry*
- Docker* Container
- Docker* Compose
- Git*
- GNU* make
- cURL* or Postman*
- Intel® Distribution of OpenVINO™ toolkit
Other Requirements
Some software packages require root permissions.
Target System Requirements
- Ubuntu* 20.04.5 LTS
- 6th (and above) Generation Intel® Core™ processors with Iris® Pro Graphics or Intel® HD Graphics
Learning Objectives
Use the reference implementation to:
- Build and experience an end-to-end prototype that simulates a specific retail use case.
- Learn how to integrate sensors and devices with microservices.
- Increase your understanding of the value of AI at the edge.
Expand the reference implementation’s base components to create your own custom solutions.
How It Works
This prototype simulates the hardware components and user actions in a retail use case: monitoring the inventory and operating conditions of a retail cooler or cabinet. It uses:
- The common open middleware framework, EdgeX Foundry*, to consolidate and present data from multiple sensors.
- Intel® Distribution of OpenVINO™ toolkit’s inference engine for creating a seamless computer vision-powered checkout experience.
- cURL or Postman commands to make REST API calls.
- Machine telemetry to detect changes, such as temperature or humidity, which may indicate maintenance is required.
NOTE: Postman is supported but not demonstrated in this prototype.
The reference implementation illustrates how to combine software components to solve a retail use case. Easily insert your own deep learning computer vision inference models and other sensors to modify it for a new use case.

Simulate User Actions
The Automated Checkout reference implementation simulates the following three retail cooler scenarios:
- An employee stocks the cooler.
- A customer purchases an item.
- The cooler requires maintenance.
Tables 2 and 3 present elements depicted in the user journey and software flow diagrams for each retail scenario.
| ACTION | INVENTORY STATE | COOLER STATE |
|
|---|---|---|---|
| An employee stocks the cooler | Empty | Operational | Vending Worker |
| A customer purchases an item | Contains Inventory | Operational | Customer |
| The cooler requires maintenance | May or may not contain inventory | Maintenace required, such as temperature or humidity modifications | Maintenace Worker |
| SIMULATED HARDWARE | MICROSERVICES | EDGE APPLICATION SERVICES |
|---|---|---|
|
|
|
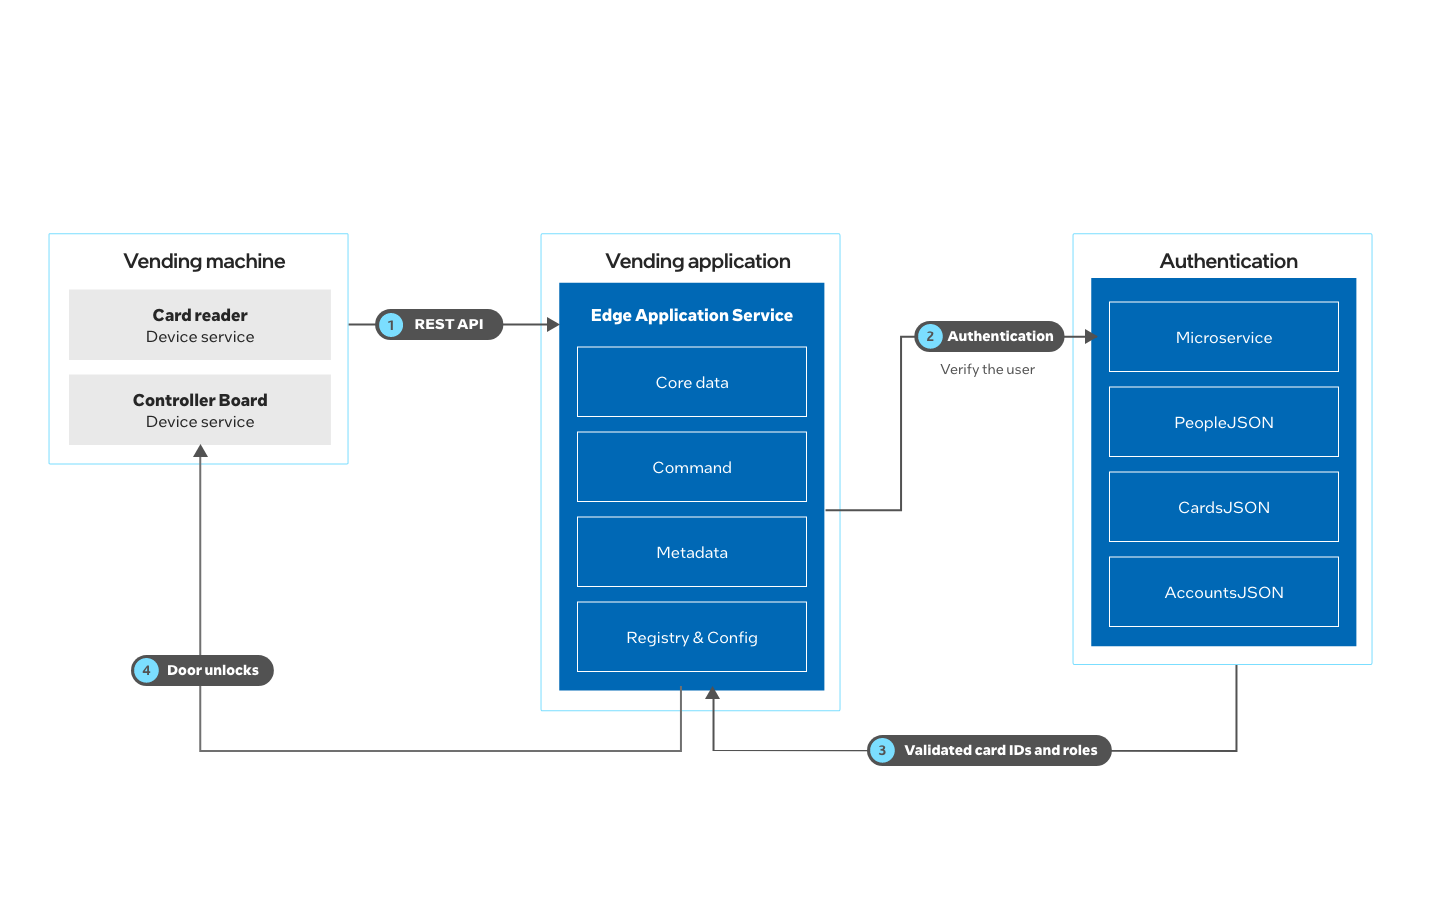
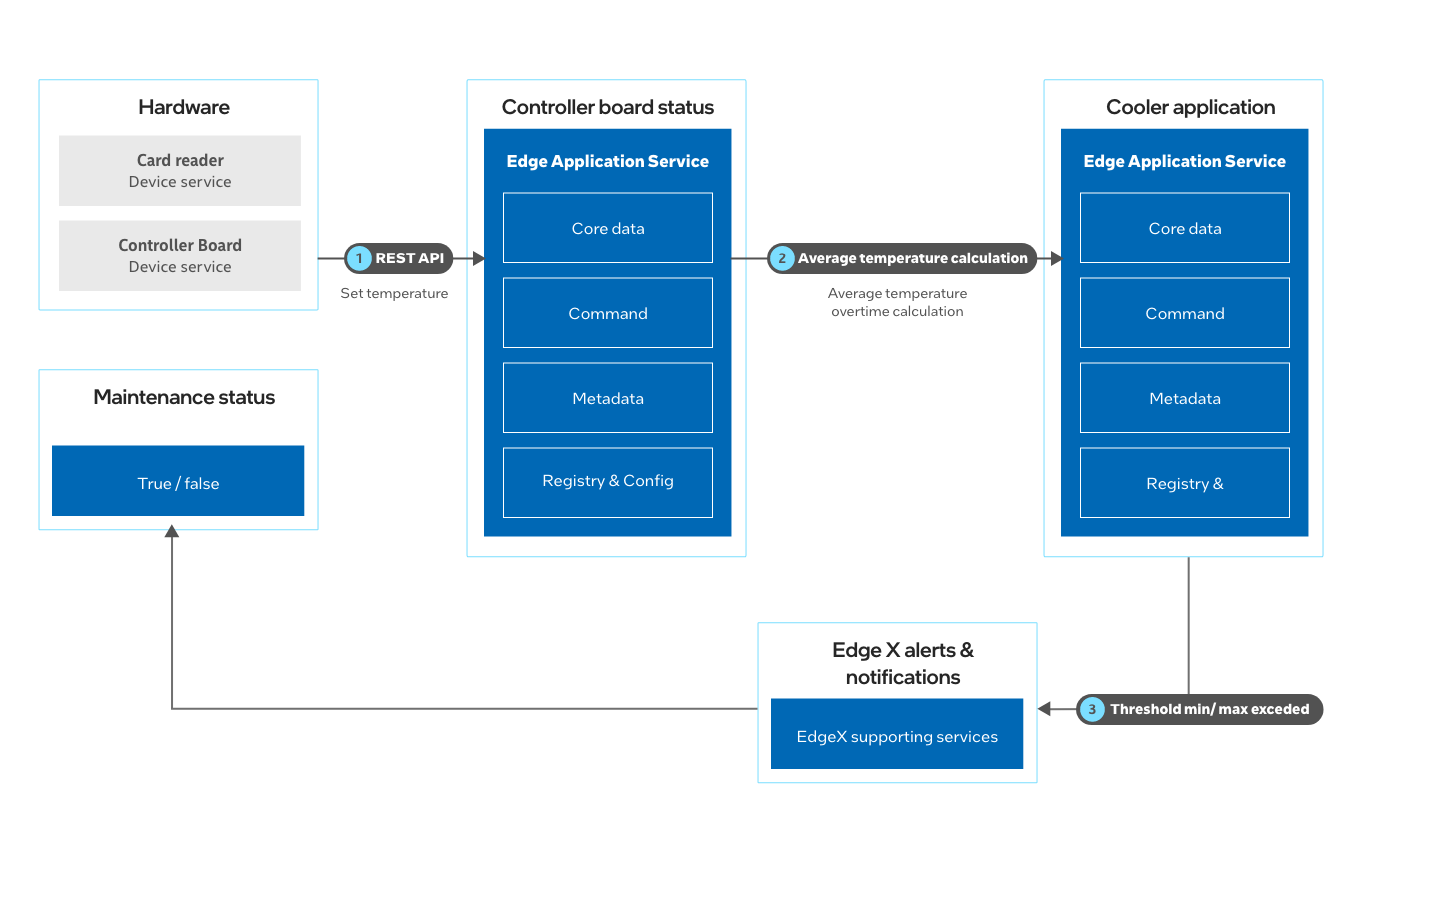
NOTE: Figures 2, 3, and 4 in the Scenarios below demonstrate software flow. The activity lists correspond to both physical and system actions.
Scenario 1: An Employee Stocks the Cooler
Simulation of the stocker’s activity requires these sub-steps:
- Swipe badge
- Open the cooler door
- Add inventory
- Close the cooler door
- Verify that the cooler's inventory has been populated
- Verify that the cooler's audit log shows the transaction
Scenario 2: A Customer Purchases an Item
Simulation of a purchase activity requires these sub-steps:
- Swipe badge
- Open the cooler door
- Remove item(s)
- Close the cooler door
- Verify that the cooler's inventory has been altered
- Verify that the cooler's audit log shows the transaction
- Verify that the cooler's ledger shows the transaction

Scenario 3: The Cooler Requires Maintenance
Simulation of the maintenance resolution requires these sub-steps:
- Set the temperature to a value above the default maximum temperature threshold
- Continue to set the temperature until the time-averaged temperature is above the default maximum temperature threshold
- Simulate a maintenance worker swiping their badge to maintain the cooler
- Reset the temperature back to normal
- Verify that maintenance mode is no longer active
Get Started
Install the Reference Implementation
NOTE: If the host system already has Docker images and containers, you might encounter errors while building the reference implementation packages. If you do encounter errors, refer to the Troubleshooting section at the end of this document before starting the reference implementation installation. The Troubleshooting section explains how to stop existing images and containers.
1. Open a new terminal, go to the downloaded folder and unzip the downloaded RI package.
2. Go to the automated_checkout/ directory.
3. Change permission of the executable edgesoftware file.
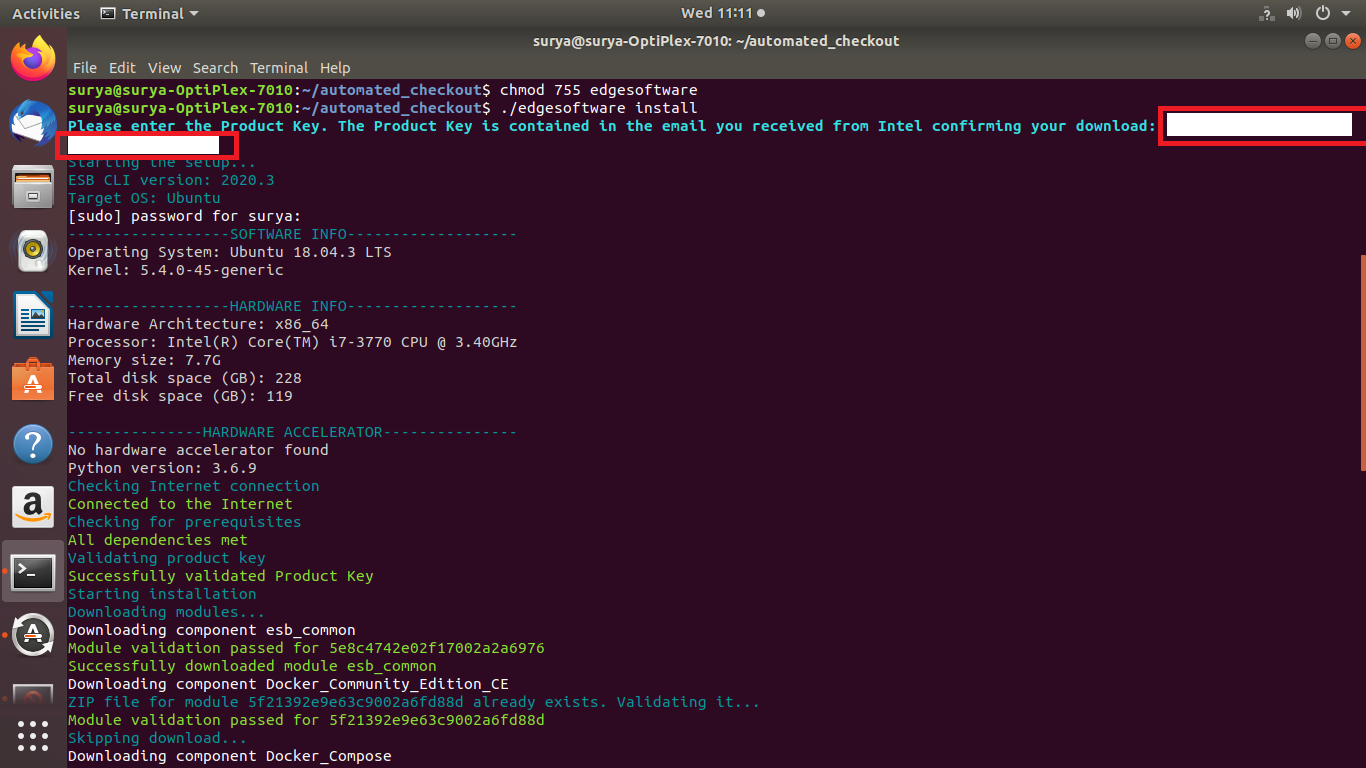
4. Run the command below to install the Reference Implementation:
5. During the installation, you will be prompted for the Product Key. The Product Key is contained in the email you received from Intel confirming your download.
NOTE: The key is also displayed (top left) on the download page after selecting the Download button.
6. When the installation is complete, you see the message “Installation of package complete” and the installation status for each module.
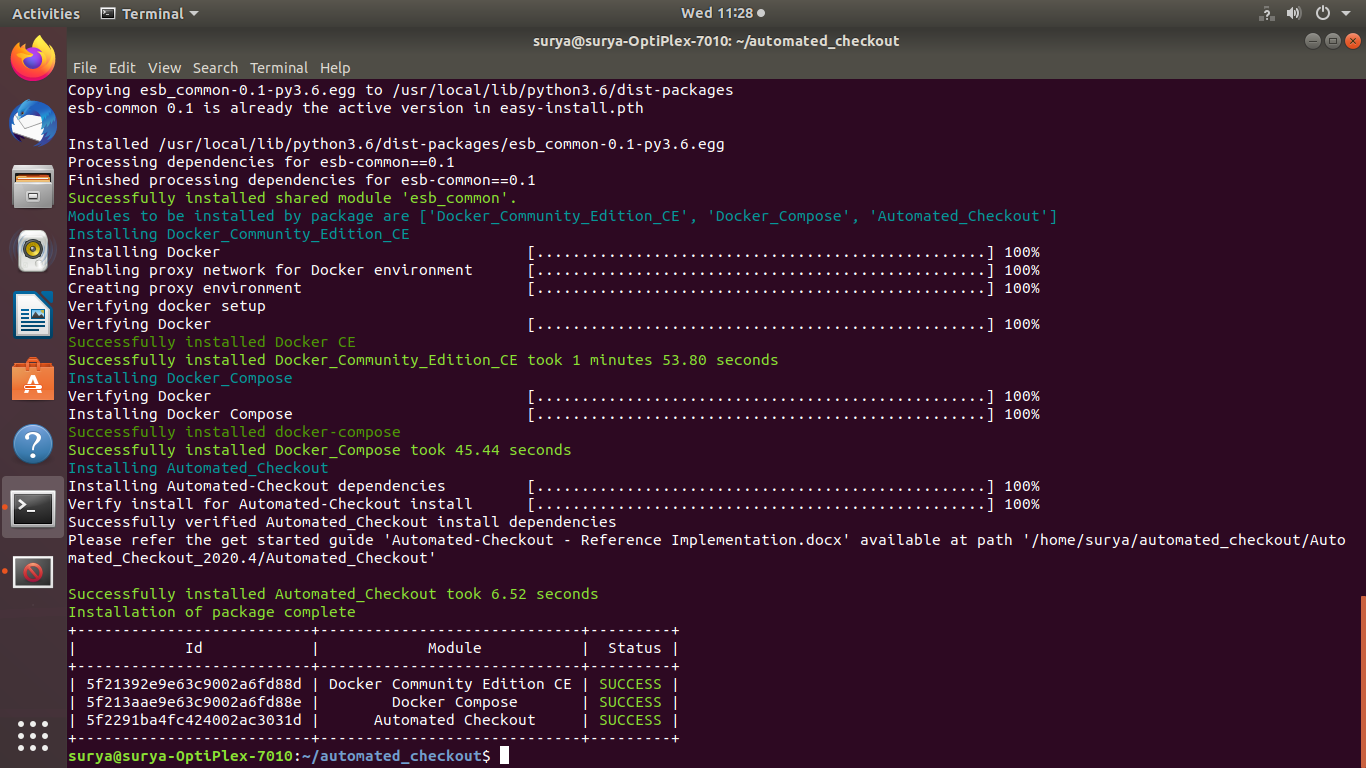
NOTE: If you encounter any installation issues, please refer to the Installation Failure in the Troubleshooting section at the end of this document. Installation failure logs will be available at the path: /var/log/esb-cli/Automated_Checkout<_version>/Automated_Checkout/install.log
Build
1. Go to the working directory:
NOTE: Version is the Intel® Distribution of OpenVINO™ toolkit version downloaded.
2. Set proxy if your system is behind a proxy network, otherwise, set below proxy as default:
3. Run the command below to build the automated checkout services and create local Docker images:
USE OF SUDO: The sudo command enables the user to run applications or commands as the superuser with temporarily elevated privileges. Add sudo to build commands and all Docker and Docker-compose commands if user group is not added in docker.
The build command may take a while to run, depending on your internet connection and machine specifications.
NOTE: If network calls fail during image build on corporate network, e.g, ‘apt-get update’ error, please refer to Docker Build Image Failure in the Troubleshooting section at the end of this document.
===CHECK FOR SUCCESS===
List the Docker images that are built successfully:
If the build was successful, the results will be:
| 1 | automated-checkout/as-controller-board-status |
| 2 | automated-checkout/as-vending |
| 3 | automated-checkout/ds-card-reader |
| 4 | automated-checkout/ds-controller-board |
| 5 | automated-checkout/ds-cv-inference |
| 6 | automated-checkout/ms-authentication |
| 7 | automated-checkout/ms-inventory |
| 8 | automated-checkout/ms-ledger |
NOTE: If you do not see all of the above Docker images, look through the console output for errors. Sometimes dependencies fail to resolve and must be run again. Address obvious issues and to try again, repeat step 3 of Build. Otherwise, continue with instructions in Start the Services.
Start the Services
1. Run the command below to start the EdgeX Foundry device services and then the reference implementation suite:
NOTE: If you encounter any issues, please refer to the Troubleshooting section at the end of this document.
===CHECK FOR SUCCESS===
List the containers are running with the docker ps command:
NOTE: Add ‘sudo’ for all Docker and Docker-compose commands if user group is not added in docker.
| IMAGE | STATUS | |
| 1 | automated-checkout/ms-ledger:dev | Up 53 seconds |
| 2 | eclipse-mosquitto:2.0.14 | Up 52 seconds |
| 3 | automated-checkout/as-vending:dev | Up 52 seconds |
| 4 | automated-checkout/ms-inventory:dev | Up 52 seconds |
| 5 | automated-checkout/ds-controller-board:dev | Up 52 seconds |
| 6 | automated-checkout/ms-authentication:dev | Up 55 seconds |
| 7 | edgexfoundry/device-mqtt-go:2.2.0 | Up 53 seconds |
| 8 | automated-checkout/ds-card-reader:dev | Up 53 seconds |
| 9 | automated-checkout/as-controller-board-status:dev | Up 52 seconds |
| 10 | edgexfoundry/core-command-go:2.2.0 | Up About a minute |
| 11 | edgexfoundry/core-data-go:2.2.0 | Up About a minute |
| 12 | edgexfoundry/core-metadata-go:2.2.0 | Up About a minute |
| 13 | edgexfoundry/support-notifications-go:2.2.0 | Up About a minute |
| 14 | edgexfoundry/consul:1.10.10 | Up About a minute |
| 15 | automated-checkout/ds-cv-inference:dev | Up 51 seconds |
| 16 | redis:6.2-alphine | Up About a minute |
The docker ps command generates a list of all running containers. Table 5 presents example output from docker ps, listing all containers that should be running after step 1. Status times will vary.
If any of the services display Exited, then use the following steps to fix the proxy config issue.
- Stop Docker Containers:
- Remove Docker proxy config file:
- To re-run the Docker image, go to the beginning of Start the Services.
Check Maintenance Mode
When the Automated Checkout is in an unstable state, it enters maintenance mode. A change in humidity or temperature above a certain threshold indicates an unstable state and triggers this mode.
NOTE: When the Automated Checkout is in maintenance mode, it automatically denies access to everyone except individuals that possess badges associated with the maintenance worker role. Before starting the Scenario sections, it is important to confirm that maintenance mode is in the proper state with the cURL command below.
1. Check that the services are not running in maintenance mode:
===CHECK FOR SUCCESS===
- Verify the output and check that maintenanceMode value is set to false, as shown below:
- If maintenanceMode is set to true, run the following command to reset the state machine:
-
Recheck the maintenance mode with the maintenace mode cURL command above.
Watch the Log and Post-processed Images
Understand events in the prototype by watching the log and viewing post-processed images that display the state of the cooler.
1. In a separate terminal window, watch the logs for a few Automated Checkout services, so that incoming events can be seen:
2. For visualization purposes, the CV inference service serves the post-processed images over http. Open http://127.0.0.1:9005 on a web browser to observe how products are being added or removed from the cooler.
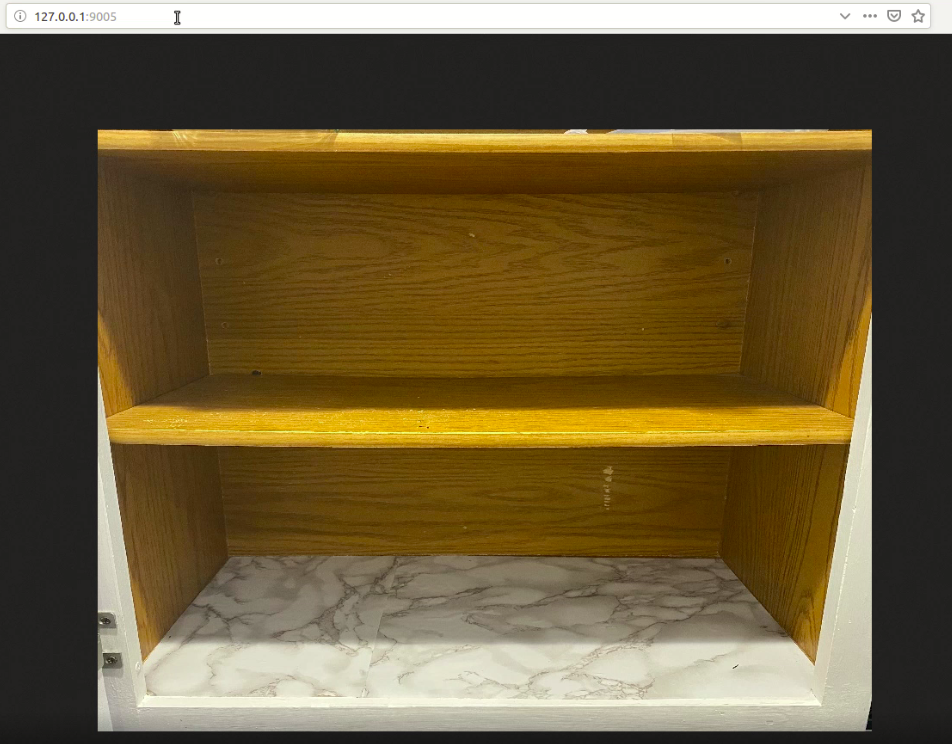
TIP: Use the logs and post-processed images to see the reference implementation states when working through the Scenario sections.
Preparation: Understand Time-sensitive Calls
Time-sensitive events in the physical world, such as opening a cooler door, trigger system events in response. The steps in the Scenario sections below correlate time-sensitive events in the physical world with their system counterparts to illustrate the REST API calls involved in each scenario.
Once started, continue the sequence of commands as described, observing wait periods as indicated. Use the curl command to make REST API calls to various services.
NOTE: Only cURL commands are demonstrated, but Postman will also work.
| ACTION/EVENT | TIME-SENSITIVE | DESCRIPTION | NOTE |
|---|---|---|---|
| Card Swipe | Yes | After a user has swiped a card, the cooler door unlocks. The user has roughly 20 seconds (configurable) to open the door before it locks again. Prepare to check the lock status and open the door commands soon after card swipe. | No response message expected. |
| Check Lock | Yes | Execute immediately after card swipe. | A lock1_status = 0 indicates unlocked. |
| Open/Close Door | Yes | Wait three to four seconds between opening and closing the cooler door. | No response message expected. |
| Inventory Check | No | Check the inventory file to discern inventory changes. | The value of unitsOnHand changes when the invenstory is stocked or a purchase has been made. |
| Set Temperature | Yes | Run repeatedly to get an average over 15 seconds. | No response message expected. |
Restart the Automated Checkout
If time-sensitive events cannot be completed in the timespans described in the previous section, the calls will fail to update the system. Inventory, ledger and auditlog may not contain the expected values. For example, the ledger may not contain a transaction after an item is purchased. To re-run commands, restart the automated checkout, which will put it in a pre-stocked state, ready for Scenario 1.
To stop the automated checkout:
make down
To restart the automated checkout:
make run
Run the Application
Scenario Details
Badge ID
Roles and Badge IDs include:
- Stocker Role: 0003293374
- Customer Role: 0003278380
- Maintenance Role: 00023278385
The ID will indicate who is performing the action in each scenario and is found in the log files after the action is performed.
By default, the card number ID corresponds to a card in the ms-authentication/cards.json file. The ID 0003293374 is associated with the stocker role.
Example JSON object for cardId 0003293374:
Door Status
During the time-sensitive scenarios below, the status of the cooler door, locked or unlocked, is a critical detail. It is important to verify that the status of the door is unlocked immediately after a card swipe. Immediately use the as-controller-board-status/status API to determine the status.
Remember these points about the cooler door:
- Door State: The lock must have a reading of 0 (unlocked) before proceeding to the next steps. If a user attempts to open the door while the lock is engaged, the reference implementation assumes an error occurred and transitions to maintenance mode.
- Door Open and Close: Open the door and close it as two separate events with three to four seconds between events. You will use the curl command to make REST API calls to the ds-controller-bard service to invoke these events. Waiting around three to four seconds is necessary as the frequency of "auto-events" that relay readings between some services is set to three seconds by default.
- Door Value to Pass: The door open action corresponds to a value of 0, and the door closed value corresponds to a value of 1. Pass these values to the ds-controller-board in the instructions below.
Inventory Checks
Scenarios 1 and 2 involve inventory checks.
For the inventory check during Scenario 1, wait about 20-30 seconds for the inventory to be recognized and counted by the CV inference service and for background processing of events to occur.
With cURL commands listed in the sections below, print the output of the contents of the inventory, audit log, and ledger to verify success of actions.
Maintenance Mode
Maintenance mode is triggered by a few conditions:
- Minimum or maximum temperature thresholds exceeded over a time-averaged temperature.
- The cooler door is left open for too long.
- The inferencing service is not responsive upon badge swipe.
- The inferencing service is not responsive upon an inferencing request.
Scenario 3 involves the maintenance role and maintenance mode. Observe the following rules concerning maintenance mode:
- Unstable State and Maintenance Status: When the Automated Checkout is in an unstable state, the maintenance check cURL command returns a value of true. The cooler goes into maintenance mode when the temperature exceeds a certain threshold.
- Access: Only the maintenace worker's badge ID grants access to the cooler when it enters maintenace mode.
- Card Swipe Resets: Swiping a badge after the cooler's temperature reaches the correct value resets the maintenance mode back to false.
The as-controller-board-status service takes temperature readings regularly and calculates the average temperature over a configurable amount of time. If the average temperature over this duration exceeds the thresholds defined in the as-controller-board-status service's configured value, it will cause the cooler to enter maintenance mode and it will attempt to send a notification. The frequency of these notifications can be configured.
If the temperature temporarily exceeds the maximum or minimum allowable temperature threshold but does not push the time-averaged temperature above or below the thresholds, no notification will be sent.
Scenario 1: An Employee Stocking the Cooler
This scenario simulates the stocking role and changes the cooler inventory. See the user journey for the stocking role in Figure 8. To review the software flow see How It Works: Scenario 1: An Employee Stocks the Cooler.
Before running Scenario 1 commands, understand these timing issues:
- When the automated checkout reference implementation is first started with no inventory, it may take as long as 15 seconds to authenticate a card swipe and unlock the door. During that time, check the status of the door several times to determine if the door is unlocked.
- After the door is unlocked, the user has 20 seconds to open and close the door.
- If the Scenario 1 actions do not take place within the allotted timespans, the automated checkout may still stock the cooler, but the Card ID will not be present in the auditlog.
TIP: Read through the scenario before executing the commands. Copying the commands to a text file can help with executing them within the time 20 second timeframe.

Inventory Check
Before stocking the cooler, note the starting content in these files: inventory, auditlog, and ledger.
1. Check the inventory:
===CHECK FOR SUCCESS===
Note the value of unitsOnHand (0) for the SKU of each item (e.g.,"productName\":\"Pringles\",\"unitsOnHand\":0). The contents of the inventory should look like this:
2. Check the auditlog:
===CHECK FOR SUCCESS===
The contents will be empty. The auditlog is not modified by this set of events.
3. Check the ledger:
===CHECK FOR SUCCESS===
The contents will be empty. The ledger is not modified by this set of events.
Badge or Card Swipe
Simulate the specific sequence of events performed by the stock worker with REST API call to the ds-card-reader service with badge ID 0003293374.
NOTE: Do this quickly as it simulates the real world business use case. For Scenarios 1 and 2: Complete all the commands in Badge or Card Swipe and Open and Close the Door within 20 seconds.
1. Call the ds-card-reader service to simulate a badge swipe (time-sensitive):
===CHECK FOR SUCCESS===
No response message expected.
2. Immediately check that the door is unlocked (time-sensitive):
===CHECK FOR SUCCESS===
NOTE: Keep checking the status until the lock1_status value is 0 as in the example output below. It may take as long as 3-4 seconds. If it never reaches 0, do not continue. Disregard lock2_status. See Scenario Details.
WARNING: Lock value must be 0. If it never reaches 0, do not continue. If a user attempts to open the door while the lock is engaged (example of lock engaged in status below), the reference implementation assumes an error occurred and transitions to maintenance mode.
Open and Close Door
Open the door and close it as two separate events. Wait three to four seconds between each event.
NOTE: Although the commands below represent two different events, with a rest period in between, they have been combined below so that they can be completed quickly. Waiting around three to four seconds is necessary as the frequency of "auto-events" that relay readings between some services is set to three seconds by default. Make sure to press Enter after the command group below.
1. To open and close the door:
- Open the door with the ds-controller-board-service (time-sensitive).
- Wait 3-4 seconds.
- Close the door.
===CHECK FOR SUCCESS===
No response message expected from any of the commands.
Inventory Check
1. Wait about 20-30 seconds for the inventory to be discovered by the CV inference service. This completes the time-sensitive command sequence.
2. Check the inventory list:
===CHECK FOR SUCCESS===
The value for unitsOnHand will have increased for several line items (e.g.,"productName\":\"Pringles\",\"unitsOnHand\":2) :
3. Check the audit log (not time sensitive):
===CHECK FOR SUCCESS===
Find the Card or Badge ID 0003293374 for the stocker role:
4. Check the ledger:
===CHECK FOR SUCCESS===
No change expected.
5. Refresh the browser to see the post-processed image after stocking the inventory. (See Figure 7.)
===CHECK FOR SUCCESS===

Scenario 2: A Customer Purchasing an Item
Now that the cooler's inventory has been stocked, simulate a customer swiping a card and removing one or more items from the cooler for purchase. The same time-sensitive assumptions from the stocking simulation apply in this Scenario. See the user journey for the customer role in Figure 10.
Before running Scenario 2 commands, understand these timing issues:
- When the automated checkout reference implementation is stocked and ready for a purchase, it takes around 10 seconds to authenticate a card swipe and unlock the door. During that time, check the status of the door several times to determine if the door is unlocked.
- After the door is unlocked, the user has 20 seconds to open and close the door.
- If the Scenario 2 actions do not take place within the allotted timespans, the automated checkout may still remove an items from the cooler, but the Card ID will not be present in the auditlog.
TIP: Read through the scenario before executing the commands. Copying the commands to a text file can help with executing them within the time 20 second timeframe.
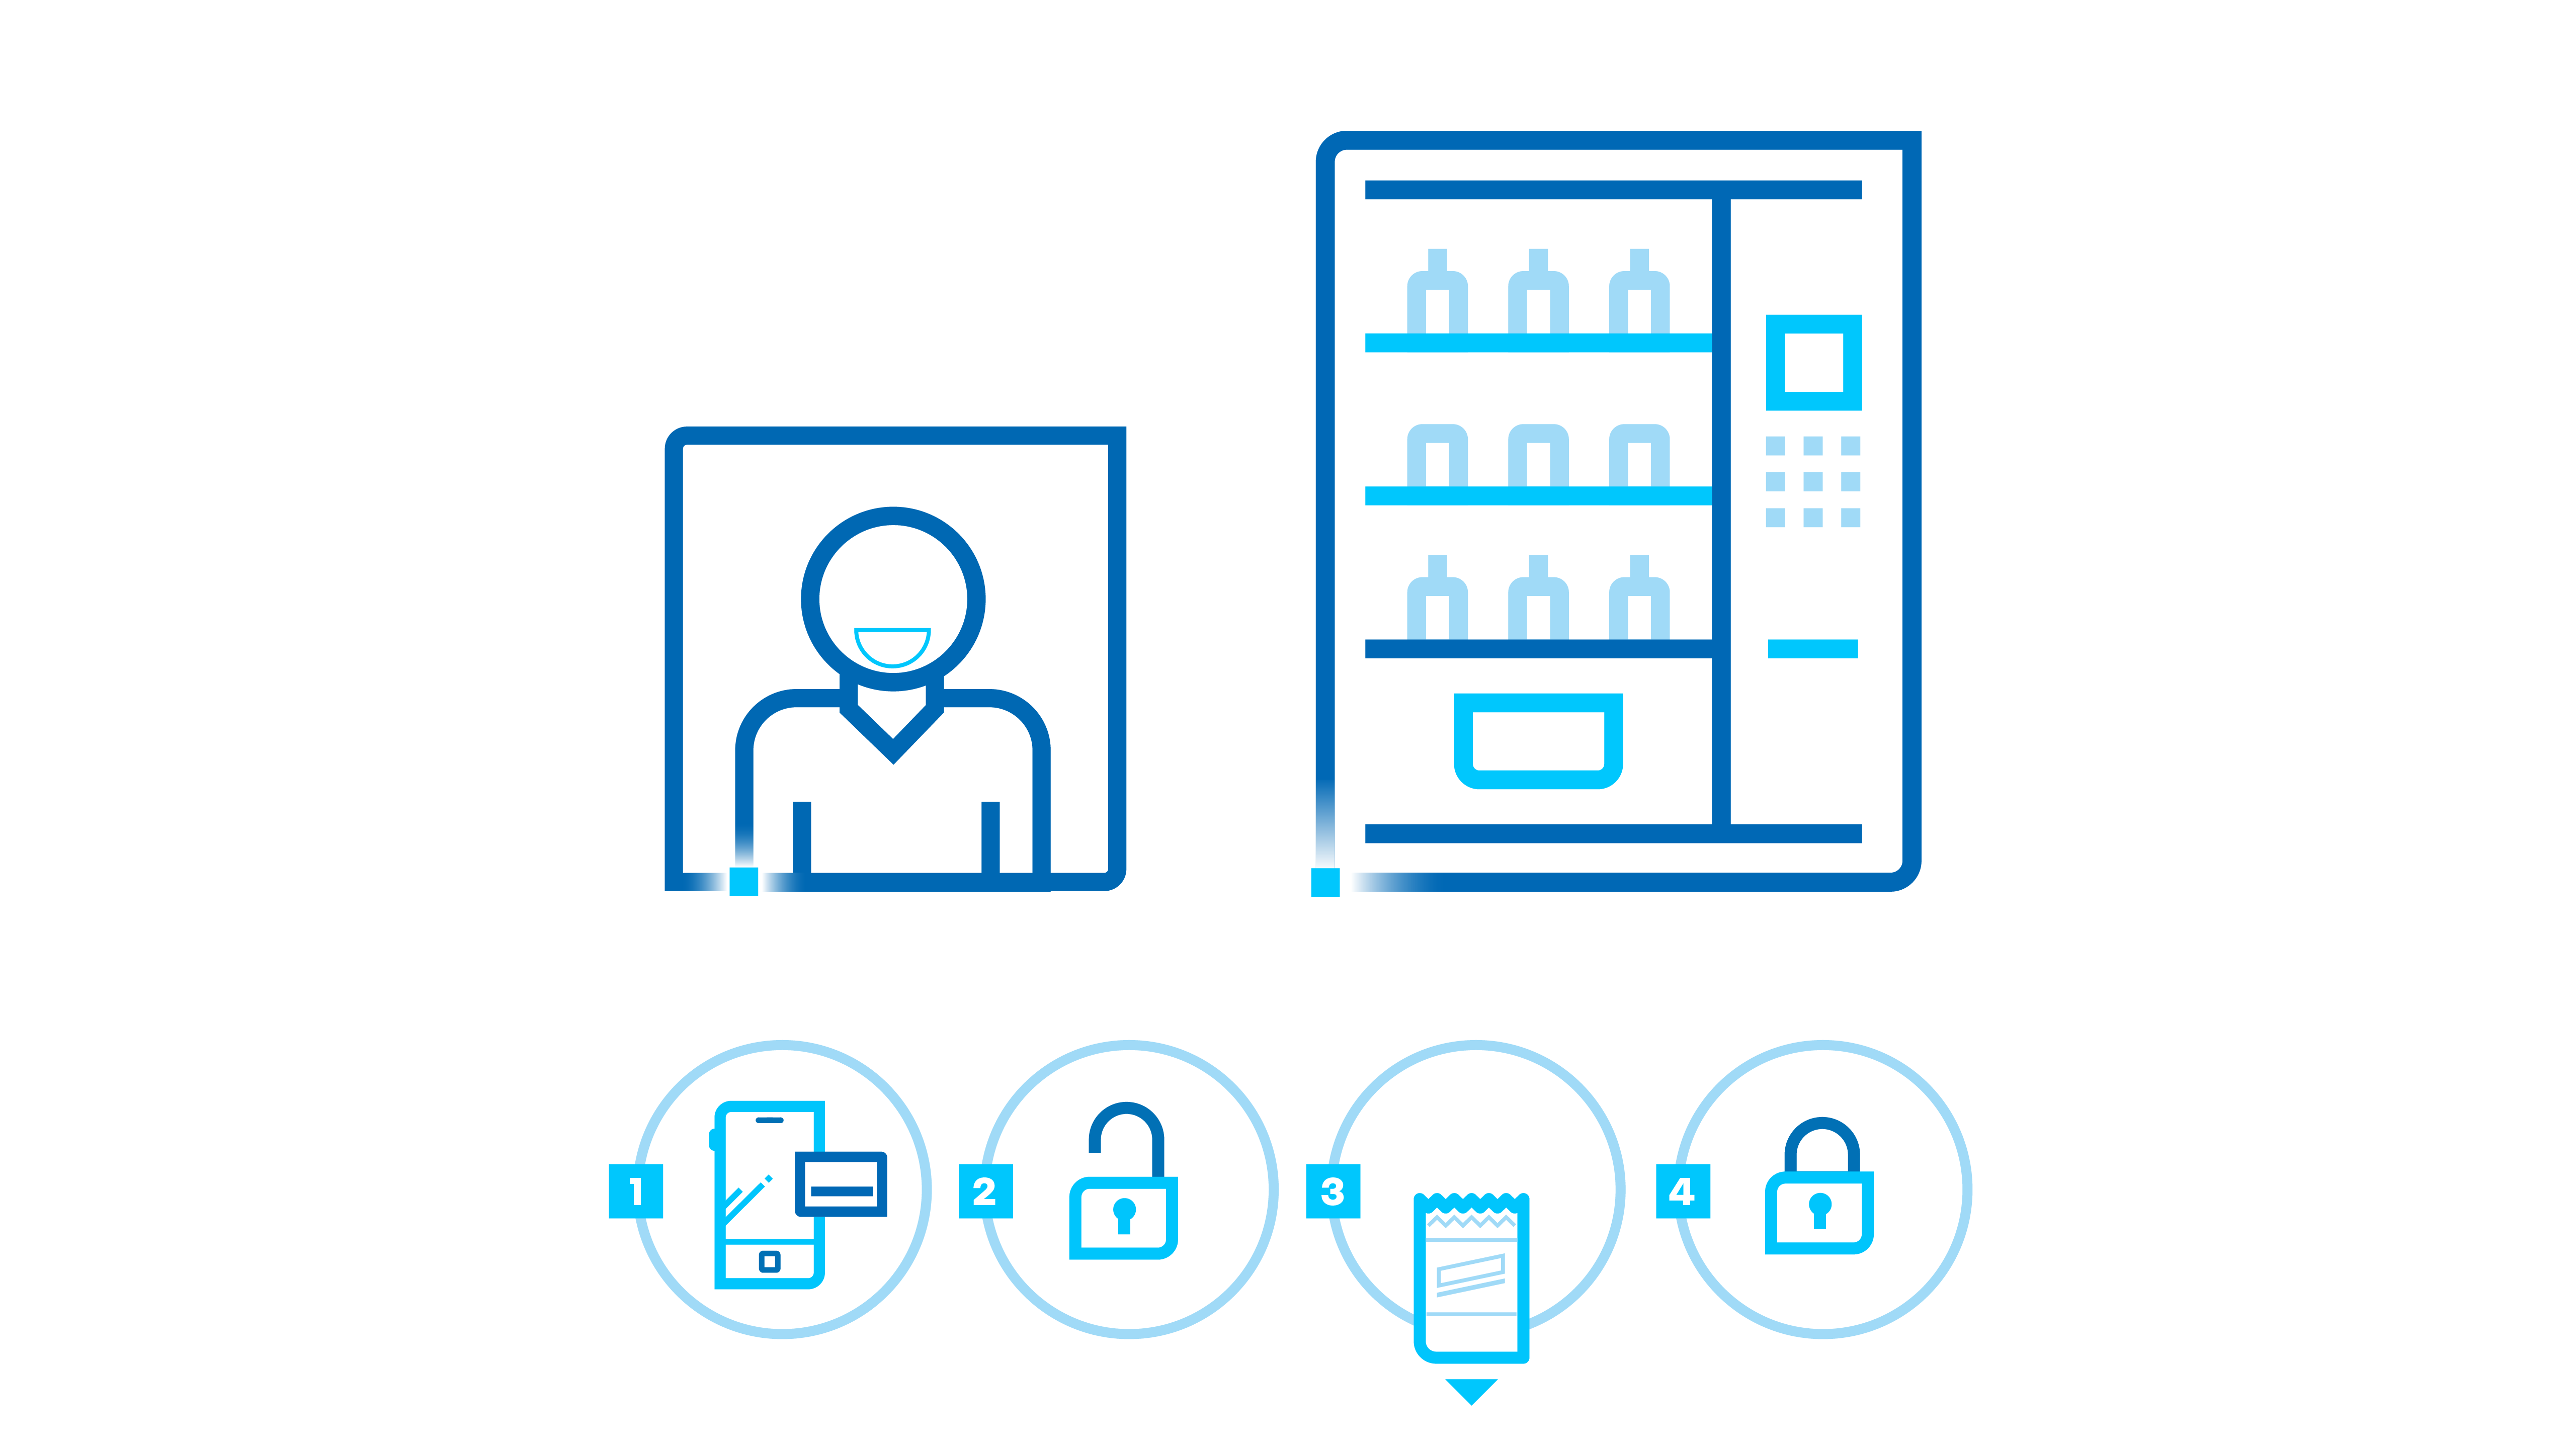
Badge or Card Swipe
NOTE: Do this quickly as it simulates the real world business use case. For Scenarios 1 and 2: Complete all the commands in Badge or Card Swipe and Open and Close the Door within 20 seconds.
In step 1, notice the new card ID 0003278380, for the customer role.
1. Call the ds-card-reader service to simulate a badge swipe (time-sensitive):
===CHECK FOR SUCCESS===
No response message expected.
2. Immediately check that the door is unlocked (time-sensitive):
===CHECK FOR SUCCESS===
NOTE: Keep checking the status until the lock1_status value is 0 as in the example output below. It may take as long as 3-4 seconds. If it never reaches 0, do not continue. Disregard lock2_status. See Scenario Details.
WARNING: The value of lock1_status must be 0. If it never reaches 0, do not continue. If a user attempts to open the door while the lock is engaged (example of lock engaged in status below), the reference implementation assumes an error occurred and transitions to maintenance mode. Disregard lock2_status.
Open the door and close it as two separate events. Wait three to four seconds between each event.
NOTE: Although the commands below represent two different events, with a rest period in between, they have been combined below so that they can be completed quickly. Waiting around three to four seconds is necessary as the frequency of "auto-events" that relay readings between some services is set to three seconds by default. Make sure to press Enter after the command group below.
1. To open and close the door:
- Open the door with the ds-controller-board-service (time-sensitive).
- Wait 3-4 seconds.
- Close the door.
===CHECK FOR SUCCESS===
No response message expected from any of the commands.
Inventory Check
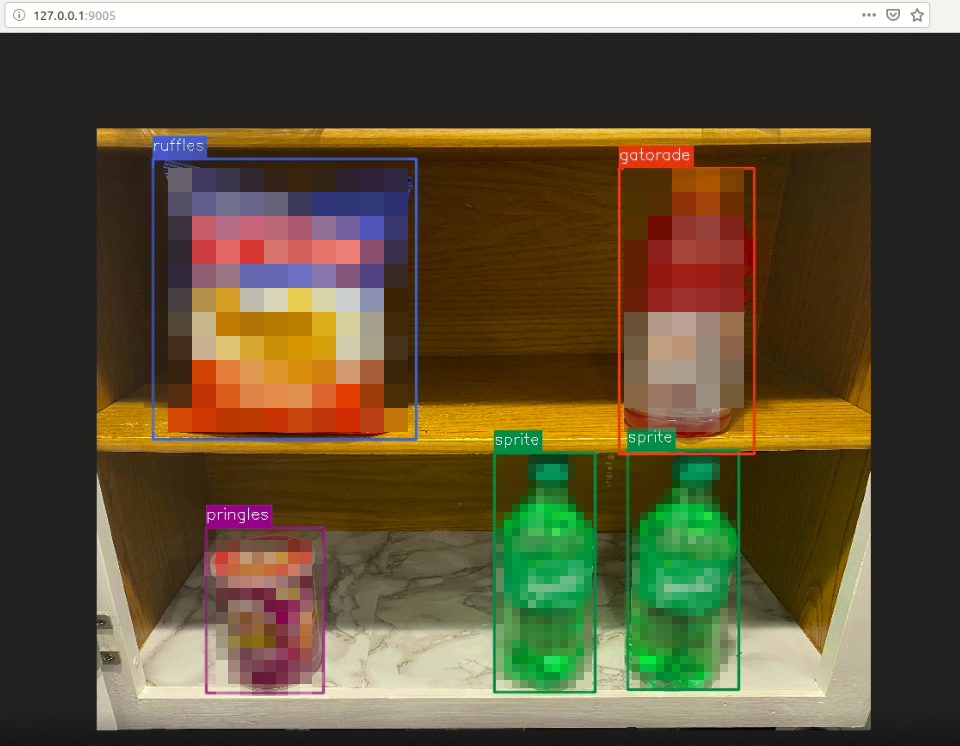
In this example, the customer purchased one item of Gatorade* and one item of Pringles*. Compare the unitsOnHand of each SKU from the previous Inventory Check in Scenario 1.
1. Wait 20-30 seconds for inventory to be discovered by the CV inference service.
2. Check the inventory list:
===CHECK FOR SUCCESS===
The value for unitsOnHand will have decreased for purchased items (e.g., "productName\":\"Pringles\",\"unitsOnHand\":1).
NOTE: Subsequent calls to Open and Close the door will result in more inventory removed from the cooler.
3. Check the audit log:
===CHECK FOR SUCCESS===
Card reader ID 0003278380 for the customer role should be present.
4. Check the ledger:
===CHECK FOR SUCCESS===
Expect to find a financial transaction in the ledger.
Figure 11 shows the cooler after purchase.
Scenario 3: The Cooler Requires Maintenance
In Scenario 3, all Automated Checkout services are operating as usual, but the following conditions are present:
- The cooler exceeds the maximum allowable temperature threshold of 83 degrees Fahrenheit.
- It stays at or above this temperature threshold for more than 15 seconds.

Set the Temperature
Set the temperature of the cooler to 99.00 degrees Fahrenheit to trigger a maintenance scenario.
NOTE: The setTemperature command works by averaging the current temperature with the requested temperature. To achieve a certain temperature, use the setTemperature command several times.
1. Check the status and note the starting temperature:
curl -X GET http://localhost:48094/status
===CHECK FOR SUCCESS===
The temperature is reported as in the sample below:
2. Call the setTemperature command below several times over a span of 15 seconds to change the temperature:
===CHECK FOR SUCCESS===
No response message expected. Repeat instruction 1 to check the status periodically. Continue calling setTemperature until the temperature is above 83 degrees Fahrenheit.
NOTE: When the temperature reaches a threshold, automated checkout creates a maintenance scenario.
3. Check the status of maintenance mode with a REST API call to the as-vending-service:
===CHECK FOR SUCCESS===
The value of maintenanceMode will switch from false to true once the time-averaged temperature exceeds the maximum temperature threshold. The default is 83 degrees Fahrenheit.
Maintenance Mode
A maintenance worker swipes a badge to resolve the issue. When a maintenance worker swipes the badge, maintenance mode is reset.
NOTE: For the sake of simplicity in this prototype, first set the temperature of the cooler, and then simulate the maintenance worker swiping a badge to fix maintenance mode. This avoids the need for two badge swipes. The maintenance worker would have to swipe the badge twice as maintenance mode will be set to false immediately, but it will be immediately set back to true once the next temperature reading arrives. Therefore, to avoid swiping the badge twice, reset the temperature before swiping.
1. Set the temperature to a normal value (e.g., 45 degrees) a few times over the span of 15 seconds (minimum) (time-sensitive):
NOTE: See the temperature setting details in the previous section.
===CHECK FOR SUCCESS===
No response message expected.
2. The maintenance worker can proceed to swipe the card, fix the cooler, and set the maintenance mode back to false. Call the ds-card-reader service (time sensitive):
INFO: The card 0003278385 is assigned to the maintenance worker role, and a person with ID 1. Additionally, if the maintenance worker opens and closes the door, there will be a corresponding audit log entry for that door open/close event.
3. Check the status of maintenance mode with a REST API call to the as-vending service (no longer time-sensitive):
===CHECK FOR SUCCESS===
Maintenance mode status should be false.
Summary and Next Steps
This application successfully implements Intel® Distribution of OpenVINOTM toolkit and provides the base components for creating a framework to run a computer vision-powered Automated Checkout. Extend the application further to provide support for different sensors and devices such as an RFID card reader or microcontroller board.
Learn More
To continue your learning, see the following guides and software resources:
Troubleshooting
Installation Failure
If host system already has Docker images and its containers running, the RI installation will not be successful. To fix the problem, stop or force a stop of existing containers and images. The sections below outline commands to stop containers and images in various system conditions.
Remove All Containers
To remove all stopped containers, dangling images, and unused networks:
Stop Containers
To stop Docker containers:
Remove Docker Containers
To remove Docker containers:
Remove Docker Images
To remove all Docker images:
Run the Application Failure
At step 1 of Start the Services, the command sudo make run may fail with the error address already in use. This will occur if the same container is running in different instances.

To resolve this problem, get the PID of the processes using the required addresses and force a stop using the commands below:
Docker Image Build Failure
At step 3 of Build, the command sudo make build may fail to build a on corporate network. If it fails, follow the steps below.
1. Get DNS server using the command:
2. Configure Docker to use the server. Paste the line below in the /etc/docker/daemon.json file:
3. Restart Docker:
Restart the Services
As mentioned above, Scenarios contain time-sensitive commands. If you fail to run the commands within certain timeframes, use the commands below to restart the automated checkout reference implementation and return it to its default state.
1. Stop the Docker containers:
2. Run the command below to start the EdgeX Foundry device services and then the reference implementation suite:
TIP: It is a best practice to read the Scenario Details section and the Scenario 1 section before executing steps. If user error occurs, restart the services and begin Scenario 1 again at step 1.
Support Forum
If you're unable to resolve your issues, contact the Support Forum.
*Other names and brands on this website may be claimed as the property of others. Intel is not endorsing or promoting any non-Intel brands mentioned on this website or the documentation.